
|
The Internet's Largest and Fastest Growing Engraving Community
Discuss hand engraving using basic to the most advanced methods and equipment
Forum Members: 14,738. Welcome to our newest member, KarriG
EngravingForum.com -
Domain since Feb 7, 2003
 Graver Video Conferencing is empty Join now!
|
|||||||
| ENGRAVING TOOLS - Paypal accepted | Classes | Glossary | Feedback | Tips | Sharpening | Bulino | Videos | Forum Policies |
 |
|
|
Thread Tools |
|
#1
 03-14-2008, 09:28 PM
|
|||
|
|||
|
Some of you may have seen this before but I know many have not. Western Bright Cut is a good style to get familiar with. Obviously its synonomous with western silver, but it can also be applied to non western items. There are so many variations that you can make it look non-western. Many of the techniques used to achieve the western engraving can be converted to fine jewelry applications.
The plates show the step by step of the cutting sequences and the basic elements in a design (scrolls and flowers). All the work is done with Flats and liners. Let me know if you have any questions. Brian 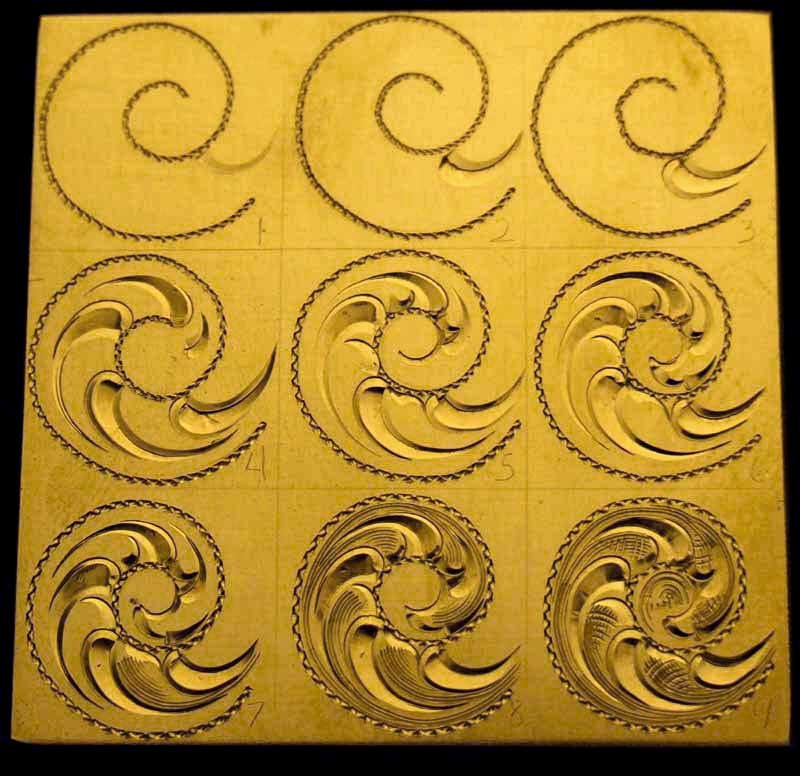 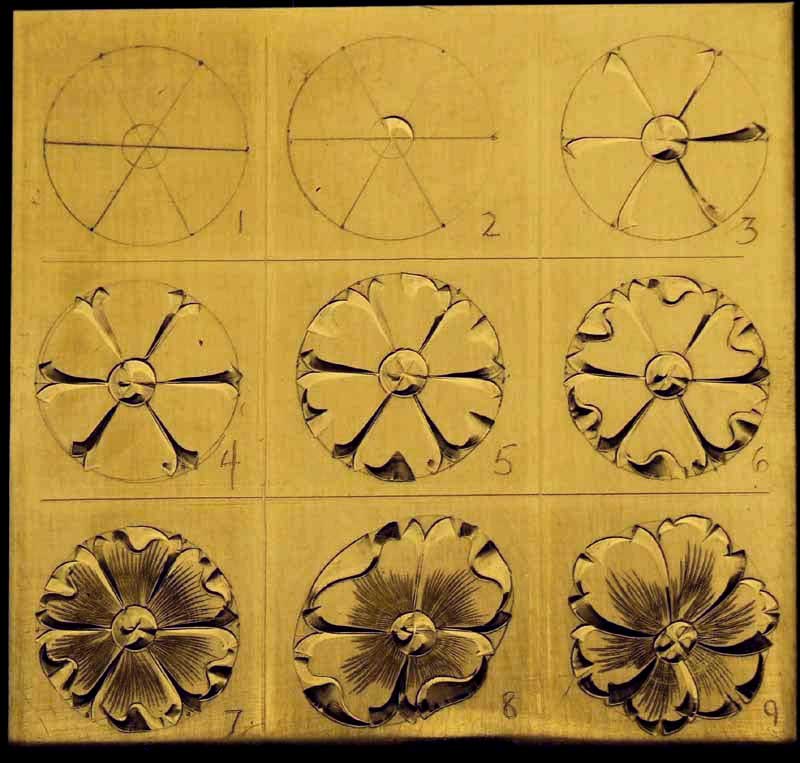

|
|
#2
03-14-2008, 09:53 PM
|
|||
|
|||
|
That plate looks familiar:smilie
 5: 5: You did a great job on that Brian. Everyone who sees it here at eh school are impressed with it. Ray
|
|
#4
03-16-2008, 02:11 PM
|
||||
|
||||
|
Brian, THAT'S A GREAT TUTORIAL ON BRITE CUT...
YOU ARE DOING SOME GREAT WORK!!! Jerry
|
|
#5
03-17-2008, 05:14 PM
|
||||
|
||||
|
Thats some really nice work, reminds me of my days at Gist engravers.
__________________
Barry Lee Hands www.barryleehands.com "Critics gather, they discuss aesthetics, Artists gather, they discuss turpentine. . ."- Pablo Picasso
|
|
#6
03-17-2008, 05:42 PM
|
||||
|
||||
|
Thanks Brian, that is excellent info!
Tom
|
|
#7
03-17-2008, 06:42 PM
|
|||
|
|||
|
I have been going to give a run threw of the cutting sequence but have not had the time the last few days to go any further.
Tools used- 45 flat with a rolled and highly polished heel 37 flat no heel 18-10 bent liner and rounded face 24-8 straight liner Ok here goes- 1. cut the backbone, this one was wriggled with a 37 flat. You can also cut a solid backbone with a polished square or the corner of your bright cut graver. Also, the first leaf cut is made,cut from thin to thick rolling the graver as you go, end the cut squarely, also note the gap between it and the backbone. Very important for later on, lining will go there. 2. The bright cut is made, again cutting from thin to thick follow the edge of the leaf cut, as you approach the end of the cut drop your hand and cut out of the cut, this will give you the rounded tip. 3. Next, outline the edge of the bright cut. This will crispen and define it. 4. Repeat the 3 step sequence as shown gradually shrinking the spacing as you work to the center. 5. These cuts are the closer cuts, they can be varied in shape like the first one is or be a simple C cut like the rest of the closer cuts are. Also the creasant cut is added to define the head of the scroll 6. Next, to the creasant, you will see two cuts that form the last leaf in the scroll 7. The liner used here is an 18-10, I start with one corner in the metal and then roll it flat as the leaf widens. The rounded face helps it cut smoother while rolling. 8. Line all the leaves, note where the liner starts on each leaf, clear back at the previous leaf, you want a long gradual flow. 9. Last cross hatch your leaves. done with the 24-8 I probably confused you more with the explanation, so if you have any questions let me know. If there is any interest, I can go through the flower cutting also.--Brian Jerry-you are very funny, I am certain GRS has no interest in me  . .
|
|
#9
05-10-2008, 12:12 PM
|
||||
|
||||
|
Hey Brian,
it may just be me but when I'm looking at this thread right now (1:11pm CDT on 05/10) I'm getting the "this image has been deleted or moved" graphic from PhotoBucket. I've got copies saved but all the folks just finding this thread might be disappointed.
|
|
#10
05-22-2008, 08:09 PM
|
||||
|
||||
|
Hi Steve, Can you email the pics and I can fix them.
__________________
__________________________________ Steve Lindsay AirGraver.com EngravingArtist.com
|
|
#11
05-23-2008, 06:44 AM
|
||||
|
||||
|
Steve,
If Brian doesn't have them I do have copies on my computer at home I can send you. Don't have them here on the work computer, unfortunately.
|
|
#12
05-23-2008, 05:49 PM
|
|||
|
|||
|
Please Send The Pics To Me
Thanks
|
|
#13
05-24-2008, 09:03 AM
|
||||
|
||||
|
Since I have copies I slapped them up on my website to make life easy for now:
  There are advantages to having your own domain, especially since Yahoo went to unlimited storage and bandwidth for the plan I'm on.
|
|
#14
06-14-2008, 10:38 AM
|
||||
|
||||
|
Excellent job Brian, especially in showing the variations on the flowers, Keep it coming, I like your work. How long have your been engraving and is western bright cut your field or do you just have expertise in it?:yesnod:
\ Neil
|
|
#16
12-16-2008, 04:38 AM
|
||||
|
||||
|
Pelone
First, Welcome To the Forum! Now then. A bright cut graver is pretty much like a regular graver except you polish the face / heels to get them very smooth so you get a well.... bright cut. Other than that it's pretty much a stylistic thing of making cuts that make good use of the very smooth, very bright cuts. Look at your graver and a cut from it under very high magnification. You'll probably see some roughness - nothing major just enough to give you some fine lines on the sides of the cut. Now resharpen the graver and continue up through a polishing stage (ceramic lap + maybe some diamond spray is the general way). Now you should have a very smooth graver that gives mirror bright cuts.
|
|
#17
12-16-2008, 08:13 PM
|
||||
|
||||
|
Thanks. It also looks to me like the flat graver used has been beveled on the cutting edge? I will have to upgrade the sharpening tools I have in order to polish the graver in the manner you outlined.
|
|
#18
01-15-2009, 04:36 PM
|
|||
|
|||
|
Quote:
What are the dimensions of the scrolls and flowers in the two examples? My printer is making them about 2 1/2 in square, so I know that is not the correct scale. When you sharpen your flats for the bright cuts you polish the Face and heel, but do you do anything to the sides of the flats ? Finally, how do you make a step liner ? Thanks in advance Steve L. 
|
|
#19
01-15-2009, 09:06 PM
|
||||
|
||||
|
Brian,
You should make a cast of this work, and I'm sure you would sell a ton of them. If you do make casts you can put me down for one. JT
|
|
#20
01-23-2009, 03:23 PM
|
|||
|
|||
|
The distinctive part of bright cut is the graver, say a 45 flat is that the heel is rolled, or rocked on the ceramic lap to brightly polish the heel of the graver thus giving the metal being engraved a very bright finish.
HTH cassie
|
|
#21
02-17-2009, 11:29 AM
|
||||
|
||||
|
Hi.
I've been cruising in the background here for several months. I'm a saddle maker just starting out with engraving. I'm currently using a borrowed gravermax, but have been thinking of buying a classic air graver. Someone recently told me that the idle on a Lindsay tool makes brightcut more difficult as the tool never entirely stops vibrating. I recently tried out an Omega. The idle seemed a bit dis-concerting compared to a gravermach that I tried that same day. Is the Classic much differnt from the Omega? The gravermach didn't seem to bleed as much air as the gravermax that I am borrowing. Also every time the compressor powers on it changes the power of the gravermax causing slips. I've read so much good press here about the Lindsay tools from stone setters, and gun style engravers, but hardly anything from brightcut silver engravers. I would so much appreciate some input from those of you experianced with these tools. I've been researching this stuff for a couple of years and thought I had it figured out, now  Thanks in advance Gordon
|
|
#22
02-17-2009, 12:44 PM
|
|||
|
|||
|
Gordon, they work pretty well, below is a good example , being the backbone is even cut bright. One thing that many bright cutters are concerned about with pneumatics, is the chatter, which are little vibration lines left in the bright cut and which are undesirable. As you can see from the pic below, there is no chatter due to the increased stroke speed and a properly sharpened graver. The tungston piston can vibrate more noticeably, due to the weight, but when the idle is adjusted properly, it is not a distraction. I would suggest giving it a try, it is a quality tool. -Brian
[IMG] 
__________________
http://www.bhsaddles.com/
|
|
#23
02-17-2009, 12:58 PM
|
|||
|
|||
|
Sorry, for the non responses guys, I never look over here at this part of the forum. But I will try to give answer to your questions, however belated they are.
Steve L. The plate is 2x2 and the squares are about 5/8". When I sharpen my square gravers I only polish the heel and face, the heel is the most important, the sides of the graver remain untouched. Also, after the heel is polished on the ceramic lap, I then run it over some micron paper to give it the real polish it needs. The ceramic lap is not enough. JT , Yes I need to get the castings made, been wanting to do that for a year or so, but just have not had time. I am planning on having them available for my May classes students to take home for study.
__________________
http://www.bhsaddles.com/
|
|
#24
02-17-2009, 01:45 PM
|
||||
|
||||
|
The reason for the idle of the design is that it prevents jumps that can sometimes occur with the spring-pulse design. The idea is similar to a car engine, if the tool is already running there is no chance of it jumping like starting your car in gear. The Omega has a 1/2" bore in it while the Classic has a 5/16. Attached is a picture of the two pistons. Because the Omega's piston is larger and heavier, the Omega will be felt more in comparison to the Classic. With the heavy piston slug in the Omega, there is no way to avoid some feeling it. I discontinued the Omega at the time that I figured out a way to make a dead blow bore for the Classic. If you try a Classic I think you'll like it. PM or email to let me know what area of the country you are located in and I'll check to see if there is a Classic near by.
The earlier Classics had a 3/8" bore in them. With the 5/16" bore using a removable sleeve I was able to turn away part of the outside diameter of the sleeve and that made a second chamber. This chamber is ported to the rear chamber behind the piston with 4 small holes. What this did was make the 5/16" piston give more of a hesitation in the back stroke which increased the back stroke when the piston changed direction. This is allowing more of a dead blow effect during impact. The end result is less vibration while increasing the power range. The idle of the 5/16" dead blow bore can be set down so low that you almost have to hold it up to your ear to hear it. If the tools get oil in them they won't idle as fine and then you know it is time to clean the piston and bore.  Here are recording of bright flare cutting with the AirGraver which were done when I engraved for Brannen Brothers from 1994 through 2007, engraving 30 to 35 flutes a month. The flute lip plates are bright cut and also the BBC logo and lettering on barrels and head joint tubes. The flutes are made of silver, 14k rose gold and once in a while platinum. Here is a video of the engraving of a barrel. For flare cuts of the BBC logo I use the Calligraphy point and lay it over. http://www.engravingschool.com/handengraving.wmv Here are two videos of cutting the logo on head joint tubes: http://www.engravingtraining.com/pri.../14k-rose1.wmv http://www.engravingtraining.com/pri.../14k-rose2.wmv Shot of one of the 14k lip plates 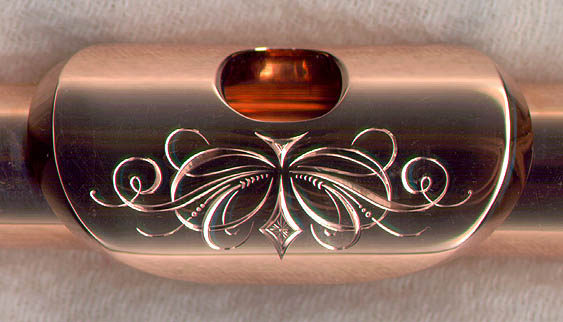
__________________
__________________________________ Steve Lindsay AirGraver.com EngravingArtist.com
|
|
#25
02-17-2009, 08:04 PM
|
||||
|
||||
|
Steve that is a very interesting history of the development of a fine tool. Thanks for taking so much time with it's development.
__________________
David Gruber WWW.Sharpgraver.com "The democracy will cease to exist when you take away from those who are willing to work and give to those who would not." Thomas Jefferson
|
|
#26
02-18-2009, 07:37 AM
|
||||
|
||||
|
Howdy Kids,
Brian,thanks for doing the plates so we can all get a good look at a step by step of bright cut,very nice. How many have signed up for your class?
|
|
#27
02-18-2009, 09:01 AM
|
||||
|
||||
|
Brian and Steve
Thanks so much for such a quick response. This is just what I needed! Brian that buckle is beautiful, truly no chatter at all. Steve thanks so much for taking the time to explain the details so well. I have been so impressed with the willingness of folks here to share such hard won expertise. A good friend of mine expressed this generosity of spirit when he would say, "when it rains all boats rise." For years I have wanted to work the design motifs that I have developed in leather into silver and perhaps steel. I've been most interested in single point engraving, but as I picked up a set of old push gravers I started playing around with bright work and have become more and more intrigued. Now I want to do more of both. I haven’t had so much fun since my first fledgling cuts with a swivel knife many, many years ago! Steve, I live in Cody, WY. I would love to try out a classic if there is someone close by with one who would be willing. If not that’s o.k. I've already placed a classic with foot control in a shopping cart over on the commercial site. I just have to put together the folded green. Thanks, Gordon
|
|
#28
02-18-2009, 11:48 AM
|
||||
|
||||
|
Sorry Brian. I meant beutiful money clip.
Gordon
|
|
#29
02-19-2009, 09:28 PM
|
||||
|
||||
|
Hi Gordon, I sent a PM.
__________________
__________________________________ Steve Lindsay AirGraver.com EngravingArtist.com
|
|
#30
03-21-2009, 07:44 AM
|
|||
|
|||
|
Thanks Brian. I am new to the forum and new to engraving as well. I have been a jeweler for 30 years but just took engraving last October. I am interested in Bright Cut work and enjoyed the tutorial. I will experiment. Thanks for taking to time to post this.
Louise
|
|
#31
04-17-2009, 12:01 PM
|
||||
|
||||
|
Well I have a classic with foot control now and WOW
 It is truly an amazing little tool! There is no doubt in my m ind that it is the right tool for the job. Here is the first project engraved with it. It is a little bracelet for my wife. It is truly an amazing little tool! There is no doubt in my m ind that it is the right tool for the job. Here is the first project engraved with it. It is a little bracelet for my wife.I already have orders for saddle silver. Thanks Steve
|
|
#32
04-21-2009, 05:45 AM
|
|||
|
|||
|
Brian,
Thanks for the Info. I just got back from my BrightCut course, w/ Diane S. When you do brightcut with the PC which piston are you using ? The standard or the tungston piston? Also where do you getting your micron paper for graver polishing? Had been using emery 4/0, but it's not enough. Thanks Steve L.
|
|
#33
04-21-2009, 09:30 AM
|
||||
|
||||
|
Hi Steve. I didn't realize that you had posted your message to Brian until I had written and posted a reply of my own. OOPS! Oh well I hope no one is upset. Here is what I had to say. I hope it is useful.
First of all let me say that I'm quite new here. But having said that, I have been researching the tools as thoroughly as I can as I wanted to spend my limited funds as wisely as possible. Steve Lindsay recommended that I try the tungsten piston for bright cutting so that's what I have done. It not only works well, to me it is amazing how well this little tool works. I have been cutting in some brass and this little beauty just peels right through it. Also I had some concerns about the longevity of the tool in demanding use. I had a chance to talk to Steve and he described how the hammering system is designed and this put my mind at ease in that regard also. I've been buying and using tools professionally for over 35 years now and this tool is as fine as anything else I have ever used. The thing that stands out about this air graver is the guy that makes it. I've not met Steve, but have been very impressed with him here on this forum and in any contact that I've had with him. You asked about the palm control. I have the classic with foot control so can't comment on the palm control. For me the foot control is very intuitive probably because as a saddle maker using a sewing machine daily I don't even have to think about the gas pedal. Here are three links to suppliers of micro fine papers and films. Gordon http://www.stewmac.com/shop/Finishin...ng_Papers.html http://www.ottofrei.com/store/produc...productid=4032 http://www.riogrande.com/MemberArea/...34=8%2f0+paper Last edited by Gordon A; 04-21-2009 at 09:41 AM. Reason: I answered a post to another person by mistake.
|
|
#34
04-21-2009, 10:34 AM
|
|||
|
|||
|
Gordon,
No problem you answered my question perfectly. I have only had my PC for a couple of monthsand I love it! Thanks for the links for polishing paper Thanks, Steve L
|
|
#35
04-21-2009, 11:22 AM
|
|||
|
|||
|
where can we see some of your finished items??
|
|
#37
04-22-2009, 09:25 AM
|
|||
|
|||
|
Thank you so much, been doing it for some time
|
|
#38
04-24-2009, 09:49 AM
|
||||
|
||||
|
rrwage
I just looked at your photos. Beautiful cuts! The layout is particularly nice. Are you using an air graver? Do you cut much saddle silver? I'm a saddle maker incorporating my carving ideas into my silver. I'm about a year into this process and am really loving it. There has been an interesting development, in that bright cut engraving is having just as great an affect on my leather tooling as visa verse. Do you mind sharing a little of how you learned and what has influenced your engraving. Brian's tutorial has been so helpful to me! Thanks again Brian for posting that. Gordon
|
|
#39
12-04-2010, 03:03 AM
|
|||
|
|||
|
Hi folks!
I am just getting started as an engraver and will be hanging out here trying to learn something. Maybe some day I will be able to post some of my work but for now I will just be lurking around here quietly watching. NOTE: This 'western bright cut' tutorial is great! Exactly what I needed. Thanks! Hackrein
|
|
#40
12-04-2010, 02:55 PM
|
|||
|
|||
|
glade to see i am not the only one hanging around try to learn just staring out in engraving have made bits and spurs for a long time but some one ules did the engraving for me g tack
|
|
#41
08-30-2011, 07:01 AM
|
|||
|
|||
|
I really enjoyed this tutorial and would greatly appreciate seeing one on the flower.
Thank You, Jeff J
|
|
#42
02-04-2012, 09:24 PM
|
|||
|
|||
|
Brian, Great tutorial, very good explanations and pics. Just one question, the shading lines on the petals of the floweres, is each line cut individualy or are they done with a liner tool? Thanks
dam
|
|
#43
10-09-2012, 12:19 AM
|
|||
|
|||
|
hi, I love the flower engraving. could you give a quick run down of tools used and method, like you did for the scroll? many thanks, kirra
|
|
#44
10-09-2012, 01:09 PM
|
||||
|
||||
 Thank you very much for sharing this tutorial, Brian! A very nice technique & clear explanation indeed Thank you very much for sharing this tutorial, Brian! A very nice technique & clear explanation indeed Greetings, Paulsph Greetings, Paulsph
|
|
#45
01-23-2014, 10:46 PM
|
||||
|
||||
|
Thank you for the great tutorial
Omar
|
|
| Bookmarks |
| Thread Tools | |
|
|


