
|
The Internet's Largest and Fastest Growing Engraving Community
Discuss hand engraving using basic to the most advanced methods and equipment
Forum Members: 14,741. Welcome to our newest member, 3012Sd
EngravingForum.com -
Domain since Feb 7, 2003
 Graver Video Conferencing is empty Join now!
|
|||||||
| ENGRAVING TOOLS - Paypal accepted | Classes | Glossary | Feedback | Tips | Sharpening | Bulino | Videos | Forum Policies |
 |
|
|
Thread Tools |
|
#51
 05-30-2009, 08:54 PM
|
||||
|
||||
|
Quote:
Go to this link and find the definition and illustrations of GRAVER: http://www.engravingglossary.com CRB
__________________
C. Roger Bleile Author of: American Engravers series of books. FEGA Historian and Founding Charter Member http://www.engravingglossary.com/ |
|
#53
07-03-2009, 06:34 AM
|
||||
|
||||
|
Quote:
Here is a copy and paste from the AirGraver.com site where I tried to describe what hand engraivng is: http://airgraver.com/HowToEngrave.htm Introduction to Hand Engraving Hand Engraving can be described as the process in which a hardened, shaped, and sharpened piece of steel, called a 'Graver', is pushed through the metal's surface. This is done with one of three methods: by hand pressure (push graver), with a small lightweight hammer and chisel (graver), or with a pneumatic air-driven hammer. Pneumatic AirGravers emulate both the hammer and chisel and the push-graver technique. The graver is ground to a pointed shape adhering to very specific angles. These angles allow the graver to properly enter the metal surface and travel forward, continuously curling the metal directly in front of the graver face, while leaving behind a small furrow.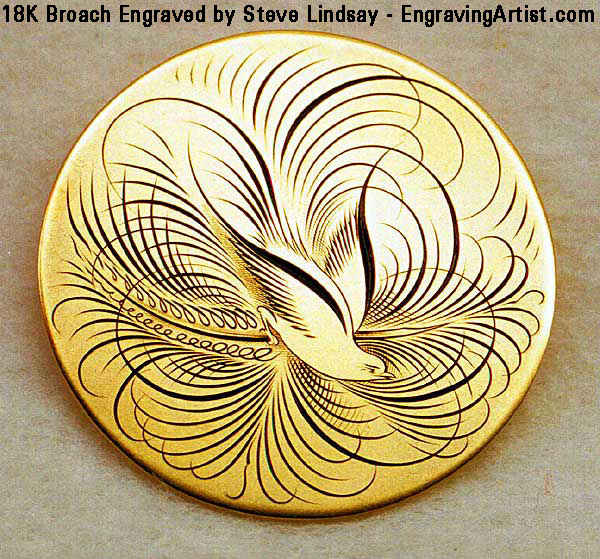 The shape of the graver and the angle at which it is held will ultimately decide the furrow shape. The angle can and will often be continuously altered during the process, allowing for the furrow to contain thick and thin graduations of the cut line. If a square-shaped graver is used so that one if its corners enters the metal, it will produce a "V"-shaped furrow. Many graver shapes are available, each leading to a particular style of engraving, and each producing a different result. Usually, the two favored shapes are the "V" and the flat gravers. Personal preference plays a significant role in choosing the tool used. The shape of the graver and the angle at which it is held will ultimately decide the furrow shape. The angle can and will often be continuously altered during the process, allowing for the furrow to contain thick and thin graduations of the cut line. If a square-shaped graver is used so that one if its corners enters the metal, it will produce a "V"-shaped furrow. Many graver shapes are available, each leading to a particular style of engraving, and each producing a different result. Usually, the two favored shapes are the "V" and the flat gravers. Personal preference plays a significant role in choosing the tool used. When using the hammer and chisel method, both hands are required; one to hold the graver, and the other to deliver light hammer impacts against the graver, driving it forward through the material being cut. With the push graver method, the graver is generally fitted to a small wooden handle held in the palm. The graver remains stationary, and the item being engraved is held firmly and fed into the graver's tip, or rotated into it when a circular or curved line is desired. When making a straight line, the graver is pushed forward using only hand pressure. Each of these methods requires a rotating vise, or a similar holding device, to hold the item being engraved.  The pneumatic graver uses air to drive a small self-contained piston within a graver hand piece. This piston impacts against the engraving tool in the same fashion as in the previously described hammer and chisel method. As with the Push Graver method, one hand is free to hold and rotate the item being engraved. The pneumatic graver uses air to drive a small self-contained piston within a graver hand piece. This piston impacts against the engraving tool in the same fashion as in the previously described hammer and chisel method. As with the Push Graver method, one hand is free to hold and rotate the item being engraved. In order to create quality detailed engravings, the engraver is required to accurately execute many cuts or lines in the metal that vary in length, width, and depth. In principle, the results achieved are similar to those produced by an artist when sketching with pen or pencil on paper. Spectacular ornamental engravings are possible when the graver is controlled by someone who is well versed in the art of engraving. Use of advanced methods, such as 'Bulino' and 'Bank note' techniques, allow the highly skilled artist, the potential to produce exquisite, lifelike renderings in metal. 'Bank note style' is a highly organized and systematic method of creating thousands of individual lines, varying in length, in order to form beautifully detailed renderings or ornamental designs. It is generally seen on pages of older texts such as, family Bibles and similar period works of literature printed from engraved plates. The closest and most common representation of this technique in the present may be seen on paper currency. An artist's ability to visualize where and how each cut should be placed determines the final outcome of the project. When an engraving artist possesses a talent for visualization, as well as theoretical and technical knowledge, he or she will be able to invest the engraving with richness, character, and even emotion.  Tool geometry and the manner in which the graver is shaped, particularly the face and heel angles, will also determine the quality of an engraving. The ability to perfectly grind and shape the graver must be mastered, otherwise clean, accurate, burr-free cutting will not occur, and the results will be unsatisfactory. Badly raised burrs tend to produce visually jagged or distorted lines, resulting in a rough, unrefined final product, rather than the smooth, clean results professionals can produce. If the engraver applies too much downward force while cutting, or the graver heel is too long or too short, burrs will be raised - especially when executing curved lines. A long heel will create drag, and a short heel will dig too deeply into the metal. Either way, the metal will be forced upwards, generating a burr along the length of the cut. Tool geometry and the manner in which the graver is shaped, particularly the face and heel angles, will also determine the quality of an engraving. The ability to perfectly grind and shape the graver must be mastered, otherwise clean, accurate, burr-free cutting will not occur, and the results will be unsatisfactory. Badly raised burrs tend to produce visually jagged or distorted lines, resulting in a rough, unrefined final product, rather than the smooth, clean results professionals can produce. If the engraver applies too much downward force while cutting, or the graver heel is too long or too short, burrs will be raised - especially when executing curved lines. A long heel will create drag, and a short heel will dig too deeply into the metal. Either way, the metal will be forced upwards, generating a burr along the length of the cut.  It can take years to fully master the technical portion of hand engraving, and to become proficient in design and in the historical study of engraving motifs. Only then can one begin to develop a unique and personal artistic style. However, some students of this art may possess a natural talent, which allows them to master the process more rapidly. It can take years to fully master the technical portion of hand engraving, and to become proficient in design and in the historical study of engraving motifs. Only then can one begin to develop a unique and personal artistic style. However, some students of this art may possess a natural talent, which allows them to master the process more rapidly. Mastering the Art of Engraving requires expertise in several areas. These can be divided into two categories: art and craft. Engravers engaging only in craft need not possess drawing and design skills to produce excellent engravings, providing that designs are supplied beforehand by either an artist or by replication of available ornamental patterns. Many copyright-free (public domain) ornamental designs are available to help the craftsman in this area. The first and foremost ability a craftsman need possess, then, is the ability to precisely control the graver, with an understanding of the technical skills required in order to achieve the desired results. However, in the case of engraver as an artist, he or she must have an intense desire to create beautiful original designs, which depends upon a background in other arts, together with artistic drawing talents. The art of engraving itself can be a fulfilling medium for an artist to express his art, and can become a life-long study. The basic method of hand engraving has not changed for centuries. However, with the advent of modern tools, today's engravers are given advantages that previous engravers did not have at their disposal. Computer technology allows the use of photo editing or vector-based drawing programs, thus facilitating the design process. Using computers and printing technologies, an artist can now successfully and accurately lay out a design from the computer onto the item being engraved. Modern pneumatic gravers are available in the same size as the graver of old, allowing ease of control of the graver cut. 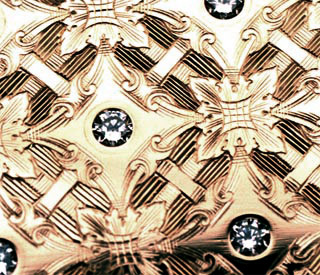 Artistic Design Concept Artistic Design Concept Before beginning the engraving process, the engraver must visualize a design concept, and view the item to be engraved for its shape, its period styling, its value, materials, and contours. There are many things to consider. If the engraving is for a customer, certain boundaries or limitations may arise to suit the customer's price and taste. Preparing to Draw the Design The item being engraved must be accurately outlined. This can be achieved using a variety of methods. The simplest method is the smoke print. This method involves using the smoke from a kerosene lamp, candle, or equivalent to cover the surface with carbon smoke "inking". The item is held high over the flame so as not to heat its surface. This is important when the item contains non-heat resistant materials. Another outlining method is to use printer’s ink over the area. Once the surface has been blackened by smoke or printer's ink, clear tape is delicately placed over the area. When the tape is removed, the smoke or ink remains on the tape, creating the exact shape of the item. An accurate outline is next traced to be used as the design boundary lines. Another method is to use frosted tape laid over the surface, then trace the item's shape with a pencil. This method is less messy, but will take a little longer. In either case, a clearly drawn outline is the base for the beginning of the drawing process. Creating the Final Design 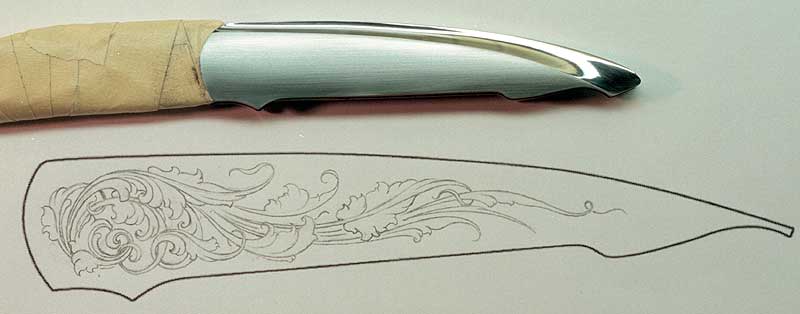 Assuming a design concept has been determined, the next step is to make rough sketches. Sketching continues until the artist has achieved the theme's desired flow. Refinements are slowly introduced, while maintaining the initial feel of the art work. Imagination, creativity and familiarity with engraving styles are important factors. The more time spent creating a design to achieve exactly what is envisioned, the better the final product will be. This also holds true for the quality of the drawing; the better its quality, the better the reproduction will be when reduced to scale for image transfer (layout of the design onto the metal). Designs may also be drawn directly on the item, thereby bypassing many steps. This is possible when a familiar style of engraving is used that has been drawn and cut many times by the artist, or if the engraving is of a less complex design. It is usually best to plan the design on paper, allowing the revisions of drawings at any time prior to the actual engraving process. There are many methods for transferring the design or layout onto the surface that is to be engraved. One is to scratch the design on to plastic mylar which is used to make an ink or smoke print transfer. Another method is drawing with soft lead pencil on mylar, and pulling the lead up with tape, eventually transferring the lead from the tape. A third method is photographic transfer, and a fourth is done with a laser or inkjet computer printer. 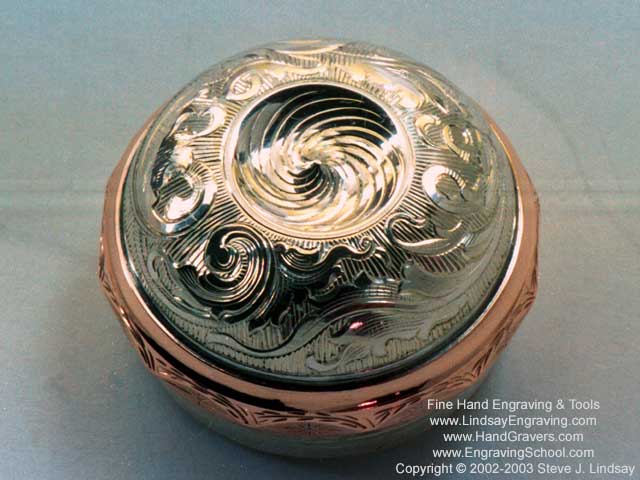 The Technical Aspects of Engraving The Technical Aspects of Engraving When the design has been transferred onto the metal, the engraving process may begin. The most commonly used graver point is the square "V" cut graver, which works well for a variety of engraving styles. Several details must be considered prior to the actual cutting of the pattern. If the engraving is to be relieved, backgrounds will need to be removed, leaving the decorative pattern as a raised or relieved engraving. A precious metal inlay may be part of the design. Gold, platinum, or silver - wire or sheet would be cut and hammered carefully into the desired areas. Both relief and inlay engraving share a common initial step: a design is cut by following or tracing the transferred design’s outlines with the graver. In the case of gold inlay, it must be determined which area of the design will have gold. In those portions of the design, the material will be cut out accurately by graver or dental air drill to a predetermined depth, based on the thickness of the precious metal to be inlaid. This cutout is called a “pocket”. When the pocket has been cut and leveled to proper depth, a small channel is cut along the base of the inner wall, creating an undercut. This could be called a "dovetail", a term familiar to woodworkers. In this case, the undercut is needed to hold the gold securely in place. The gold, having been cut to fit this pocket, will now be placed in the pocket. Its surface will be carefully hammered, usually with a brass punch. The hammering may be accomplished using a pneumatic AirGraver and brass punch, or with a traditional hammer and punch method. In either case, the result is the same. During impact, the gold undergoes expansion, spreading into the undercuts of the pocket, which secures it firmly in place. The next stage involves leveling of the inlay surface. This can be achieved by filing, sanding and polishing to the predetermined height of the image being inlaid. Once the inlay surface is leveled and scratch-free, the gold can be detailed. Detailing may include line engraving, bulino, banknote techniques, or sculpting. The process is somewhat easier if the gold inlay is to be flush and level with the base metal surface, since there are no difficulties with mushroomed gold and pocket position. The surface is simply filed, sanded, and polished flush. Relief engraving is simpler by comparison to inlay work, and only requires the removal of background around the design. This is accomplished by cutting away the metal background and leaving the decorative motif design in the foreground. The cutout background may be decoratively punched to create a matted textured, or it may be lined to create interesting light reflection effects. There are several methods in which the background may be detailed. Some of them are punching, stippling, lining, and beading. 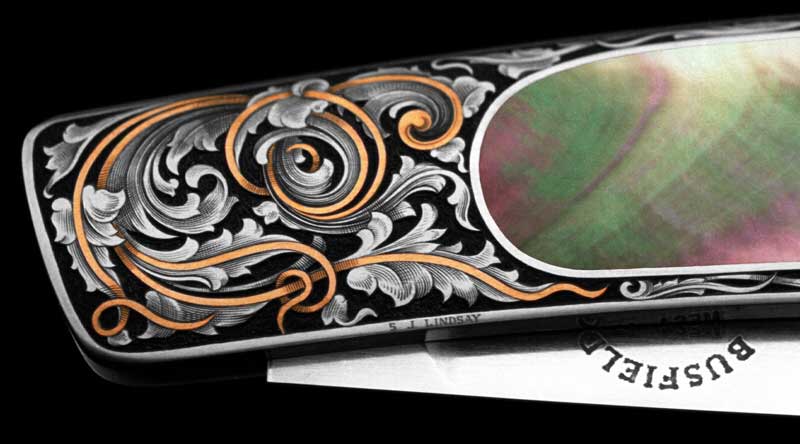 Having accomplished the above, detailing of the decorative motif will begin. This step is labeled as shading. Shading is the process by which multiple, tightly grouped fine lines or dots are applied in order to achieve light-to-dark contrasts. This defining step can raise or lower the overall quality of the engraving. Correctly produced, it will add life to the art. If shading is not fully understood and expertly executed, however, the engraver runs the risk of lowering the quality of his previous efforts. Shading is the highlight of quality engraving, and is perhaps the most difficult area for the beginning and intermediate level engraver to develop proficiency. Collectors who recognize quality engraving examine the shading and look for precision, continuity, and character in the shaded areas. Having accomplished the above, detailing of the decorative motif will begin. This step is labeled as shading. Shading is the process by which multiple, tightly grouped fine lines or dots are applied in order to achieve light-to-dark contrasts. This defining step can raise or lower the overall quality of the engraving. Correctly produced, it will add life to the art. If shading is not fully understood and expertly executed, however, the engraver runs the risk of lowering the quality of his previous efforts. Shading is the highlight of quality engraving, and is perhaps the most difficult area for the beginning and intermediate level engraver to develop proficiency. Collectors who recognize quality engraving examine the shading and look for precision, continuity, and character in the shaded areas.
__________________
__________________________________ Steve Lindsay AirGraver.com EngravingArtist.com |
|
#54
07-06-2009, 07:09 PM
|
||||
|
||||
|
Quote:
Ste, Do you ship to the uk? Whats peoples opinion on electric engravers for beginners,like the burgess pro?or http://cgi.ebay.co.uk/Engraver-SINOG...%3A1|294%3A200 I know once I get started on this I'm going to be in it for the long run as I am very art minded and can draw,tattoo 3 hand with ease,Can basicly draw or tattoo what I can see but have problems keeping the vision in my mind but hey,thats were the internet helps ay. Would like it if some one or some of you could post up some designs (forgive me if there is already a section on them). Love the site and you can be sure to see me here a lot once I get started,Thought about the rotary engravers but there rubbish,I'm needing hammer type like the ones you make ste but there a bit out of my price range for a while which is why I am looking towards electric or push type,don't think I could do the hammering the chisel way but hey every one has to learn and practice. Speak to you all soon, till then, Take care and do the best you can. ATB Last edited by Ricky Follows; 07-06-2009 at 07:32 PM. Reason: email notification |
|
#55
07-10-2009, 09:54 PM
|
||||
|
||||
|
Hi Rick, Yes, no problem shipping to the UK.
For tutorials help there is a forum section with tutorials. Here is a link to it: http://www.engravingforum.com/forumdisplay.php?f=6 And here is a page about holding the graver and starting a cut: http://www.engravingschool.com/priva...er-holding.htm And also here is page with videos of fundamental practice cuts. http://www.engravingschool.com/private/tut1.htm
__________________
__________________________________ Steve Lindsay AirGraver.com EngravingArtist.com |
|
#56
08-11-2009, 03:04 PM
|
|||
|
|||
|
First let me say thank you for all the information that you've put out and for how helpful you've been to all of us new to this art.
I've gotten the template and have a sharpened graver and handle. I've been practicing straight lines and I've been struck with a point of curiosity. I have watched the videos and I was wondering what magnification they are shot at? I think I've having a crisis of scale in that I'm trying to cut lines that are as deep and wide as they appear on my screen, but I'm not achieving much success with anything wider than .5mm (if even that wide). So I'm wondering if I'm simply trying to go too deep/wide for a hand pushed graver. What would be a reasonable expepectation of depth/width of cut for the universal 116 point being hand pushed? Thank you again. |
|
#57
08-11-2009, 04:00 PM
|
||||
|
||||
|
The lines are nowhere near as big as they look under magnification.
A common beginner mistake is to try to cut too deep - and it's especially hard when you're hand pushing. If you need the line deeper, just go over it again. But remember, those fine shading lines you see in the pictures / videos? They're as fine (or finer) than a hair. |
|
#58
08-11-2009, 06:03 PM
|
|||
|
|||
|
bloomerg, I think your .5mm width is about what to expect with a push graver and a 116 face. To go wider you lose control and slip. How hard the metal is also has alot to do with it. Softer metal like copper and silver you can cut deeper, which allows you to roll the graver over more without losing control and slipping, since the heel line is staying in the groove. Then you would be able to get a wider cut than .5 mm. I measured the max width I could get with a 120 graver cutting gold filled which is harder than silver and copper since it is work hardened in the forming- manufacturing process, but alot softer than medium steel. The most width I could get without loosing control was .65mm. And at that width I would not want to make a cut very long. So I think you are on the right track. With air power I believe they can go wider because at the same time they can go deeper. But I have never used air power, so I could be wrong. Someone who does both should be able to confirm or correct me on that. Congrats on being smart and buying the template. You have saved yourself a huge amount of hours of total frustration. Also, keep checking your graver point for damage. It does not take much to damage it, especially when you are new at this. Good Luck, Kevin Scott
|
|
#59
08-16-2009, 01:57 PM
|
|||
|
|||
|
Thanks for the pointers. On the subject of point damage, aside from cuts becoming appreciably more difficult and slips happening (more frequently) what are indications that a tip is dull or broken that I can look for before a slip or some other catastrophe that would ruin what I'm working on?
|
|
#60
08-16-2009, 09:18 PM
|
|||
|
|||
|
Hello,
Can you elaborate a bit more on howto use copper for engraving? Thank you for your prompt response. |
|
#61
08-16-2009, 09:42 PM
|
|||
|
|||
|
Copper is used to engrave on. It's a softer metal than steel and quite a bit less expensive than gold or silver. Many people use it to practice, and some people engrave copper for a finished product.
|
|
#62
08-17-2009, 12:23 AM
|
|||
|
|||
|
before i got a block, i used a piece of plywood screwed to a1.5" dowel... makinga sort of T out of the whole thing. shelaced my engraving project to the ply, and butted the dowel against my bench pin.. this way i was able to fairly easily turn my curves..
course this would outlive it's usefullness when you started to get out of jeelry scale. |
|
#63
08-28-2009, 09:02 PM
|
|||
|
|||
|
Brownells has this kit.
HARTLIEP ENGRAVING SCHOOL STARTER SET Mfr:BROWNELLS Price:$270.99 Designed By The Master Instructor For Beginners We've worked out this Engraving School Starter Set with Neil Hartliep. It's designed to exactly fill the needs of the beginning engraver. With the lessons from Neil's book, The Basics Of Firearms Engraving (included in the kit) and these tools, you will get started off on the right foot. SPECS: Kit contains the following: 1, Chaser's Hammer; 2, #6 Square Gravers; 2, #1 NgraveR® Handles; 1, #16-6 Straight Line Graver; 1, #8-6 Straight Line Graver; 1, #44 Flat Graver; 1, #36 Flat Graver; 1, #2 NgraveR® Dotting Punch; 1, #3 NgraveR® Dotting Punch; 1, 6" Stainless Steel Ruler; 1, Carbide Scribe; 1, Divider with Lead, Ink and Steel Tips; 4, #642 Wood Handles; 1, #5 OptiVISOR; 1 book, The Basics Of Firearms Engraving Does this look like a good starter kit or would I be better off going with something else. Does Steve offer a similar package? I haven't calculated the price would I be better served getting some handles blanks and sharpener from Steve |
|
#64
08-28-2009, 09:21 PM
|
||||
|
||||
|
Erich,
Steve has something compatible, chisel handle, push graver, and sharpening set. Look at the tools page a ways down, add some blanks and maybe a template and you are set to get started. Probably at a more lucrative price since you get a sharpening solution with it. Peter |
|
#65
08-28-2009, 09:33 PM
|
|||
|
|||
|
Found it and I think you're right. My Police discount through Brownells would make their Hartleip kit about $60.00 cheaper than the Kit that Steve has for $272.50 (Chisel holder, Manual push graver and Lindsay Sharpener set), but I think the kit of Steve's would probably be better in the long run.....plus after reading posts on this forum and seeing how Steve is so willing to give help I think I'd like to buy from him....I'll just have to save up my pennies for a little longer.
|
|
#66
08-29-2009, 07:38 AM
|
||||
|
||||
|
ErichM,
The Brownell's kit has nothing included for sharpening and that is one of the most important elements. Having gravers and no way to sharpen them is like buying a gun and no ammunition. The late Neil Hartleip's book is a useful beginner manual that shows how to manually sharpen gravers on a stone. This method is very difficult for most people to master especially if you do not have an instructor at hand to correct your mistakes. All of us who learned engraving more than 30 years ago had to manually sharpen on a stone but later I changed to the powerhone, diamond laps, and sharpening fixture. about a year ago I got the Lindsay sharpening system with several templates and now hardly ever use the power hone. For a beginner, the universal or detail template and a flat graver template will be all you will need for a long time the rest of the templates are fine for advanced techniques but a beginner does not need them. Good luck to you. I also was in law enforcement when I started engraving. CRB
__________________
C. Roger Bleile Author of: American Engravers series of books. FEGA Historian and Founding Charter Member http://www.engravingglossary.com/ |
|
#68
08-29-2009, 10:03 PM
|
|||
|
|||
|
templates are the ticket.. just got a bunch more.
question. is there any reason to get the round graver template? |
|
#69
08-30-2009, 11:18 AM
|
|||
|
|||
|
Thank you Steve for having this wonderful board. I have been looking for 4 months to learn about engraving. And all i find is galvanic engraving. You mght want to ask for and give a link to steampunk.com
I currently am of limited means and mobility. Is is possible to purchase some of these items used? I wanted to get the kit that's about $190 but it is a bit too steep right now to see if I have an aptitude for this? I would appreciate a pointer to where I can purchase these hand items. Also If you have some blems I would be interested. Thank you |
|
#70
10-24-2009, 03:45 PM
|
|||
|
|||
|
Hello everyone!
At the risk of providing a painfully long introduction let me simply say I'm a recent graduate school graduate who is less enamored with his recently-attained 40hr/week desk job than he was planning so he's looking for a hobby. :D I was considering gunsmithing (not necessarily the fabrication, but the understanding, operation, maintenance, and modification of existing firearms) but a friend recommended engraving (gun engraving specifically) and through a series of hops and jumps across Google search results, I've found this wonderful forum. But the reason I'm making this post is I'm having difficulty trying to find a good starting point. The wealth of information on this trade is overwhelming and between bit sizes, shapes, materials, methods, and techniques I have no idea where to even begin. Peter M mentioned a user named Steve having a good starting 'kit' for aspiring engravers but I haven't been able to find it. So long as it's under $400, I can reasonably afford it. Better still, if there's any sort of recommended steps to take if one wants to begin in engraving I'd love to know them. Engraving seems like a hobby you really only learn through doing and hands on practice, but if anyone has any book recommendations I'd love to hear them too. (I've found a bunch of links to e-books It seems like a great hobby to pick up and a perfect way to fill my free time after work and on the weekends. (And, dare I say, something potentially able to become self-funding so I can use the proceeds from engraving to pay for more engraving stuff. :D) It's nice to be here and I think this place has a wealth of information for novice and expert engravers a like. I hope to hear back from you guys soon! |
|
#71
10-24-2009, 04:50 PM
|
||||
|
||||
|
Welcome Faux,
Look trough the forum there is a lot of good information on how to get started. Steve's kit I mentioned earlier can be found here http://airgraver.com/Hand_Engraving_...Graver%20Tools . Peter |
|
#72
11-02-2009, 09:34 AM
|
|||
|
|||
|
Quote:
I should probably state that most of what I have been trying to engrave has been annealed high carbon steel, which probably compounds matters a bit, but I have to assume a push graver will work fine with steel since I've had very limited success with it even with dull tools, poor technique and an overabundance of ignorance about engraving. So could you point me to the items I would need to put together a very simple manual startup kit that includes the ability to resharpen the gravers properly? I'm thinking pre-sharpened gravers would be just the thing because then I'll know what they SHOULD cut like and will then know when I've got it wrong. |
|
#73
11-11-2009, 11:03 AM
|
||||
|
||||
|
Hi Robert, I just found your post on the forum about ordering the gravers. Did you receive the order ok and how are you getting along?
__________________
__________________________________ Steve Lindsay AirGraver.com EngravingArtist.com |
|
#74
11-16-2009, 01:00 PM
|
|||
|
|||
|
Got everything OK and am going to be talking to you about better outfitting myself. I've talked to enough people and researched all the options to the point where I'm satisfied which equipment to go with and just need to talk to you about details.

|
|
#75
11-25-2009, 10:29 AM
|
|||
|
|||
|
Hi, I found this forum googling about engraving. I have always been interested in art and usually only use my airbrush. But after seeing what can be done with engraving I think I´m going to give it a try
|
|
#77
12-23-2009, 11:37 PM
|
|||
|
|||
|
I dont know if this will help but I make my own hand tools from materials that are sometimes free.
A good example arethe dovetail chisels and hand gravers Ive made from worn out HSS (high speed steel)thicknesser blades. Ill post pics when I get home to the city. For now Ill describe the proccess: First visit a saw doctor or sharpening service and beg damaged or worn out thicknesser/buzzer blades from them. It always helps to carry a couple of bottles of beer in with you. The blades come in a variety of thicknesses but I usually get the 3mm (1/8") or 4mm (3/16") in 312mm-500mm lengths (12" - 15"). They can be 25mm (1") across so lots of chisels and gravers can be cut from one blade. To cut to a close size use a thin (one of them 1.5mm ones) cutting disk in the hand held angle grinder and place the blade on a wet cloth to reduce overheating of the HSS. Yes I know HSS is very tolerant of overheating but why take the risk. I usually cut onto a concrete slab so my bench doesnt get damaged. Run the disk down the line youve marked to start a nice accurate cut, it doesnt have to be deep just very straight. The thin disk will want to follow that line now. Keep the cloth wet and cut away from yourself. Sparks will be kept to a minimum and cutting is slow but the result should be a pretty clean edge. Dont try to cut half way and snap, HSS doesnt like it and will show it's displeasure by breaking where it chooses not where you want. Plus some HSS acts like glass when it breaks. Diamond stones are the best for sharpening HSS but any good stone will work too. The bevelled edge is the perfect start to a dovetail chisel all thats needed is a bevel on the other side a handle. (I use 16mm x 65mm titanium bolts but any bolt will do) just drill a hole and Devcon the blade in and Bobs your uncle. Cut square lengths and all you need to do is clean up, cut to length and use one of Steve's most excellent sharpening jigs to grind the tip. 3 disks and one length of free HSS gives up to 16 graver blanks. Is that a help?
__________________
"Never attribute to malice that which is adequately explained by stupidity" |
|
#78
12-26-2009, 10:54 PM
|
|||
|
|||
|
Hello Steve
I am close to retirement and looking for a new way to pass some time and make a little extra cash in the process. I currently do glass etching and some wood carving.I've been using a rotary tool to dress up knife handles and thought I would like to give hand engraving a try. My first question to you and the forum would be, is this something that can be picked up by self teaching? I enjoy a challenge and I am not afraid to fail. I have been looking at your website for quite awhile and it is something that I can't get away from. Looking forward to more conversation on this subject. Thanks Kully |
|
#79
01-22-2010, 09:16 AM
|
|||
|
|||
|
Thanks for all the info here.I am ready to give this a try,maybe someday I will be able to do something worthy of showing here..
Thanks again for all the info, Bruce |
|
#80
03-06-2010, 07:45 PM
|
|||
|
|||
|
Wow... impressive work! I'm extremely interested in trying my hand to see what I got. As a tattoo artist I have always had an appreciation for old-world crafts and trades, as well as the artwork and patterns. I use a lot of the lattice and filigree and calligraphy styles in my artwork already.
My question, apologies if it's already been answered, is where would one look to buy these tools locally? as far as the cheap way to get started (times are rough for everyone lately), could these simple tools be purchased in a hobby shop or ACE hardware or will I be better off purchasing online? I wish I could spend 200-300 for the basic start-up kits but right now this just isn't an option. also, is there anyplace online where I could search for used tools? I looked around on ebay but didn't really see much of anything there. Thank to Steve and all the other members for the great resource here! One of my favorite aspects of the interwebs is how simple it has become to learn new things. I've already spent a few hours scrolling through photos and tutorials etc... the gears are already turning! |
|
#81
03-07-2010, 12:46 AM
|
|||
|
|||
|
OK I got my Lindsay Carbalt blanks and sharpening templates a couple of weeks ago and Ive been spending an hour every night after work chisling away at a practice plate (16 Ga) glued to a 1/2" piece of timber.
The points are a pleasure to use  I use the gravers I made from HSS now as kata-kiri bori style chisel points and Im having fun. I hope to sort the transfer of drawing to metal soon and start with some proper shapes.  Cheers Steve for the forum and for sharing your expertise. Steve P
__________________
"Never attribute to malice that which is adequately explained by stupidity" |
|
#82
03-12-2010, 05:13 PM
|
|||
|
|||
|
I hope you dont thi nk Im cheecky asking for one of your engravers but I have found it hard to try and get such tools in England. My Address is
John Hardisty 8 Orchid Close Halesworth Suffolk Uk IP19 8ES I would be more than grateful also if you could advise me where to buy other tools in the uk if possible |
|
#83
03-20-2010, 06:58 PM
|
||||
|
||||
|
Hi Mason, Sorry to take so long to reply. I just now saw your post. UK is no problem. In the shopping cart just select the country, type in your postal code and the shopping cart will give several shipping options. There are manual tools on the site. I'll try and paste that part of the page below. I hope this works.
______________________________________________ Manual Palm-Push adjustable length graver with supple Santoprene rubber handle (click to enlarge) 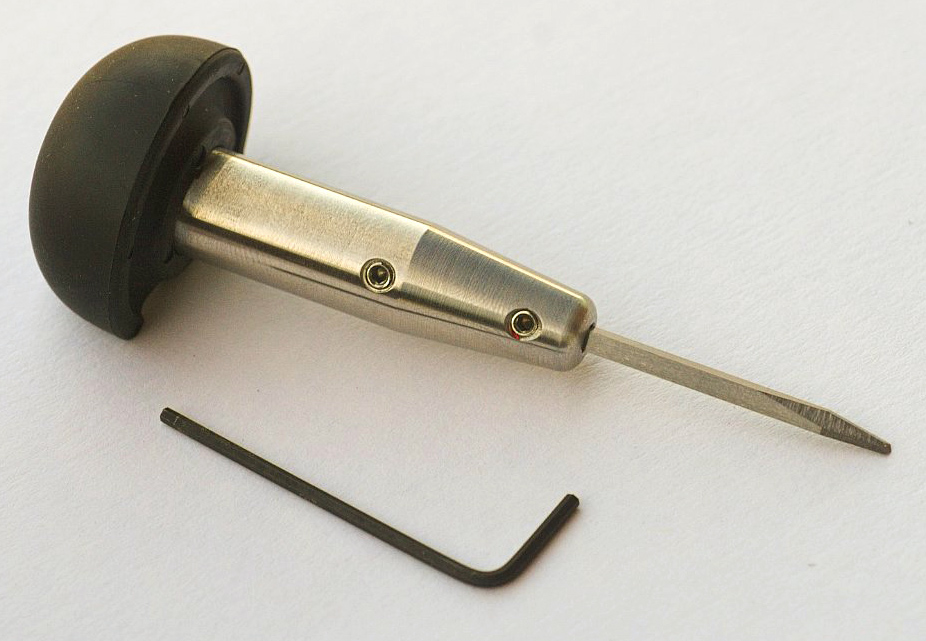 This adjustable length graver $49  (does not include point) (does not include point)Two unsharpened M42 graver blanks $20 One Presharpened CarbaltXD $39 ___________________________________________  Manual Palm-Push stainless graver, wrench with Lindsay sharpener. Sharpener includes 600 grit diamond stone, sharpening fixture, 110 degree Uniform-Parallel template, 6"x6" plastic desk plate, and small copper practice plate $177 (does not include point)$216 (includes sharpened CarbaltXD point)______________________________________________
__________________
__________________________________ Steve Lindsay AirGraver.com EngravingArtist.com |
|
| Bookmarks |
|
|


 The question i have is probably stupid but what is a "graver"? Is it a metal punch just with a different name? Ive dabbled in metal engraving but usually with just simple items i could find on hand. From simple chisels on sheet metal to using a miniature flathead screwdriver(something you would prolly use on eye glasses) on a .50 cal casing. Crude, yes I know, but working a design into metal seems to keep calling me back for more.
  i think i made the grade!!!!


