|
The Internet's Largest and Fastest Growing Engraving Community
Discuss hand engraving using basic to the most advanced methods and equipment
Forum Members: 14,741. Welcome to our newest member, 3012Sd
EngravingForum.com -
Domain since Feb 7, 2003
 Graver Video Conferencing is empty Join now!
|
|||||||
| ENGRAVING TOOLS - Paypal accepted | Classes | Glossary | Feedback | Tips | Sharpening | Bulino | Videos | Forum Policies |
 |
|
|
Thread Tools |
|
#1
 07-08-2008, 02:54 PM
|
|||
|
|||
|
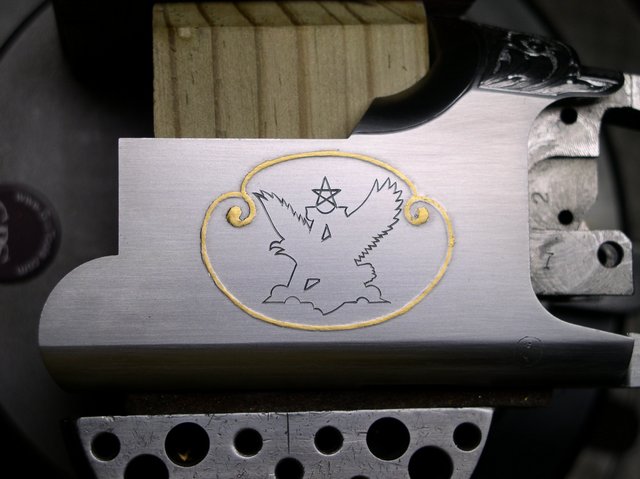
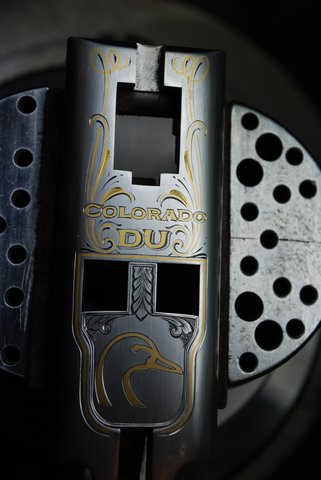
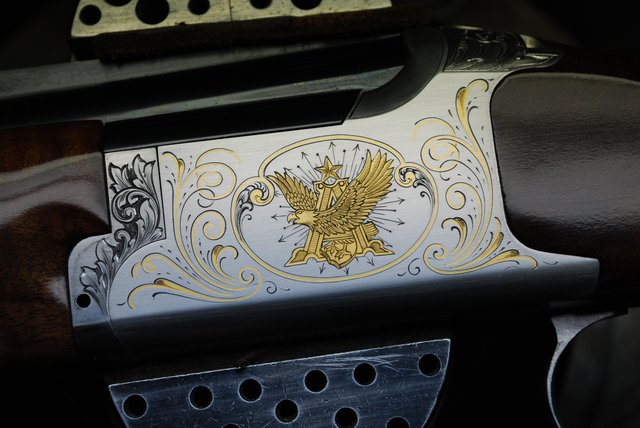
This is a re-post of MikeDubber's contest submission, found here. If you'd like to discuss or give comments on Mike's submission, this is the place to do it. :D
You can read about the current contest, its $2100 in prizes, and how to enter here, as well as see all of the contest entries in the contest sub-forum here. Enjoy! Kaitlin Quote:

|
|
#2
07-08-2008, 05:45 PM
|
||||
|
||||
|
Looking forward to watching this Mike!
Do you cut pieces to shape or build these sort of things up wire by wire? I recently learned the wire-by-wire technique and for me it seems easier than depending on my somewhat shakey transfer and saw skills.
|
|
#3
07-09-2008, 06:11 AM
|
||||
|
||||
|
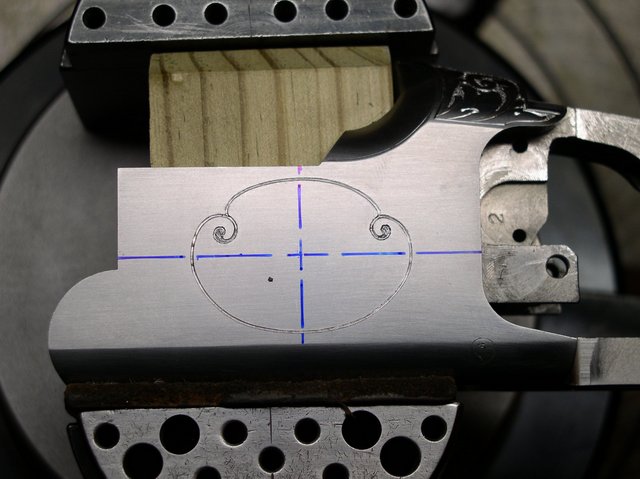
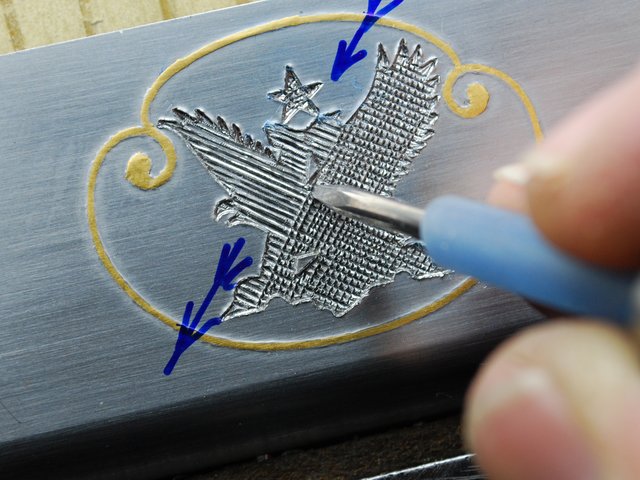
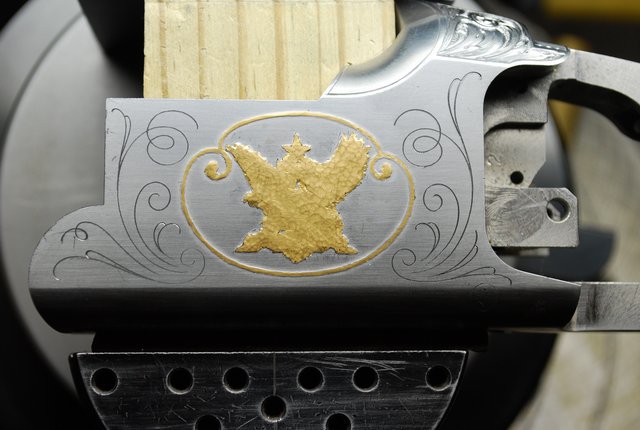
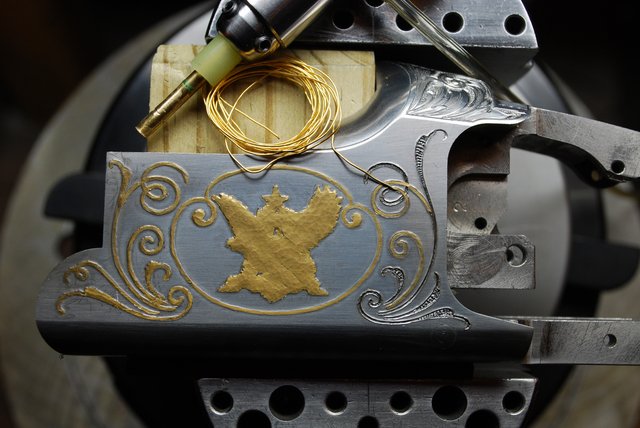
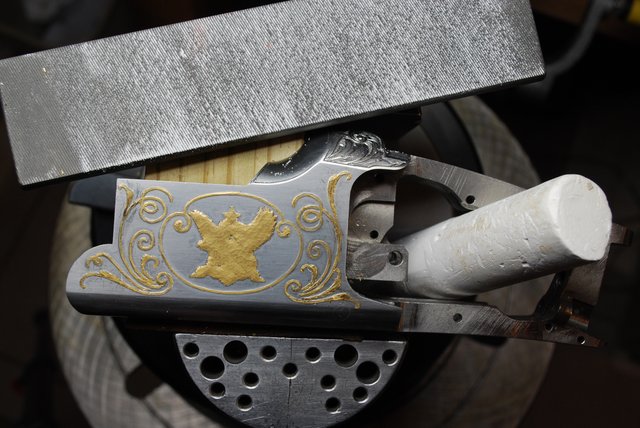
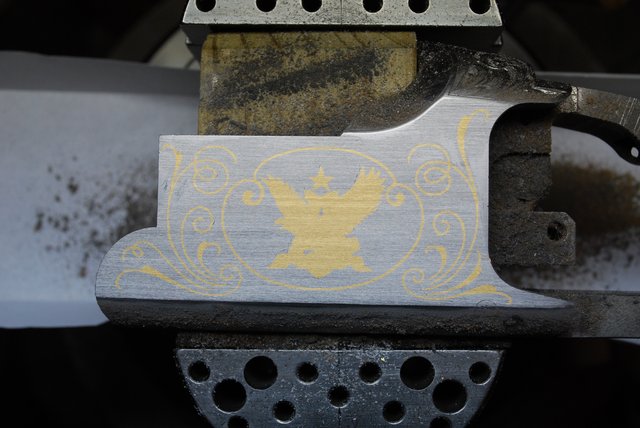
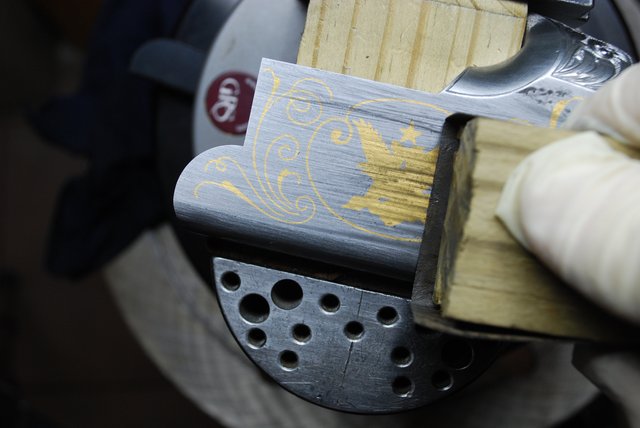
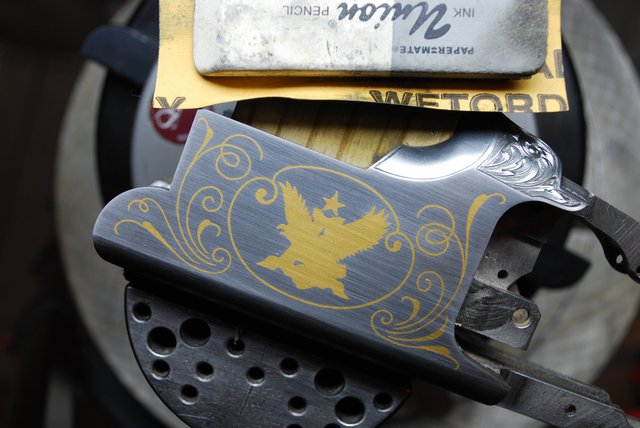
I did my last tutorial (An Engraving Puzzle) creating the Brittany in sheets of silver and gold. This inlay will be done with wires.
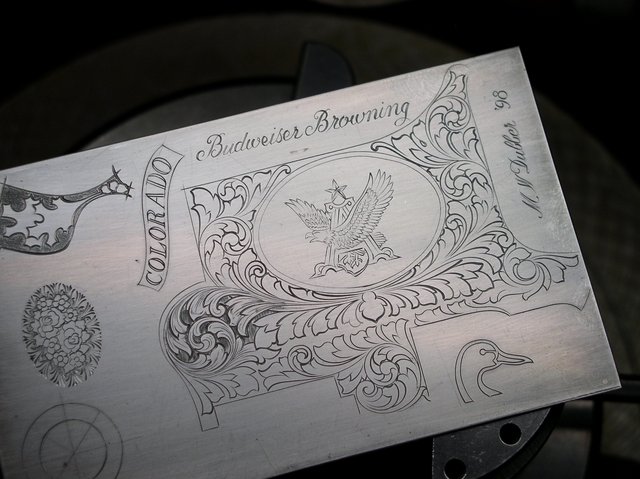
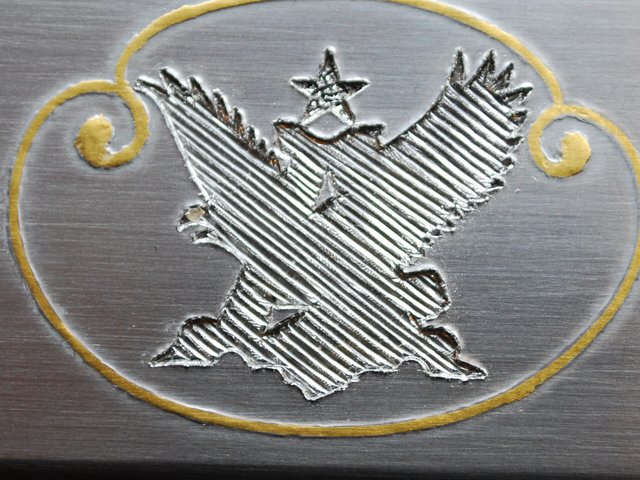
I do not prefer one method over the other - I would only suggest that engravers who do inlay better know how to do both. There are many good reasons to use sheet or wire during the proper application, and on the particular subject at hand. Likewise, I have discovered that if you come off as an expert and say this is right way or this is wrong way to do anything, you will face immediate challenge and someone out there will prove you worng! Once again, I use both solid and wire inlays, not preferring one over the other. I do believe that I save time and material (precious gold material) using the wire method. The Budweiser logo has lots of irregular edges and feather tips - it would be very time consuming to cut, trim and fit the A & Eagle using a jewelers saw. Mike Dubber
|
|
#4
07-09-2008, 07:26 AM
|
||||
|
||||
|
Thanks Mike!
I had thought that there were good reasons for using both methods - otherwise one would have died off in the face of the other, more superiour method.
|
|
#5
07-14-2008, 07:54 AM
|
|||
|
|||
|
Mike,
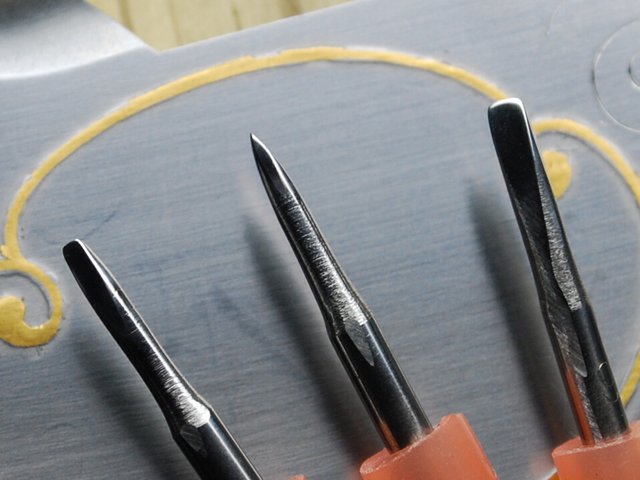
I'm really enjoying your tutorial. Nice neat and clean work. What gravers are you using to cut the outline on the Eagle and to do the cross hatching in the excavation after the liner, is the one for cross hatching, one that you have made specifically for job? Thanks, Good job, Gene
|
|
#6
07-14-2008, 09:41 AM
|
||||
|
||||
|
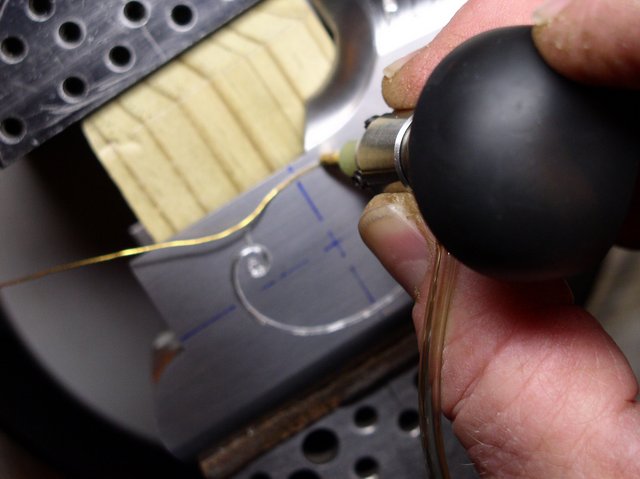
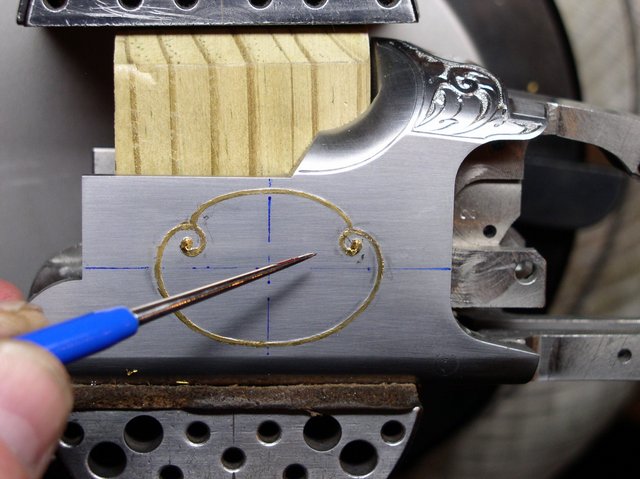
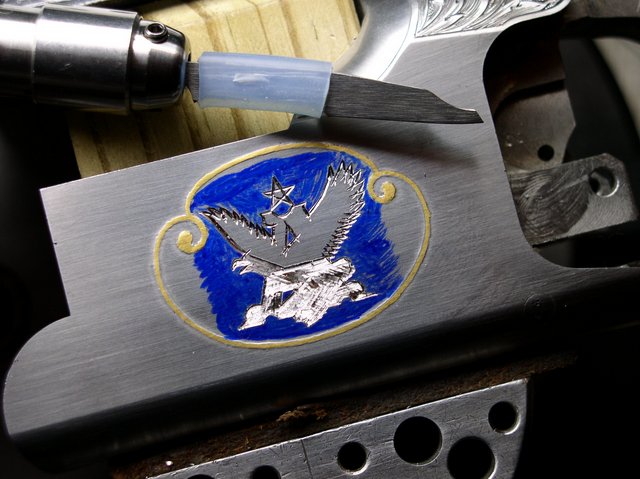
I'm using a 90 degree graver (actually a graver sharpened with the Lindsay Detailing template) to cut the outline of the logo and the perimeter of the A & Eagle. The "chisel" shaped tool that I use to do undercut is one I grind myself from used dot punches (in the jewelry busienss we call these beading tools). I'll try to get a good photo of one of these, or maybe a drawing, but they are essentially a chisel shaped punch.
|
|
#7
07-14-2008, 11:45 AM
|
||||
|
||||
|
So just for clarification ... you are using the undercut tool for material displacement and not removal.
Also ... any particular preference/reason for wire over sheet? Thank-you in advance ... Chris Regarding your editorial .... seen that on the news this morning as well. I have a feeling what Glenn Beck will be ranting about later:yesnod: .
|
|
#8
07-14-2008, 02:07 PM
|
||||
|
||||
|
Chris:
I do use a 90 degree graver to make a fiinal cut entirley around the inlay cavity, but that's done more to clean up the edges than to undercut. The chisel (I've promised several responders that I would include a photo of that tool) is used to "undercut" or "upset" and raise the edges in preparation for the inlay. I have to be very careful in explaining that I do not prefer wire inlay over sheet inlay...not do I use wire more than sheet. I do believe that I save both time and material using wires to fill inlay cavities. First I don't have to trace out and pierce the inlay from a sheet sheet or file and fit it to fit the cavity (that's a very time consuming process). Secondly, there are no unusable cuttings left over from cutting a sheet. Yes, those can be melted down, rolled out and reused, or sent to a refiner - but all that eats up more time and cost. Wires are quick and simple. The cavity is prepared exactly the same way and when its ready you simply start inlaying gold wire...as per the tutorial. I don't prefer wire when I'm inlaying into a curved surface - like on the recoil shield of this Colt SAA. I would never trust wire to stay in/on that kind of surface - so this would have been a really bad place to try to accomplish a wire inlay - too big and area and outwardly curved. Wires tend to stretch and bend upwardly as they are set and when they are not confined in a flat place. Mike ....and about the Budweiser thing - it's Coors for me and my Road King...America first! 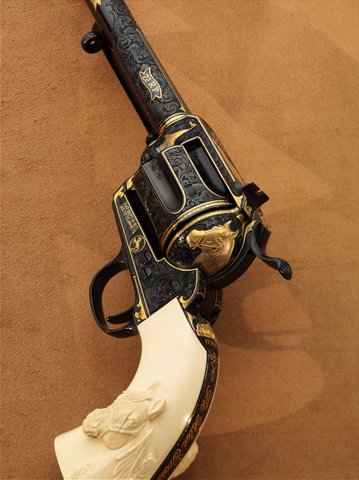
|
|
#9
07-14-2008, 03:30 PM
|
||||
|
||||
|
Mike
Excellent point about why sheet is better than multiple wires for some cases. Hadn't thought about wires wanting to rise up in the center combining (in a bad way) with a curved surface. Just another reason it's good to learn both methods.
|
|
#10
07-14-2008, 07:17 PM
|
||||
|
||||
|
Yep, pound on any piece of metal and it tends to sink in the center and sping up on the edges:willy_nilly: !
|
|
#11
07-14-2008, 08:25 PM
|
||||
|
||||
|
Mike,
Thank you very much for the clarification. I did kinda ask a question that you already answered but the additional details on where you prefer to use gold sheet is the type of "specific" I was looking for. Also as you mention ... I think that one of the most difficult parts of doing an inlay this size in wire is not allowing any of the new wire to overlap the previous, adjacent line of wire. The Colt is beautiful Mike. I'm in 110% agreement ... be American, buy American!!!! Even though 1973 was the last year that Harleys were 100% American made, I'll still be buried with my Evo!!! Thanks again Mike.
|
|
#12
07-16-2008, 03:51 AM
|
|||
|
|||
|
Hi Mike
A really great tutorial, although I have read of inlaying with wires, Its finally making sense with your step by step description and photos, looking forward to the rest of your submission. Thanks Paul
|
|
#13
07-27-2008, 12:52 PM
|
|||
|
|||
|
Excellent tutorial, Mike!
WL
__________________
Weldon Lister http://weldonlister.com http://weldonlister-engraving.typepa...ter-engraving/
|
|
#14
07-27-2008, 02:33 PM
|
||||
|
||||
|
Thanks Weldon!
|
|
#15
07-27-2008, 10:36 PM
|
||||
|
||||
|
The chalk in the draw file is fantastic tip. This tutorial contest is gonna be really close. Very exciting indeed!!!
|
|
#16
07-28-2008, 07:50 AM
|
||||
|
||||
|
A lot of good tips tucked into this one Mike!
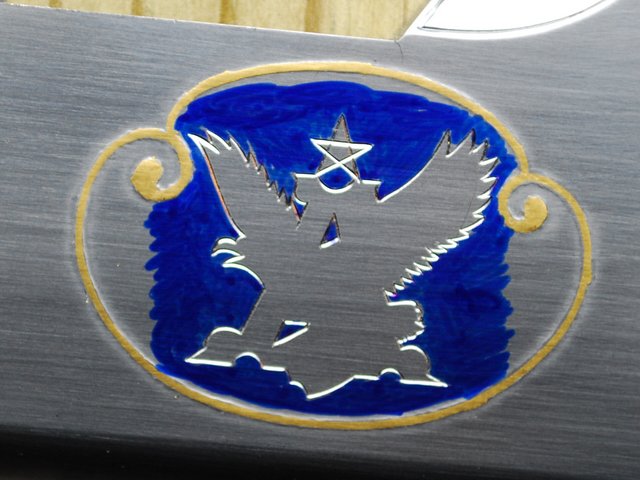
I particularly like the one about coloring the metal you don't want to remove - I haven't done much inlay yet but, uh... 'adjusting' the area on the fly is something I can easily see myself doing. Hopefully with this tip from you I can avoid that particular bit of happiness.
|
|
#17
07-29-2008, 08:29 PM
|
||||
|
||||
|
Mike,
That draw file from Brownells; is that special made for the purpose, and now I wonder if I was wrong for using just a new Nicholson Mill Bastard for flattening the frame and barrel of my 73' Wichester? Is the cut on that like a Mill, Mill Bastard, or even finer? We sure do appreciate all those photos for the tutorial, keep em' coming and maybe, just maybe you can win Steve's Corvette 
__________________
"If one needs a tool, and does not acquire it, they end up paying for it, but not having it." - Henry Ford
|
|
#18
07-30-2008, 10:34 AM
|
||||
|
||||
|
Great tutorial Mike, look forward to a class in the future...
Thanks so much, Jerry
|
|
#19
08-04-2008, 02:28 PM
|
|||
|
|||
|
This is a re-post of MikeDubber's contest submission, found here. If you'd like to discuss or give comments on Mike's submission, this is the place to do it. :D
You can read about the current contest, its $2100 in prizes, and how to enter here, as well as see all of the contest entries in the contest sub-forum here. Enjoy! Kaitlin Quote:
|
|
#20
08-07-2008, 11:57 AM
|
|||
|
|||
|
This is a re-post of MikeDubber's contest submission, found here. If you'd like to discuss or give comments on Mike's submission, this is the place to do it. :D
You can read about the current contest, its $2100 in prizes, and how to enter here, as well as see all of the contest entries in the contest sub-forum here. Enjoy! Kaitlin Quote:
|
|
#21
08-12-2008, 10:08 AM
|
||||
|
||||
|
Hi Mike,
All the photo's accept the last 2 Does Not Exist,? Please Help!!!
__________________
ChrisBooysen www.cbknives.com "If you are patient in one Moment of Anger, You will Escape a hundred Days of Sorrow."
|
|
#22
08-12-2008, 02:57 PM
|
||||
|
||||
|
The photos have now been restored to the Tutorial.
Mike Dubber
|
|
#24
08-15-2008, 11:43 AM
|
||||
|
||||
|
Mike,
I am Out Of Words,:willy_nilly: If I Make A Mistake Typing, please Bear with Me.!! I Have Been in a State off Don't Try It,  That Is Inlay, That Is Inlay,  My Good Friend Jacques told me to go for it!! But I Didn't Know How To Cut Out The Groove. My Good Friend Jacques told me to go for it!! But I Didn't Know How To Cut Out The Groove. This has Made My Trying Out, to Inlay a Better Prospective, I made Some Chissle points from steve's sq blanks,  I Notice that You Undercut, (is That The right discription ?) at a 90 deg, angnle to Your Groove,? Not Running the Chissle in line with the groove? What A Great Tutorial for Us Out of Town or Country Guyes.
__________________
ChrisBooysen www.cbknives.com "If you are patient in one Moment of Anger, You will Escape a hundred Days of Sorrow."
|
|
#25
08-15-2008, 12:53 PM
|
|||
|
|||
|
This is a re-post of MikeDubber's contest submission, found here. If you'd like to discuss or give comments on Mike's submission, this is the place to do it. :D
You can read about the current contest, its $2100 in prizes, and how to enter here, as well as see all of the contest entries in the contest sub-forum here. Enjoy! Kaitlin Quote:
|
|
#26
08-15-2008, 03:16 PM
|
||||
|
||||
|
That's just beautiful in the white. Later, if there's an accesible picture of it blued I know I'd appreciate a link over to it.
Blued the scroll should, I think, be less visible (which is a bit of a shame) but that gold is going to POP!
|
|
#27
08-16-2008, 07:35 AM
|
||||
|
||||
|
Mike, thanks for the great tutorial! I've been wanting to try this technique for quite some time and this post has cleared many of the questions I've had about this issue.
I now have successfully completed my first wire inlay. However, when I tried to cross-cut the wider sections, my chisel (on the second pass) would knock down the initial groove instead of raising a bur. I'm not sure whether the problem was my angle of attack, my chisel geometry, the direction of my cut, or something else entirely. I'm sure with a little experimentation I'll figure out what I am doing wrong, though I'm open to any suggestions. Thanks again! -James Perkins
|
|
#28
08-16-2008, 08:44 AM
|
||||
|
||||
|
James
A tip I got in a class was to make your 'toothing' cuts in the opposite order from what you would tend to do them. Instead of working from the 'top' to the 'bottom' you want to go the other way so that your new cut isn't pushing into the previous one(s).
|
|
#29
10-30-2010, 09:40 PM
|
|||
|
|||
|
Hi Mike, My name is Cornel and live in France. I suppose that I am the last register on the forum. I am cutler and I have to begin engraving 2 years ago. Now I want to make damascening. Your tutorial does my questions answer well has but will I want to know how one uses the chisel shaped tool to make the side.
Thank you for your nice work. cornel
|
|
#30
10-19-2012, 11:12 AM
|
|||
|
|||
|
That's just beautiful work. Great design, crisp execution. Beating a dead horse a bit, so the undercutting chisels do have sharp edges but have slightly convex faces to help with displacing the metal, and also to help keep them from wedging in the grooves?
Do you try to lay the wire in the direction of one of the sets of grooves, or doesn't that matter much? I'll have to dig out my Meeks book, but I think the sharp edged crosshatching is what he described for sheet inlays. With regard to sheet being better than wire (or not), do you find any tendency for the wires to separate as you're doing the final engraving after flattening/surfacing? No matter how mushed together they are, they're still separate pieces, as you noted, though even work hardened from the setting I imagine they cut so easily with sharp gravers that there's not much side force on them, and where are they going to go anyway? It's a wonderful piece. I love the way the gold pops after bluing. Thanks for sharing all this with us!
|
|
| Bookmarks |
|
|