
|
The Internet's Largest and Fastest Growing Engraving Community
Discuss hand engraving using basic to the most advanced methods and equipment
Forum Members: 14,739. Welcome to our newest member, S_Two
EngravingForum.com -
Domain since Feb 7, 2003
 Graver Video Conferencing is empty Join now!
|
|||||||
| ENGRAVING TOOLS - Paypal accepted | Classes | Glossary | Feedback | Tips | Sharpening | Bulino | Videos | Forum Policies |
 |
|
|
Thread Tools |
|
#1
 10-26-2008, 10:41 PM
|
|||
|
|||
|
I am submitting some plates and information for beginners to let you know you are not alone in the effort to be able to engrave something that makes you smile.
I will be going though from the starting as a rank beginner (since I consider my self one) and submitting some of the information and practice plates as I learn. I will also include links and some new/old techniques of engraving and using some of the tools. I hope this is not boring considering all the great engravers on this site but it is a first step in learning the tools and the control and Practice in a effort to get better. Hopefully some others might benefit from my mistakes and discoveries. I tried to engrave in the late 70s when I was in professional school as a addition to my work of trying to help pay for school. I had a small jewelry fabricating business and sold mainly hand made silver rings and necklaces. It wasnt enough money so I started doing lost wax and eventually was in the jewelers board of trade and producing about 75-150 lost wax items a week and set many stones but they were all prong set. I only did gold and silver handmade and casting. My introduction to engraving was when I had a order for a custom ring that had to be set by a hand engraver/stone setter. A Girl by the name of Becky was a engraver that learned from a old time plate engraver in Chicago and did the setting for me. Well one thing lead to another and she gave me my first gravers and copper plate. She also gave me a poor mans engraving block (vise??). 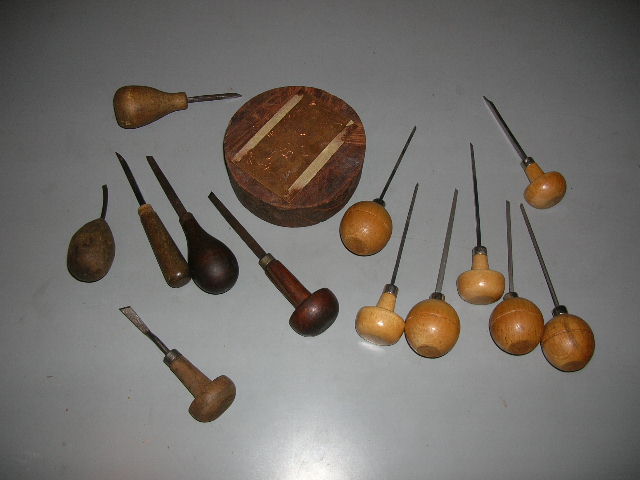  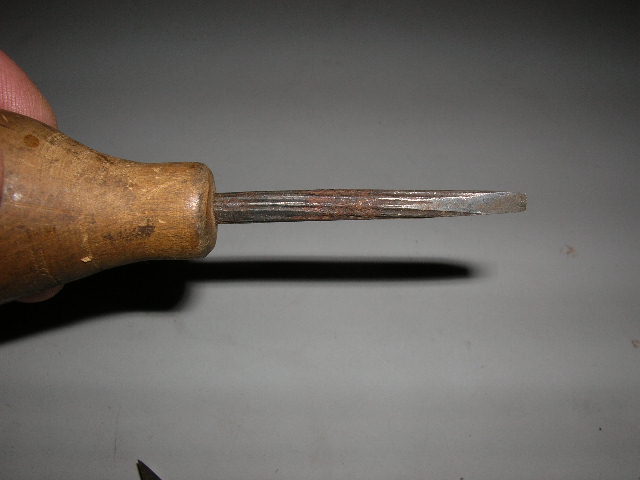 Here are the gravers I had and my first practice plate from the 70s. Note one of the push gravers was made from a masonry nail The engravers block (vise) was a block of wood with tacks on the bottom for less friction and the plate was taped to it. Well I had to make money and judging by my first practice plate engraving was put on the back burner indefinitely. Besides it wouldnt be a good thing to push one of those gravers though my hand being an intern. Fast forward 29 years. Practiced as a Chiropractic physician for 20 years in Connecticut and then moved to Arizona in 2000. I have a small practice here and also practice in a medical office besides selling/buying quite a bit on Ebay under user name AirAmp for the last 8 years. See SVDs thread on (selling on Ebay). http://www.handengravingforum.com/sh...t=selling+ebay I found a Magnagrave on Ebay and won it at a low price. Looking into engraving more I decided to give it a try again. Ray J. Phillips the inventor of the magnagaver was from Connecticut so I called him and he rebuilt the magnagraver with updates. I was impressed with the tool but had no gravers that were sharp enough to do anything with except cut soft plastic. I started my search for a way to sharpening gravers. Somehow I was lucky enough to find Steves site and downloaded his patented parallel point method of sharpening gravers. I did have a few faceting machines to sell on Ebay so after downloading the patent I started sharpening on a faceting machine. I did write a thread on it in the forum. I have since improved the chuck and now use a 120 index gear and a Jacobs chuck for round 1/8 inch carbides.   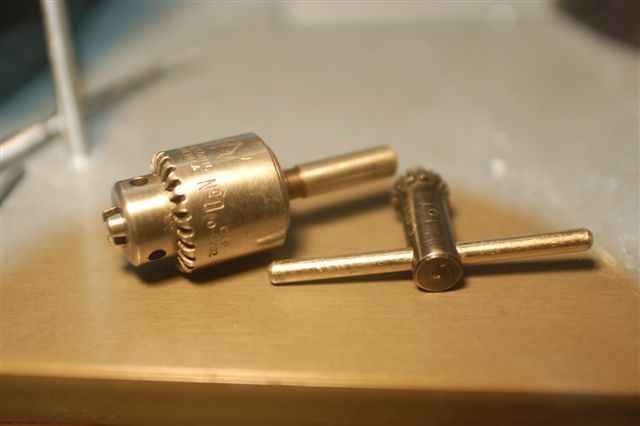 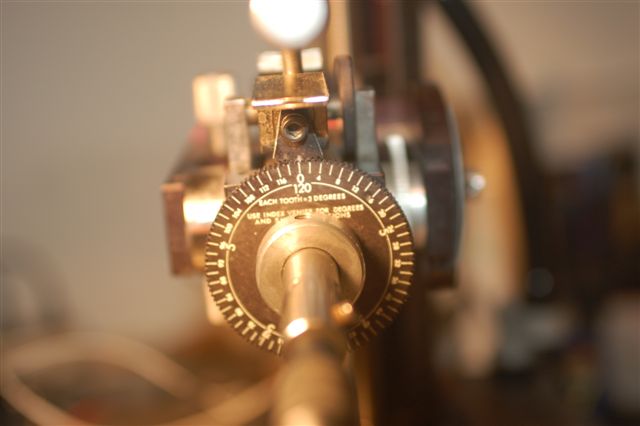 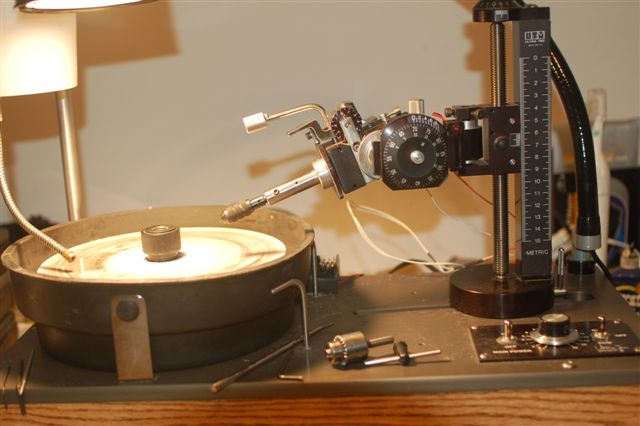 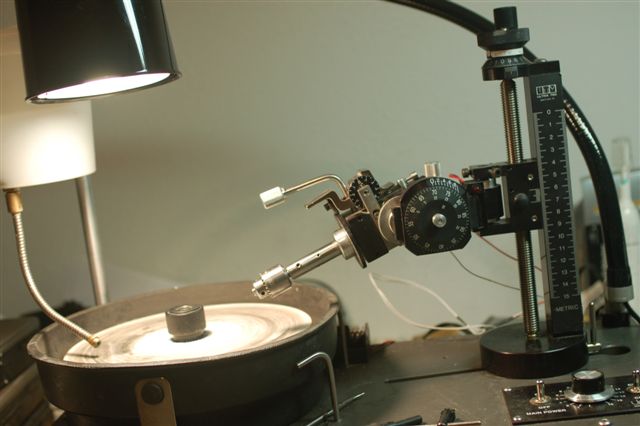 Here is the link for sharpening on a faceting machine. http://www.handengravingforum.com/sh...ceting+machine Doing more research watching Steves videos and reading the forum I decided I had to have a Classic if I was going to try this again. I still have not cut another practice plate in about 29 years. I set up a bench by using a Steelcase desk (from a auction at a local university), pulled out some of my jewelry tools, bought a engravers vise on ebay and set up one of the microscopes I had for sale (ebay again). Here is my bench, the draw acts as a good catch for the chips. A few more things and all I needed was the Classic. 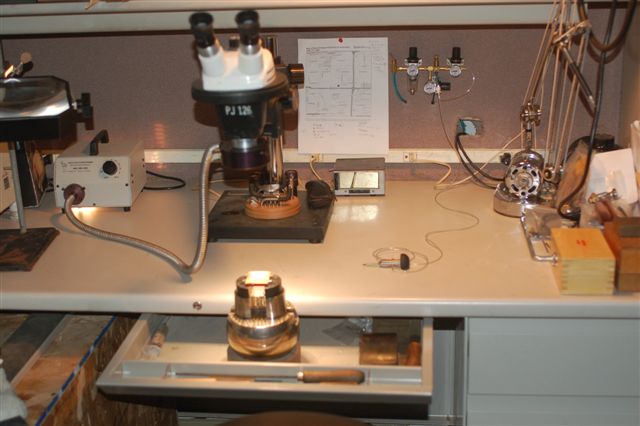 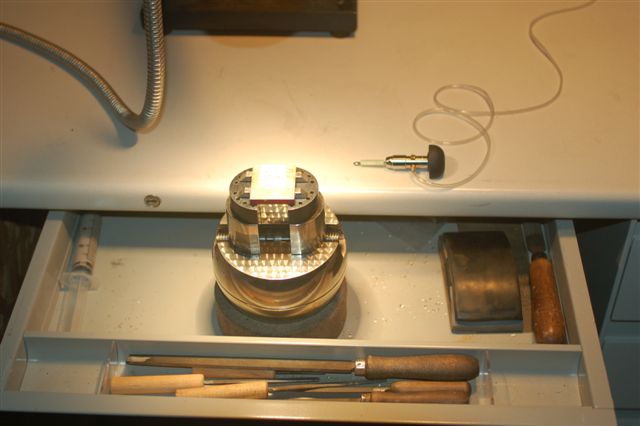 I picked up a little box from the jewelry supply to hold the sharpened gravers in one place. 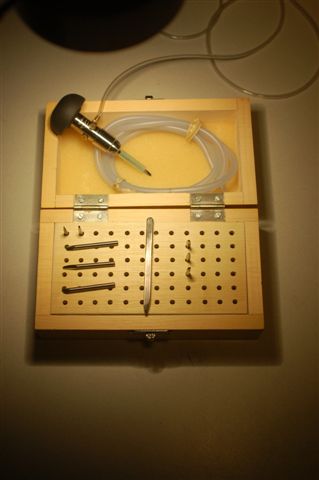 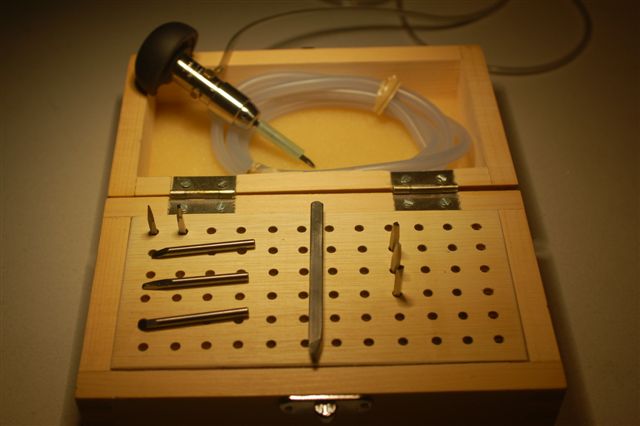 Hobby shop silicone fuel line is great for putting on gravers to save your fingers from the sharp square edges when putting pressure and guiding the graver in a cut. 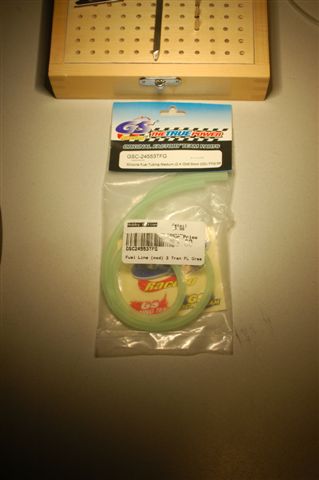 Other tools needed or helpful are: Files, Optivisor with lenses #5 (8 inch focal length) #7 (6 inch focal length) These have glass lenses any others are just not worth the money. If you use reading glasses you can wear them and the focal length is shortened (usually to the next number optivisor lense). 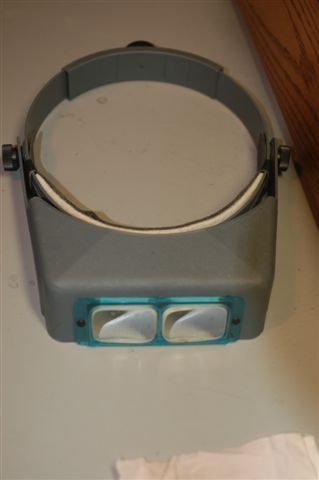 Sanding block with 600 & 1200 emery paper and some soft brass and steel wheels 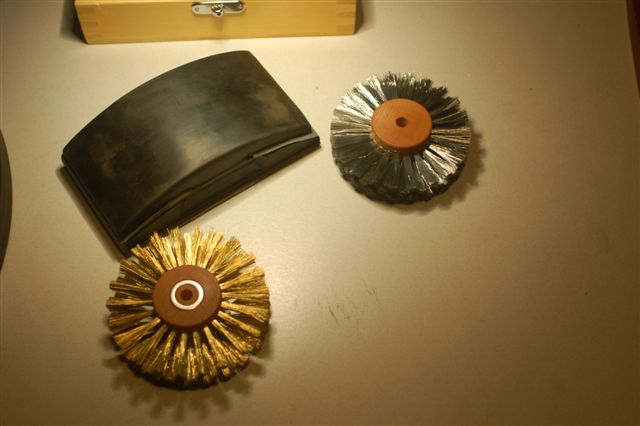 Demagnetizer if you are using a power grinder would be nice. Cassette demagnetizer works well.  Scribe, carbon black pigment, V block (for squaring up gravers) could be useful Lube oil (blue lube, or light oil, kerosene) finishing stones, 1/8 inch Drill blanks (can grind them into gravers or points for stippling and will fit airgraver). Polishing motor with cotton wheels and polishes (from a Jewelry supply company). Semichrome polish ( or S100 total cycle finish restorer chrome polish) this is actually about 50,000 grit diamond paste) 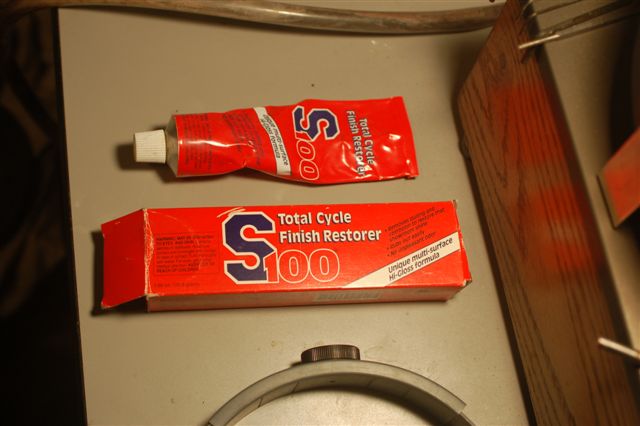 A microscope is nice but not absolutely needed at first. I bought a rotary tool called a Ney Hurricane for back round removal. These can be bought on Ebay Rebuilt for less than $100.00 if you are luck. 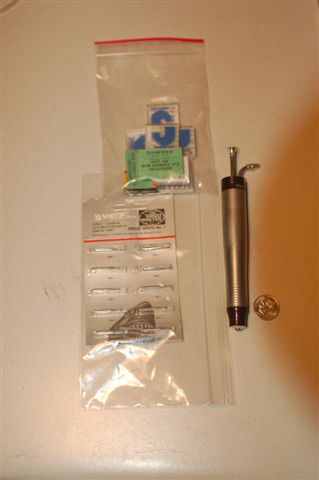 Check out this forum link. http://www.handengravingforum.com/sh...ight=hurricane Graver Blanks (Carbolt are the best, Cobalt, M42, then HHS) M42 and HHS are the best for Bolino points, Knive grinds, and stippling punches (drill rod).  I found some 1/8 Carbide round on ebay 50 pieces for about $44.00 delivered. Good for making gravers C2 carbide I bought a foot control Classic from Steve on 08/22/08 and was set to give it a try again. I set it up with a 20lb CO2 bottle and a welding regulator adapted for the Co2. I really didnt want to hear a compressor.  Files are handy 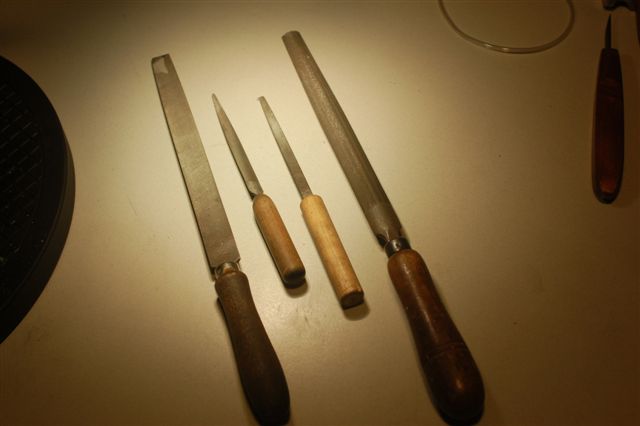 Many supplies and basic tools can be ordered at reasonable prices from this link: http://www.contenti.com/products/engraving-tools.html I have used them and they are very reputable. The classic came with a sharpened graver so I had at it with a steel electrical knockout plate. The Classic cut like a dream through the metal but cut so fast I knew that now I had to learn how to control it. Here is my first practice plate with the foot pedal classic set at 30 lbs and mid range stroke. Random cuts and just having some fun. 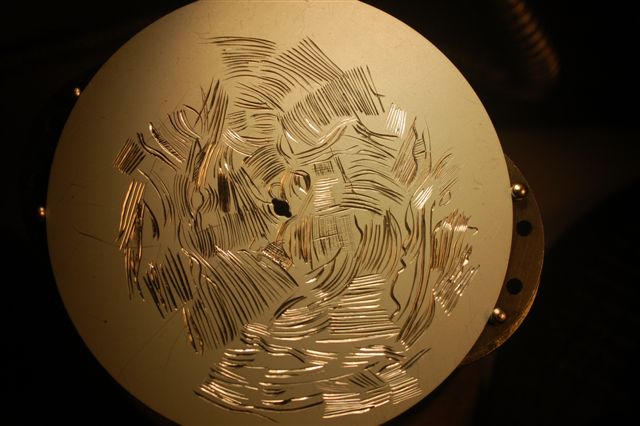 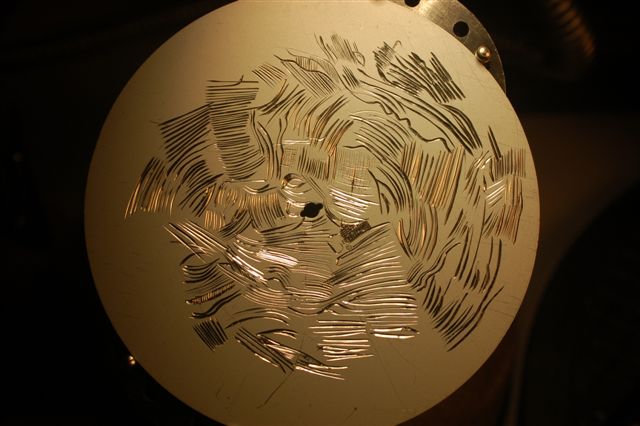 As you can see I tried various depths, turns, fine lines, cross hatch and generally messed around on the plate. It wasnt long for me to realize that this tool was even better than I expected and was everything plus more that was raved about in the forum and in articles. Now the challenge: To control it to make something that is beautiful. I started by trying to make straight lines of constant depth and width on a ¼ inch brass plate. 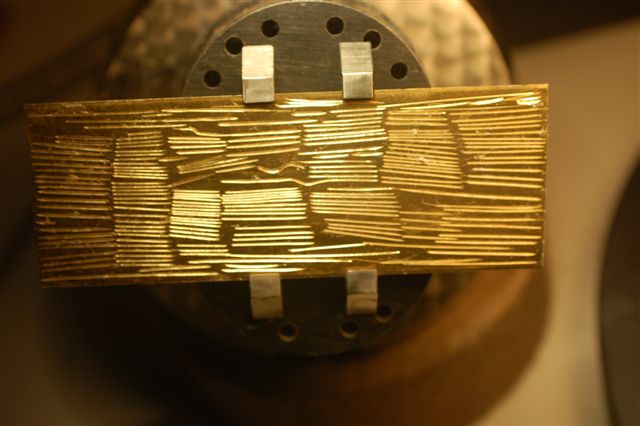 The lines were straight but varied in depth, width and still didnt feel I had the control I needed. ( I had to resist the urge to just mash on the pedal and smile). Maybe did it once or twice. About in mid September Steve called and asked if I was near Tempe, Arizona, which was the next town over from me. He said that Bryan Bridges a engraver was going to start giving classes and maybe I would be interested in taking a few lessons. Steve said he was very experienced and worked with Lynton McKenzie. He was in fact good friends, partners and Bryan was the reason Lynton moved to Arizona. Well it was just what I needed, since most schools were far away and I couldnt get away from my practices and Ebay business and the expense?? Having Bryan Bridges close by was Perfect!! I called Bryan and started 3 hour classes once a week. You can read more on the thread I did on Bryan and Steves write up on Bryan Bridges School and classes and some more detail of his history and his accomplishments. http://www.handengravingforum.com/sh...=bryan+bridges http://www.engravingschool.com/schools.htm Bryan also patented a power turntable that is under Vises on the Airgraver site. Bryan said Lynton used a crude foot powered turntable that gave Bryan the idea of making his powered high tec model. I used it and it really is incredible no longer have to stop and reposition your hand in the middle of a turning cut. It also has instant reverse so cutting a S curve is easy. With the right foot on the Classic pedal, the left foot on the turn table speed controller, the right hand with the classic cutting and the left hand on the reverse switch it is more like flying a helicopter than riding a bicycle but in a few moments it all comes together. Is that a good enough reason to Get A PC??? After all it will free up one foot!! Check the turntable out here. http://www.airgraver.com/vises.htm After using his turntable and his Vise I had to change to a self centering vise and a turntable. I bought a Grizzly self centering vise, TV turntable, machine parallels, and a laser pointer for centering the curves under the scope. The Ball Vise went to the side. Here is the bench with the Grizzly and turntable on it.  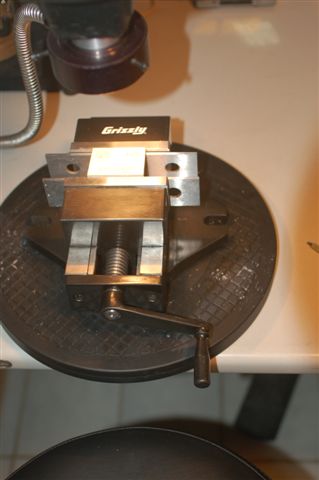 Grizzly vise link: http://www.handengravingforum.com/sh...hlight=grizzly Also remember you have to be comfortable so have an adjustable (height) chair or stool. This is one of the most important things you can get to help your progress. If you are not comfortable you cannot concentrate on what you are doing. Classic transfer technique. Learning from Bryan I knew I wanted to learn the old tricks of engraving and have the added advantage of Bryans experience as a Die Maker and sculpture to boot. We first made a scribe out of a carbide dental bit sharpened to a point for tracing on acetate. This is only used for acetate do not use it as a scribe, make one for just scribing or you will not get good transfers. The print was put on glass then a layer of colored acetate and then a layer of clear acetate. The colored acetate was so you could see your scratches. The Tracing is now colored with lamp black pigment. Use a old tee shirt roll it up into a roll and tape it. This will serve as a method to get the lamp black into the little scratches you made. 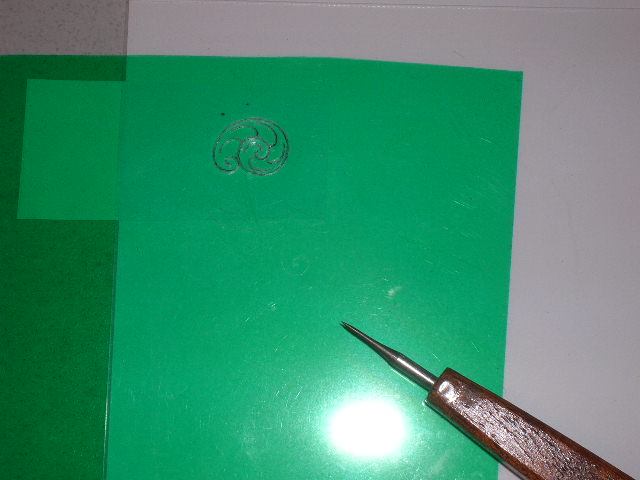 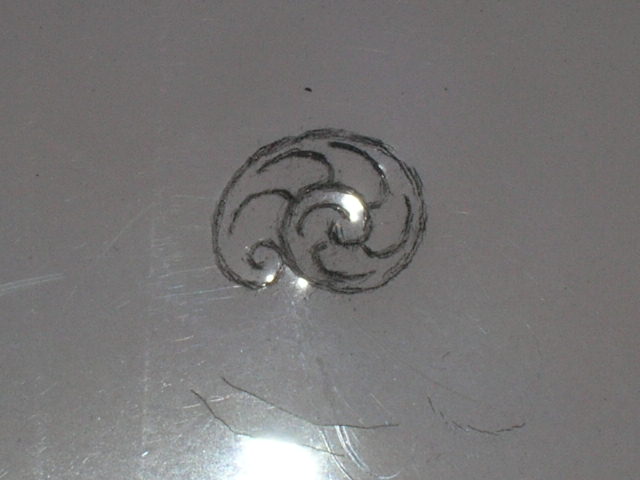 Your plate is prepared by sanding with 600 grit and cleaning with a cotton cloth ( spit as the classically was done (just love that) to clean the plate of any oils). Put a layer of transfer solution on it and burnish it once the solution is tacky, place the acetate down and burnish it. The carbon black will leave a perfect transfer. This is a acetate transfer of a McKenzie smoke and my first cutting with Bryan. Not too great but I got a chance to use Hammer and Chisel, and PC airgraver on the plate. These are my first curves practice. Not consistent on depth or smooth but more interesting than straight lines!! Thank you Steve Lindsay for putting on loan a P.C. Classic for Bryan Bridges Classes it is really a great addition and as you say it is intuitive to use.(Did I mention frees up one foot!!) 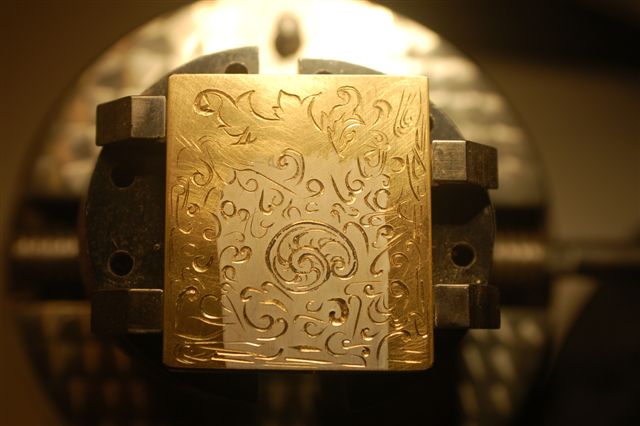 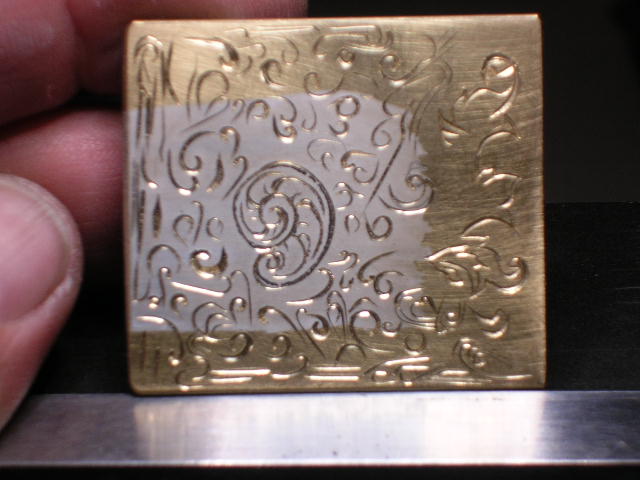 Transfer mixes There are many transfer mixes out there that seem to all work some better than others. Bryan Bridges Chisel Whiting :The Best All Around Transfer Solution Ever You will see this on my plates. It is not Chinese white. It is a special mix used for years by die engravers and will not rub off or smear the transfer at all. (more on this later but you will see it used submission) (A mix kind of like your grandmothers meatloaf) (Once the formula is perfected Bryan will be selling it) Tom Whites Transfer Magic (best system for use with inkjet printer) High detail transfers Uses Epson printer and Durabright ink and Epson acetates Expensive printer ink and only Epson Acetate works with this system. Site for transfer magic for more information and examples of this product: http://users.commspeed.net/ttwhite/xtransc.htm Others are: Delmar Varnish with Alcohol (15/85%) Delmar Varnish with Zippo lighter fluid (naphtha) (20/80%) Delmar Varnish with turpentine (20/80%) Bulls eye shellac with Alcohol (15/85%) NOTE: Alcohol is DENATURED Alcohol (NOT ISOPROPAL) Note these mix formulas are approximate numbers by volume. The varnish or shellac can be decreased by adding thinner of your choice to get the mixture to tack up in 30-90 seconds. New laser technique of transfer how to: I realize that there are copyright on many if not most of the artwork in books and on the internet. I will be using some of the work for practice plates. If anyone feels the use of this artwork for teaching or showing examples of work done violates there copyright please notify me and it will be removed it from the tutor. That having been said I have to recommend a few Great books as educational and a great source for practice plate art. (Personal use only). The Art of Engraving (Meek) http://www.contenti.com/products/books/116-356.html The Art of Engraving: A Text-book and Practical Treatise on the Engraver's Art, with Special Reference to Letter and Monogram Engraving 1904 Forum Link: http://www.handengravingforum.com/sh...engraving+book Credit to Steve Lindsay. Modern letter engraving in theory and practice; a manual for the use of watchmakers, jewelers and other metal engravers" (published 1898) Forum link: http://www.handengravingforum.com/showthread.php?t=2336 Credit to: WVEngraver Chris for finding this one. Guide For Drawing the Acanthus". It is dated 1886 Forum Link: http://www.handengravingforum.com/sh...ht=online+book Credit to: Steve Lindsay Drawing and understanding Scroll Designs (Ron Smith) http://www.contenti.com/products/books/116-614.html And many more on Steves Thread on Old books. Link: http://www.handengravingforum.com/sh...engraving+book Credit to: Steve Lindsay I mention these for the beginner at the site to try to give them more information on designs and information on engraving much of which is free. These would take hours to find on the site So I thought it would be a good start to link them for a beginner. 
|
|
#2
10-27-2008, 09:53 AM
|
|||
|
|||
|
Well Back to Laser transfers.
With all the artwork out there you have to pick a design for a practice plate, transfer it to the plate and cut it. Sounds simple but as you saw in the Acetate Transfer technique it was harder than you thought. New technology has made it possible to scan art work into the computer, size it erase and redraw parts of it and more. I will go through the easiest and cheapest method I have found so far. Laser transfer method of recently discovered by Rodstan on 5/21/08. Here is his original link: http://www.handengravingforum.com/sh...hment+transfer It only works with a laser printer and does not work well with Inkjet printers. If you only have a inkjet printer Tom Whites method is the best for Inkjet Printer. How to Do IT First you have to pick and scan artwork into your computer and save it or print it from the scanner.   cut out the artwork and tape it on a clean sheet of paper. Scan it and print it again so you have a clean copy for your scanner and to save it.   You can save it and use adobe photoshop to edit it add or take away lines and invert it for a right and left side. Since these are one time practice plates I scan the image and print it to the printer. If it is too big I print it again and reduce the size with the printers software. Like shrink it 80 percent and check it again. You can save it again when it is right.  When I have the size of my plate and like the way it looks I print 3 or 4 of them on paper. I put one away as in a file and the others are for making transfers. 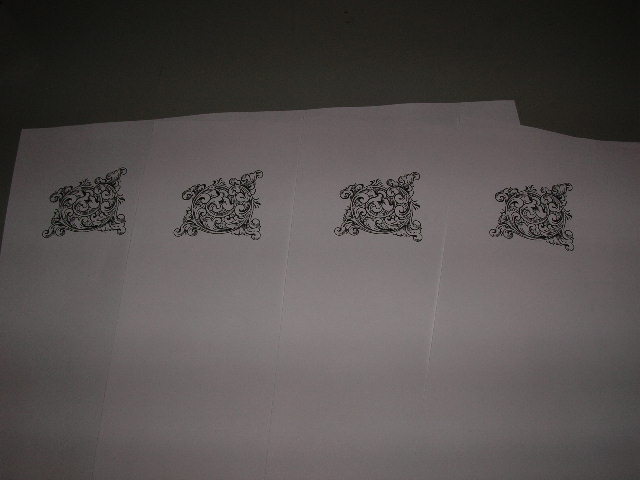 If you are doing this with original artwork scan it, save it and print it on a acetate sheet for easier positioning and sizing on real work. Remember the print will go down backwards (face down) so be sure you have it properly sized and made for the way you want it to come out (right or left sided). Now that you have your artwork and it is in the correct direction and the right size and printed on sheets of paper or acetate. Take a piece of parchment larger than the artwork you want to transfer. 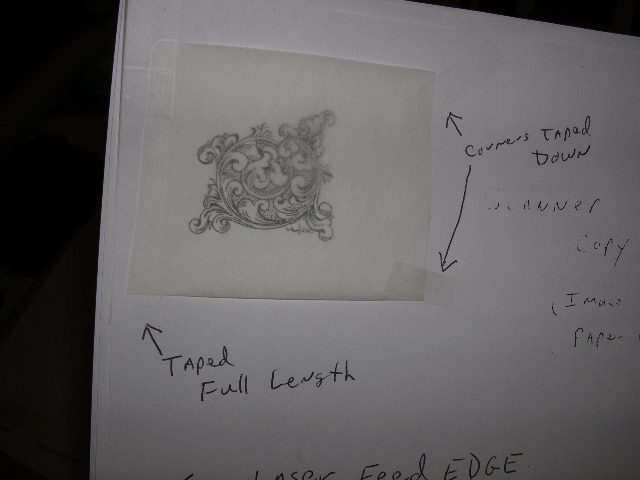 You will be taping the parchment curl side up since it is normally rolled over your artwork but you must know how to tape it down. BE SURE YOU KNOW HOW THE PAPER IS FED INTO THE PRINTER. (Long side or short side first). HP printers have a little diagram in the printer tray. This is very important since you must tape the full leading edge of the parchment on the paper so it feeds the paper taped with parchment leading fully taped edge first. If you do this any other way it may work but if the tape comes off in the rollers or fuser it will be a PIA to clean and fix. You will get paper/tape jams no doubt. So Tape the leading edge full length of the parchment. Pull the parchment tight and tape the other 2 corners down. Put it in your printer tray and scan and print your file copy to your printer or print from your saved and modified copy. It is important that both the parchment overlay and the scan or saved copy are the same so you are double printing the parchment copy. This is what it looks like double printed 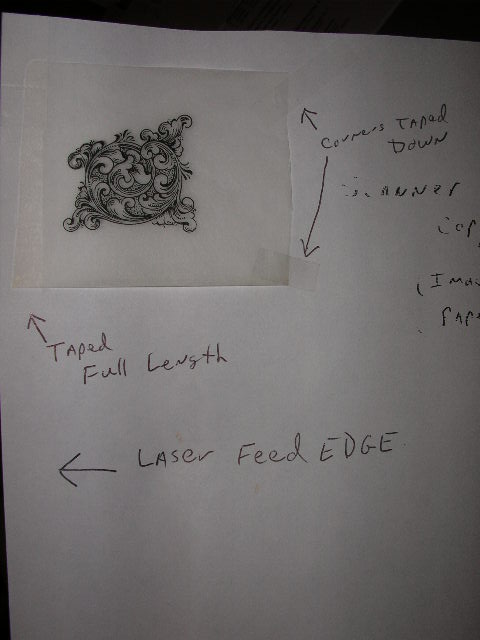 Once the transfer is done take a letter opener and separate the parchment from the paper. The tape doesnt stick well to the parchment so this should be easy. 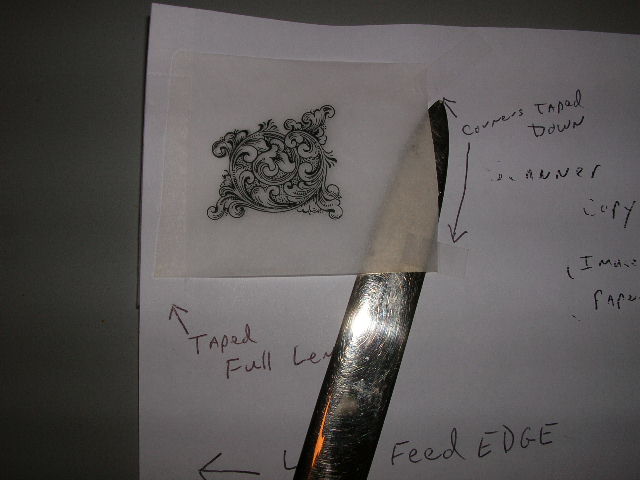 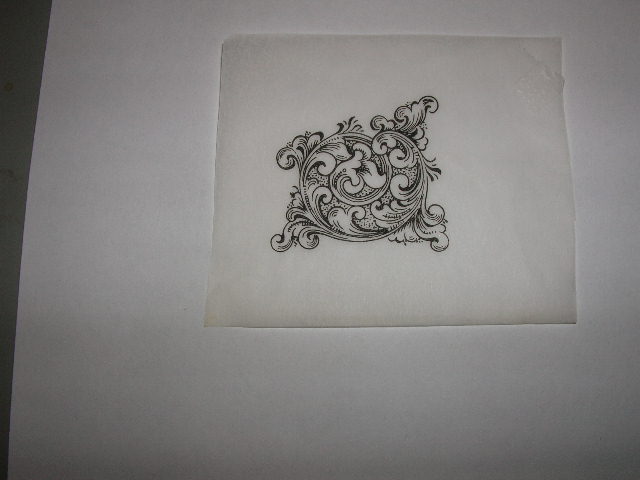 Preparing the plate: Sand your practice plate with 600 grit emery paper and clean with a cotton cloth. Spit on the plate to clean off any oils and prepare the plate. This is a old trick of die engravers. (love that). Use one of the transfer solutions and give it a quick light one swipe coat with a cheap brush. This is Bryan Bridges Chisel Whiting. 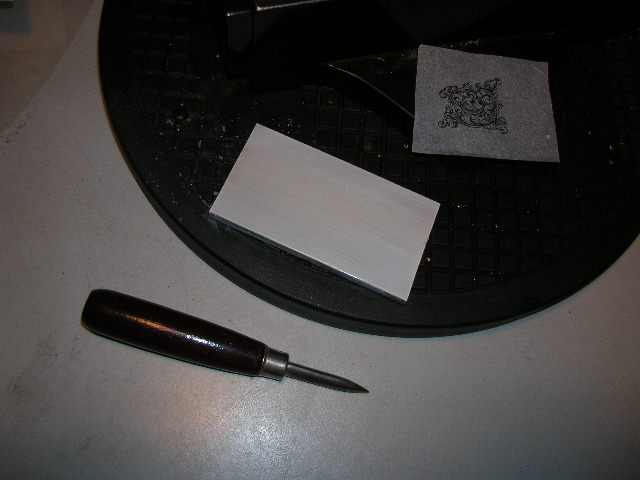 Once tacky position your parchment paper where you want it on the plate (be carefully you only get one shot at it). Once you have it on the tacky plate put a piece of acetate over it and burnish it with a steel. I use a jewelers burnishing tool for bending bezels around stones. The Acetate makes it easy to slide the burnishing tool on the parchment and gives a more even pressure for a complete transfer. 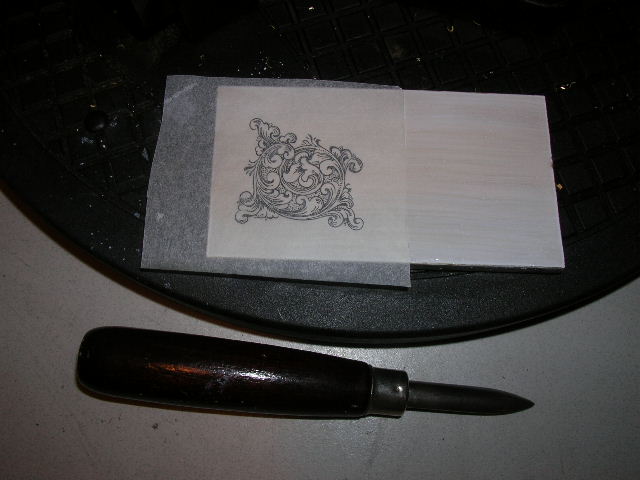 You can see a slight change in color from black to gray as the design is transferred. Brunish the design completely and a second time at 90 degrees to the first burnishing. Remove the acetate cover and slowly remove the parchment with a lift peal off the plate motion. You should have a near perfect transfer. 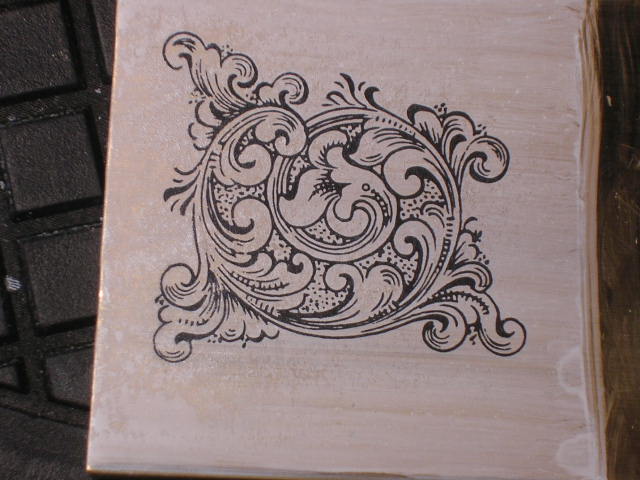 Let it dry a few minutes and it is ready to cut. It will not run, smudge or fade and can be handled easily with no fear of losing your transfer. Note: Bryans Chisel whiting and how clear the laser transfer came out. The whiting really makes it easy to see your lines and cut out any glare. This Batch of whiting is old so the transfer is not as great as it should be. We are working on the formula to solve having to mix up a batch every week or so. How it Works The reason this works so well is that a laser printer actually cooks small particles of plastic (toner) on to the paper. Unlike a inkjet that sprays on ink. The laser tries to cook the toner on the parchment in the second run and the little particles actually cook together but does not stick well to the cooking parchment paper so your design is really one piece of thin plastic. Use this method on laser printers only. If you do not have a laser printer, go to a thrift store or Good Will store and look for a Hewlett Packard laser jet printer. They are common and there are many part and toner cartridges on Ebay for all models. If you want to use the Inkjet or need extremely high detail use Tom Whites techniques with Transfer Magic. It is the best system out there for extremely high detail transfer. The laser method is much cheaper and doesnt require special materials. Detail is excellent for most work. Give it a try. [/quote] Gravers To start as a beginner a simple 90 degree is all you need. Make one with a large heel for straight lines and one with a small heel for curves. Better yet is if you grind one of the 90s from Steves patent. A flat chisel is the other beginners graver that is needed. Make some of different widths for background removal and inlaying wire. Chisel should be the width of the inlay wire but more on that later. The reason for using a 90 degree graver, as explained, is that is that you cannot see the depth differences or uneven lines of the finished engraving as much as with a wider graver. It is true and good for a beginner. Steves 96 degree point template is about the same as the 90 but much better in tight turns. I have also made 100, 115, 123, flats chisels and Lindsay point flat chisel (115 with a flat bottom added) Here is the link to Steves Patent point register on line and down load it and study it to get a good idea of new graver point geometry. It is at the bottom of this link on this area of Steves site: http://www.airgraver.com/sharpening.htm There are many other modifications and graver points on the site. I do not have all the links but it would be nice to have them all in one area. I just couldnt find them all. Sharpening Well I use a faceting machine as you can see by the thread by sharpening on a faceting machine. Tim C had a great thread on sharpening to make a stronger Lindsay point: http://www.handengravingforum.com/sh...stronger+point Very helpful and gives more insight in grinding points. Bryan uses a Crocker style sharpener and a fine Arkansas stone. Crocker style sharpener link of what this is http://www.progresstool.com/pd_crock..._sharpener.cfm Steves link above is for the most up to date system using the Diamond Hone by Tom white and Steves Templates. This is the quickest and easiest system out there. Of course there is the dual angle fixture. Hamler tool fixture here is a thread on this tool: http://www.handengravingforum.com/sh...pening+fixture For those of us that have that have access to a Deckel SO (single lip) grinder these can also be used to grind precision graver points and much more. Expensive tool but great if you have to make a custom single flute end mill. Bryan a Deckel SO uses it for some of his chisels and I am working on a fixture for this machine to hold 3/32 and 1/8 inch square blanks. I will let you know when this is done. This is what that machine looks like: http://www.rohnermachinery.com/grinders/0088.htm Very expensive but if you have a shop and have one it works great. All in all the Crocker style sharpener and stones is the cheapest and most versatile of the sharpening method but will take time to master and is not super accurate. Steves Templates and coupled with Tom Whites Diamond hone is the both accurate and quickest way to sharpen and keep sharp gravers compared to all the other systems. It is limited by the templates but more are being added by Steve and others all the time. Hammer and Chisel Hammers are 1 inch, 1 ¼ and up. The lighter the hammer the finer the engraving lines can be. You can use up to a shoemakers hammer for big (1/4 inch chisels) and hog out a lot of material. These are cheap, but get a chasing hammer since the handle is a little springy and it has a flat face. A few different weight hammers is a good thing to have We made a chisel in Bryans class it is a classic McKenzie Bridges type chisel. Here it is next to the modern way of engraving (The Classic). 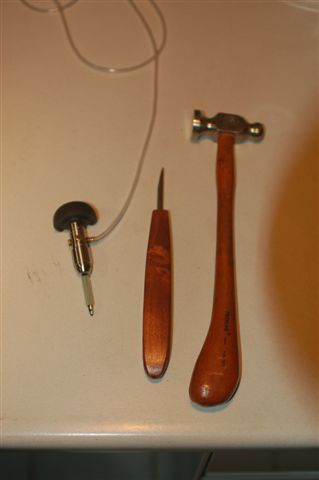 Die Sinking Chisels (engraving chisels) can be made or bought at Brownells site, but I found the source and you can save some money. You should have some chisels and push gravers added to your tools since not all tools do the same thing or have the same control (or you dont have the experience yet). I have to say I have grown very fond of the hammer and chisel over push gravers. Much easier to control for a beginner and with the proper guidance you can really do some amazing things. Thank you Bryan Bridges for introducing me to the H&C. Anyway here is the link for die sinking chisels at a great price: http://www.falcontool.com/Falcon_Section10.pdf Punches I cannot due better than Pauls tutor on making punches. I have make punches with Bryan and I can add a few helpful hints. Here is Pauls tutor for making punches: http://www.handengravingforum.com/showthread.php?t=2306 Great Job Paul on the tutor. I could add that the punch should be rounded on the striking end so you cannot hit it unevenly. When hardening it hold the flame lower as in the tutor when tempering it. Too close to the tip and it can overheat easy and ruin the punch. Before hardening tap the punch on a course stone and clean it with a wire brush to get any stones out before hardening. This prevents the punch from slipping when struck by have some texture to it and it also slightly rounds the sharp pattern. Plates to Date (as of 10/22/08): After making the McKenzie transfer and cutting it I cut more curves on the plate. Turned the plate over and set the airgraver for 10 lbs and short stroke. Here are the light cuts of more curves for practice: 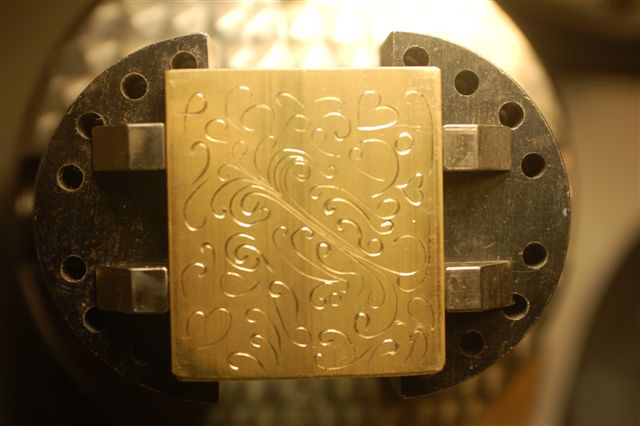 And another back of the line practice plate for more practice: 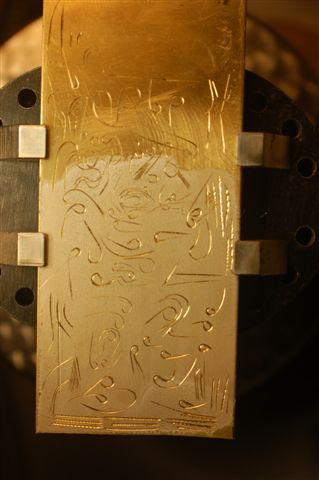 The 10 lbs and short stroke helped get more control of the airgraver and the practice gave me more experience of riding the bicycle feel of the airgraver and hand position for depth control. I was ready to try an English scroll plate with a little more power. I used the laser transfer technique to do the transfer: Here are the first results of a plate that had a completed in mid September. 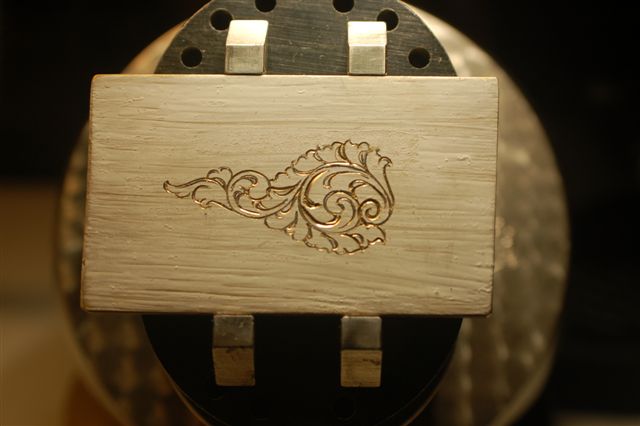 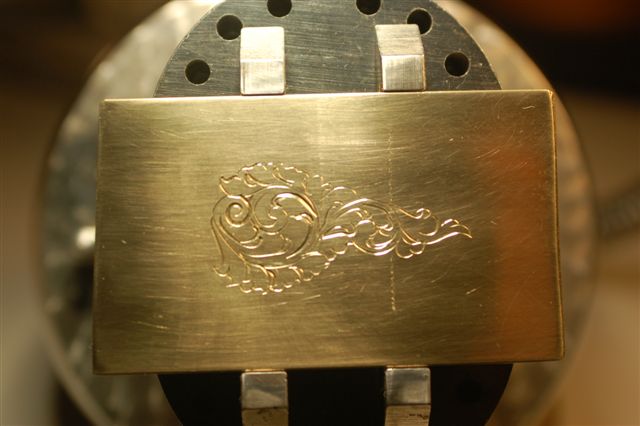 I am still cutting line depths inconsistent as seen and messed up (slips). The grizzly and the turntable works better than the ball vise for the curves. The reason is that I dont have to reposition the plate in the ball vise to get to center for curves. I only have to move the grizzly to center of the turntable and cut again. 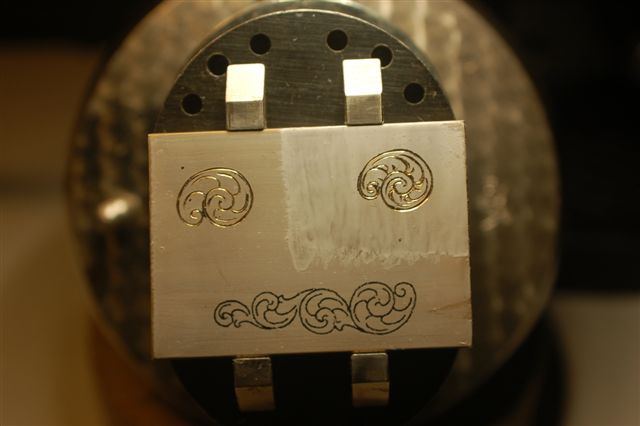 I did some smaller English scrolls (more practice) on a plate: The one to the right was first, then the left. I was getting a chop to the cut with the airgraver set low pressure and short stroke and discovered that when sharpening I was putting pressure on the tip when grinding the heel. This caused the back of the heal to be lower than the front and got heel drag. Other reason for the heel drag was suggested by members of the forum here: http://www.handengravingforum.com/sh...ight=heel+drag My chuck in the faceting machine was changed to be more stable and NO PRESSURE WAS PUT ON THE POINT FOR GRINDING THE HEEL, along with the helpful suggestions of the forum members I cut the third scroll on the plate. The chop disappeared. Here is the third scroll cut: 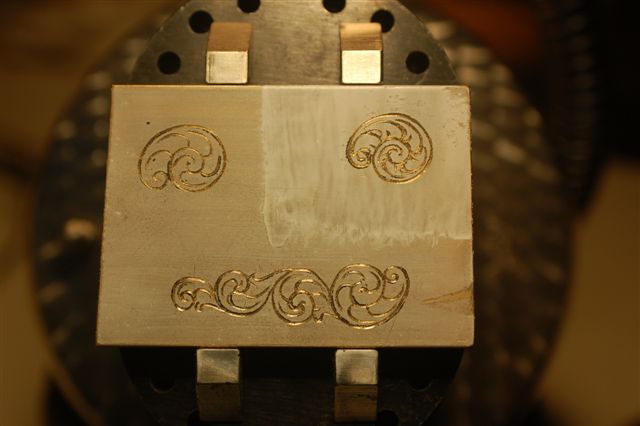 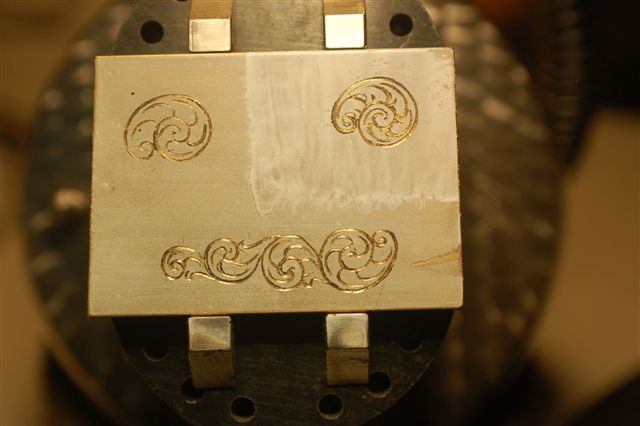 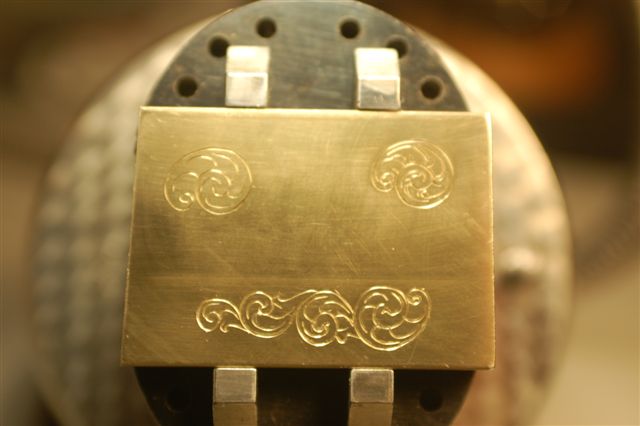 Some improvement can be seen in the curves, depth and smoothness but still not there yet. Next will be the plate pictured. I shot this through the scope as SVD suggested in Katherine Plumer scrim tutor and it worked.  This is the one of the previous plates reversed with Photoshop I will cut it next. . The one laser transfer section (in this thread) will be cut after the scope cut. This one has back round removal. I will post the next plates when they are cut so more are to come stay tuned.
|
|
#3
11-10-2008, 11:11 PM
|
|||
|
|||
|
Well I finally got a chance to cut the English scroll see in the scope from last time.
Here it is under the scope and a couple without the scope view. I am still making dog legs, I did increase the airgraver to 30 lbs and mid range stroke. I think there is improvement from the last English scroll with 10 lbs pressure and light stroke. It was easier to control with a little more practice. It didnt seem to get away from me too much. Depth is still variable but generally deeper cuts. Some too deep or many not deep enough? Your input would be appreciated.  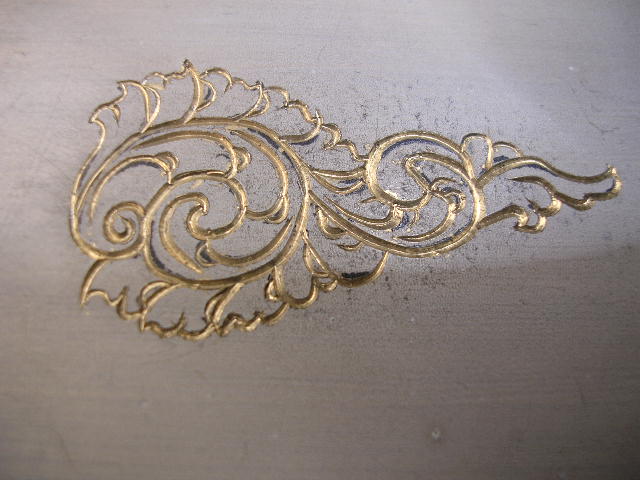 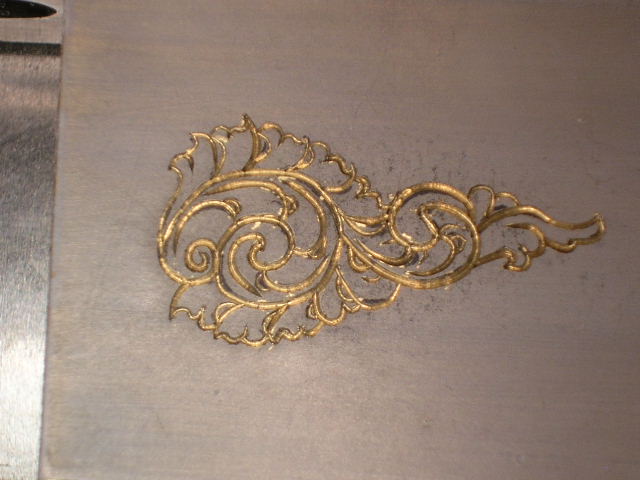 I had to make some stippling tools so I used #30 hardened drill blanks (that fit the airgraver nicely) and a #26 for hammer. Both were ground by using a foredom # 30 hand piece on a 600 then a 1200 and the tip finished with a 3000 grit. They cannot be sharp or they will stick so you have to grind them a little blunt, and polish them if you want them to make a nice stipple. 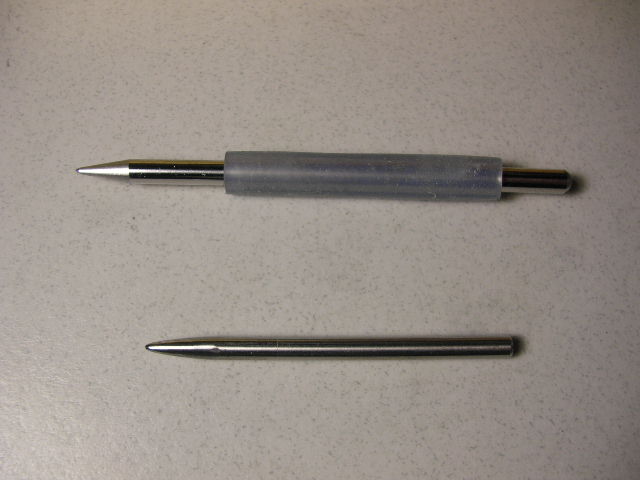  It is nice to have both options both Airgraver and hammer for stippling. Learning from Bryan Bridges you learn both ways which I feel is great. Bryan mainly uses hammer and Chisel and the Airgraver for removal of the parts close to the cut scroll. The Flat chisels used to remove the bulk of the material which gives a nice flat bottom to the removal area for stippling. I didnt get a chance to set up the Ney hurricane rotary tool to give it a try for back round removal but I will use what I learned for now. I did spend a day grinding after a class on back round removal and inlaying and decided to grind some flat chisels for the airgraver. I used a jewelers wire gage to get the right sizes for inlaying wire. Here is a wire gage and the 1/8 inch carbide chisel that I ground. They are wire gages numbers 12, 14, 16, 18,and 20 for now. These are, from what I remember, are very common in jewelry silver and gold wire from jewelers supply companys and have the added benefit of being electrical copper wire sizes for practicing without the cost. 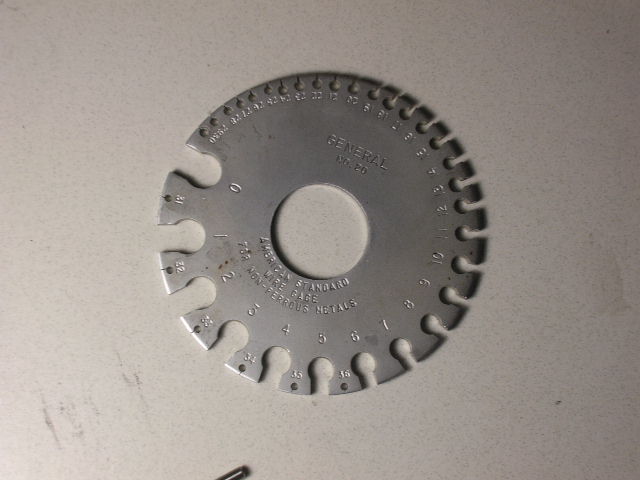 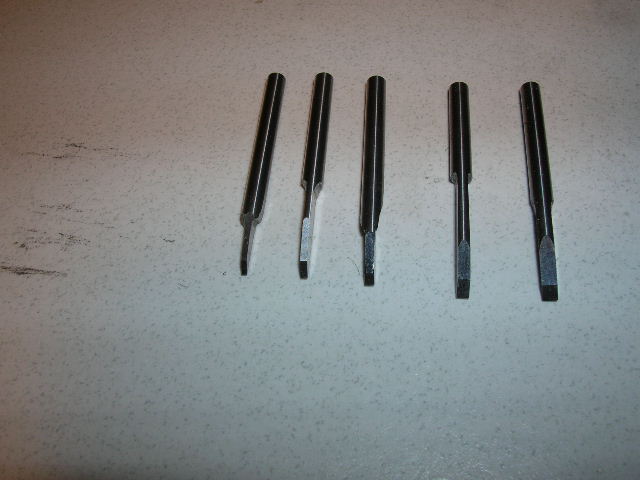 I wanted to do some boarders and decided to experiment a little with the airgraver. I though it would be cool to be able to make a beginners wiggle boarder using the airgraver so I gave it a try with a M42 and a hss. I used a M42 115 lindsay point and a HSS 115 to try a wiggle border. I rolled the graver side to side. Well it worked but broke the point even cutting brass on both the HSS. That wasnt too bright.  I did like the way it looked and how brilliant the cut looked. It catches a lot of light. I then ground a 90 and a 120 with a third heel and relief on a Lindsay point grind with the faceting machine hoping not to break the point on next trial. I also took Steves recommendation to use carbide or carbalt since it leaves a bright cut on non ferrous metals and the metal will not plate on the tip. It seemed to work fine.  Here is a modified Lindsay point. 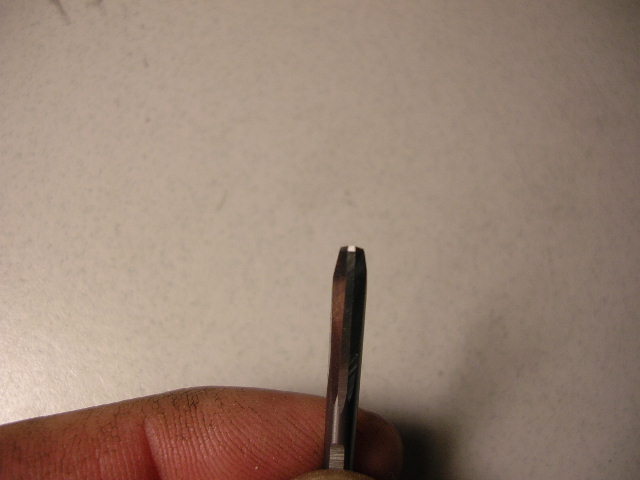 I used one of my old practice plate to test the flat chisels, stipple points and my airgraver wiggle point border. Not the best pictures but you can see the carbide flats cuts very bright, the testing of the stippling points had to be done when grinding them to be sure they worked right and a few bad (broken point wiggles) and some good ones with the modified 3 heel gravers. The thin wiggles were with the 90 and the wider ones are with a 120. 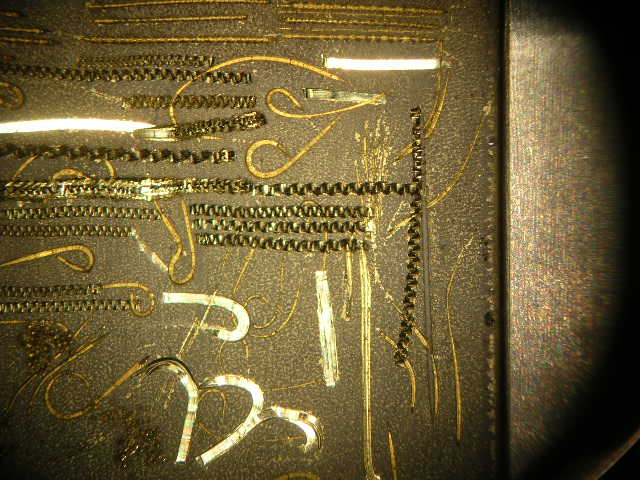  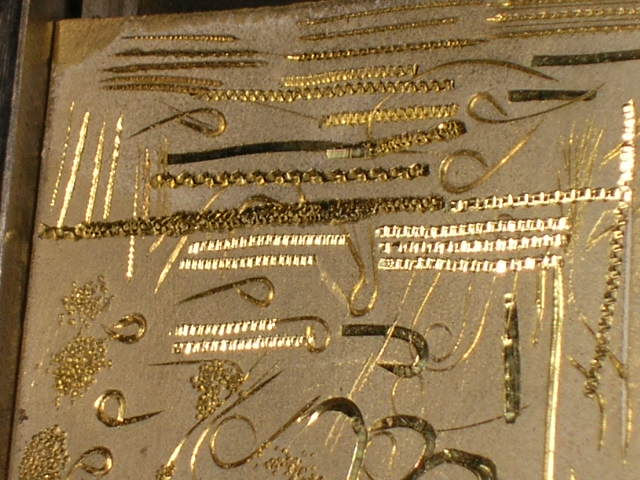 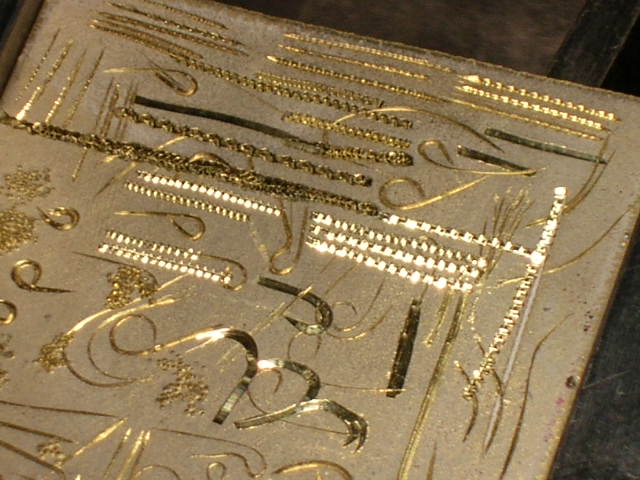 Now that I have more sharpened gravers and stippling points I think I will attempt a Airgraver wiggle border on the English scroll plate I just cut before I move on to the laser transfer plate in the previous post. Suggestions are welcome and thanks for viewing. 
|
|
#4
12-02-2008, 12:49 AM
|
|||
|
|||
|
Well I finally got back to finishing the boarder of the English scroll. I tried to do a wiggle grave with the Air Graver classic and the 3 heel 120 graver I ground and tested.
I did draw a line that I wanted to follow but lo and behold it was much harder than I imagined it to be. The top and the bottom lines were very erratic, one side was wavy and the other was moderately straight. I decided that it really looked bad especially the top and bottom so I thought to just do a 12 gage copper wire inlay and cut the wiggle out. (I needed 12 gage wire to cover most of the bad wiggle). I started with the classic and my 12 gage flat graver to cut the trough for the wire. It went well until I started getting deeper. With the increased friction of going deeper in brass I found that the SS piston in the classic just made the cutting go slow since I was hogging out so much brass. I maybe should have used blue cutting oil or a lub on the cut now that I am writing this but I had the chance to use the Tungsten Piston I bought with the Air Graver. Wow that is the greatest. It cut the trough so much easier than the SS piston. It just ploughed it out with little effort. I have to say if you didnt get one order it from Steve, It is worth every penny, very impressive. Here is the little info sheet that comes with the tungsten piston. 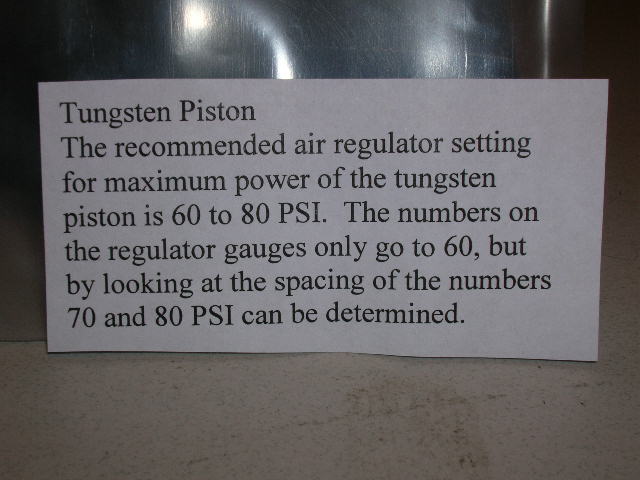 The flat 12 gage carbide from the last post was used to cut the trough with the tungsten piston. It was ground at a 45 degree face, 20 degree heel, sides were ground to have a -2 degrees to the center make room for turning if I had to in the future. I also put on a very small heel on the sides of the face so it would cut cleaner without making a burr at the top of the tough. In Bryan Bridges class he said that you have to do ½ the depth of the wire you are inlaying to make it seat properly. The wiggle was so bad on the top and the bottom that I could not cut it all out even with a heavy inlay of 12 gage wire so there was going to be some gaps. It is a practice plate anyway This is what it looked like after the troughs were cut and the two bad wiggles on the side.  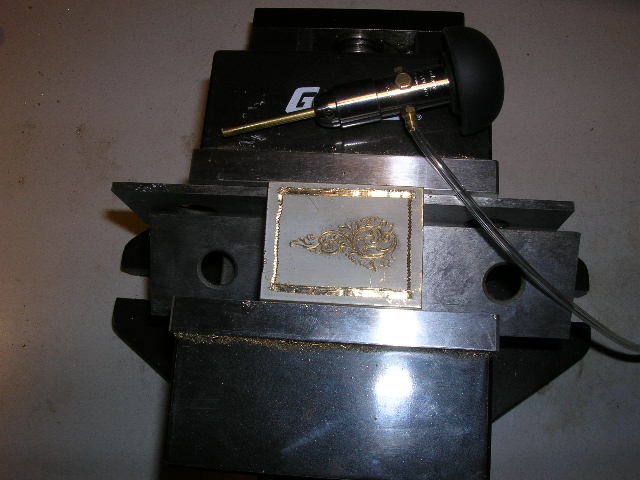 I used a knife graver with a small heel to cut the grooves in the trough to hold the inlay. Knife cutting the grooves instead of going in with a flat chisel and decreases the possibility of raising the surface and when sanded would result in a uneven line in the final inlay. The knife technique was learned from Bryan Bridges. Thanks Bryan. To see it better under the scope I angled a 45lb angle machine vise (4 inch jaws) that I got on Ebay. It is a V.R. Wesson angle vise I found for $ 100.00 delivered!!. It does need to be cleaned up a bit but works fine. :whoo: It is unusual in that it rotates on the base and on the vise and swivels horizontal. The weight is so it can also be used for H&C without moving. I dont have a ball vise that is that heavy. Here are pictures if what I think was a great find and saved the price of a heavy ball vise for now. 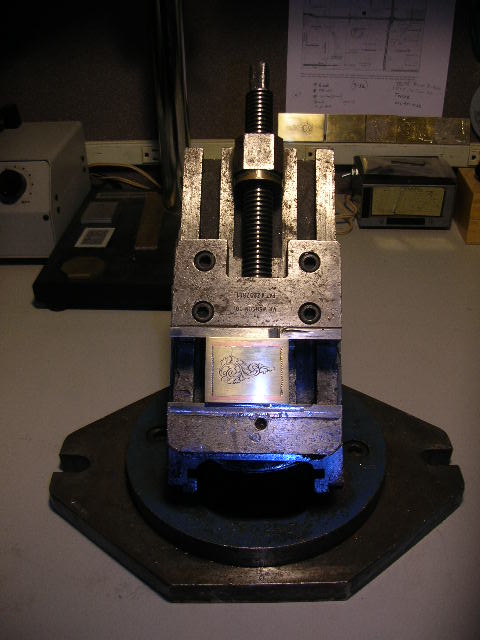 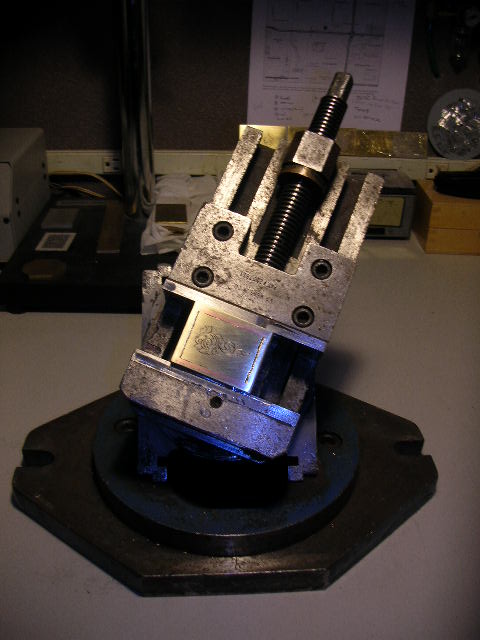 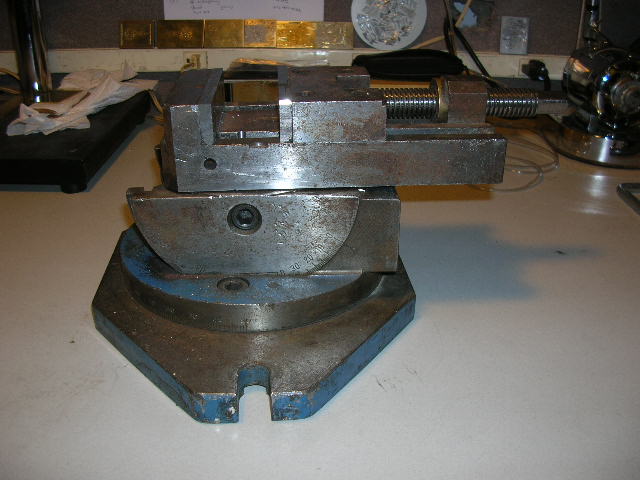 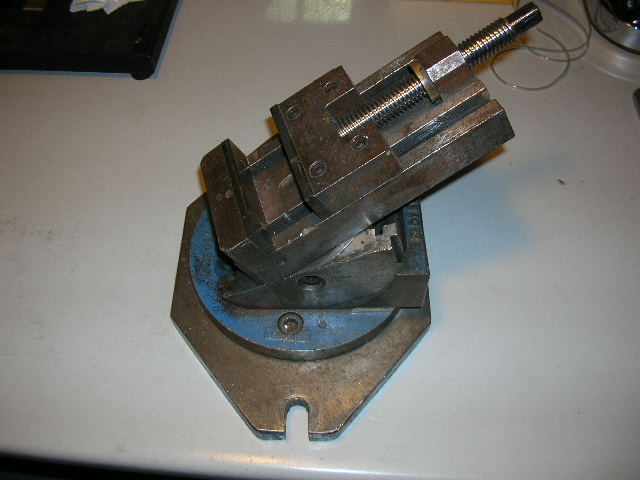 I did cut the groves but slipped and scratched the face of the plate, Very obvious and could not fix that ( it is a practice plate, I seem to be saying that quite a bit) Oh Well. I cut some #12 gage copper wire heated it to red hot and quenched it in sparex. It is a pickle solution used in jewelry making and I used it many times for silver and gold. If you drop your red hot wire into it (non ferrous only) it makes it oxidation free and no fire scale. YOU MUST NOT PUT FERROUS METAL IN YOUR PICKLE!!! Use copper tongs to get out your inlay or you will poison your pickle. Sound like a punch line to a joke?? But true. The wire is now soft and clean so it can be set in the trough. Here is a link for sparex. http://www.grobetusa.com/ProductDesc...rexpickle.html There other pickles you can use or make your own here is a google serch of jewelry pickles. http://www.google.com/search?hl=en&r...+supply+pickle Well I tried to use the Classic with the tungsten piston and a 1/8 inch brass punch. It just wasnt enough to get that big wire flattened enough to hold and it started to be work hardened. I switch to hammer and a ¼ inch brass punch and it seated fine. 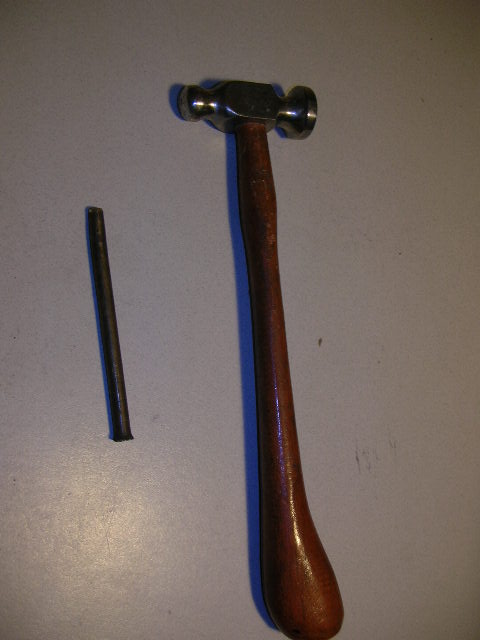 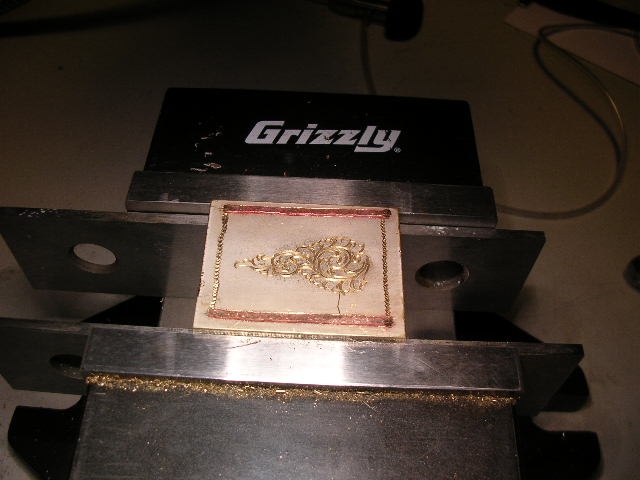 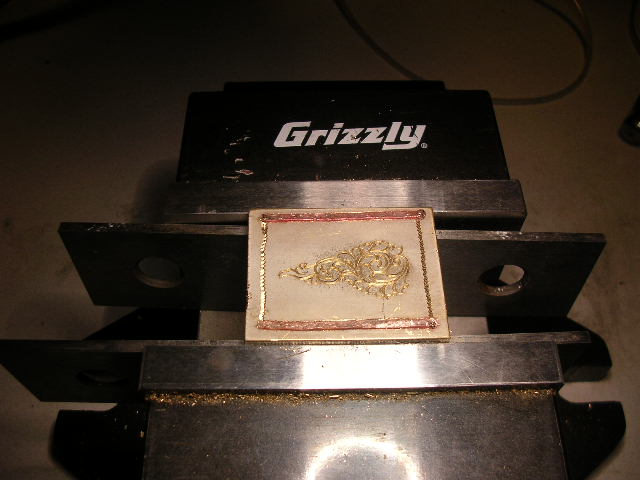 I then filed ¼ of the copper down and then used 400 emery paper and then 600 to get it flush with the surface. As you can see (except for what is the left over gaps from the bad wiggle graving) the inlay has some very nice straight lines. The knife technique for inlays works great.   Well that is my first inlay. This poor plate has taken a beating so I think I am done with this plate. I always look on crags list and Ebay for tools and such and came up with a New Hermes Engravograph GTS and some fonts. The Guy was local and charged me $130.00 for it but I had to take the other TX Engravograph Also called a super Both with motors and could use rebuilding but a great deal. Here is link for crags list in your local area. You will be amazed what people are selling these days and at great prices. http://www.craigslist.org/about/sites Here is a link to a google search on New hermes engraving machines. http://www.google.com/search?hl=en&q...3&oq=New+herme I put a date in the machine and dated this plate 11/30/08 before putting this plate to bed. I used the diamond scratch cutter since the motor needs new brushes.   It is not hand engraving but it did turn out nice for a scratching machine. Feels like cheating.  The pantograph from what I understand can be used to make help make punches or at least lay them out for hand cutting, you can make masters with the air graver and scribe them smaller on plates for hand cutting and more that I cannot even think of or know yet but it is a useful tool it seems. Well that is it for now. I do have to practice more but for 3 months of engraving it is a start.. I didnt get to the laser transfer yet in the previous posts. I hope to get to it soon but may not before this contest ends. I will continue to let you know what else a beginner like me finds as I go. Most obviously I need more practice. Qestions and comments are always welcome. Hope everyone has a great holiday.
|
|
#6
06-01-2010, 11:12 PM
|
|||
|
|||
|
Hi , My name Simon from HK. A beginner of engraving.
Might need help from your guys in future. Thanks
|
|
#8
06-02-2010, 08:37 AM
|
|||
|
|||
|
Thanks for sharing
|
|
#9
07-01-2010, 10:04 AM
|
|||
|
|||
|
HI,
Sorry the Pictures were down for a few days. Well this thread has had over 10,000 hits in this past year and someone ended up hacking my hosting site through the picture links or something like that. I had to take down all the photos and scan and reinstall them. I think everything is back up now after a few hours of working with my hosting site, and uploading the pictures all over again. It is well worth it since it seems to be enjoyed by many which makes me smile  . .Sorry about the problems over the last few days. It should be all good to go now. AirAmp
|
|
#11
08-03-2010, 09:11 AM
|
|||
|
|||
|
Note to Administrators -
Any chance of making this a "Sticky"? It is much too valuable to be lost in the multitudes of posts that are on the forum. Roger 
|
|
#12
09-15-2010, 11:23 PM
|
|||
|
|||
|
Hi all, my name is Steve Lombard. I am a knife maker staying in Cape Town South Africa. I am also a member of the Knife makers Guild South Africa (KGSA). I have done a bit of scrim and am now interested in doing some engraving. My passion is riding a BMW 1200cc on/off road motorcycle into the vast open expanses of this country. Hope to hear from you. Steve
|
|
#13
10-09-2010, 07:20 AM
|
|||
|
|||
|
I am Ernie Peck--born and raised in Kansas--got my first spanking for drawing on the wallpaper--Took a lot of art classes in high school and college--spent a number of years as an enlistee in the Army followed by a lot more as an officer--as a result of this service I learned a great deal about machine tools and weapons--with much exposure to LOUD noises (rifle, machine gun and cannon reports intermixed with unmuffled engines) so I am QUITE deaf.
I entered the computer age kicking and screaming at an older age--so I'm a novice or LESS at using the darn things--I DID learn to use a camera--but I haven't a clue as to how to utilize putting the images on the internet--I have attended a number of NRA summer engraving seminars in Colorado and Oklahoma where I learned how to make points on my tools. I enjoy making fixed blade knives, usually with antler hilts and engraving them
|
|
#15
09-23-2011, 09:49 AM
|
|||
|
|||
|
Hi! I believe that this is a great art specially if it is made on 1911's and other guns as well. I hope to be doing this very soon. Thanks and more power.

|
|
#16
10-23-2011, 09:24 PM
|
|||
|
|||
|
This is a really good tutorial. As a beginner I got so frustrated after seeing my first practice plate. I was going to throw it away. Now I see the value in keeping it for future reference and guage to improvement. Thanks for posting this.
|
|
#18
05-06-2016, 10:26 PM
|
|||
|
|||
|
Great points and directions!
Thank you, Joe
|
|
#19
06-09-2018, 10:07 PM
|
|||
|
|||
|
This was very useful.
Thanks a bunch !
|
|
| Bookmarks |
|
|


