
|
The Internet's Largest and Fastest Growing Engraving Community
Discuss hand engraving using basic to the most advanced methods and equipment
Forum Members: 14,786. Welcome to our newest member, Drake Silversmithing
EngravingForum.com -
Domain since Feb 7, 2003
 Graver Video Conferencing is empty Join now!
|
|||||||
| ENGRAVING TOOLS - Paypal accepted | Classes | Glossary | Feedback | Tips | Sharpening | Bulino | Videos | Forum Policies |
 |
|
|
Thread Tools |
|
#1
 06-09-2007, 08:57 AM
|
||||
|
||||
|
I recenlty completed a Parker Brothers Double 20 Ga. that included a multi-metal inlay of the client's Brittany, his very favorite hunting companion! The client was specific about his dog and I created the original art from a selection of photos that he supplied. I created the finished inlay using five individual pieces of metal cut to fit the various inlay cavities, i.e., "An Engraving Puzzle."
I used 24K gold and Argentium Sterling 20Ga sheet for the inlays - cut from the sheets with a jeweler's saw.. The attached photos (these will be entered soon) show the progression of the work from the initial layout on the reciever through the complete inlay. You'll see that the sequence had me doing the silver material first. I do that because the Silver work hardens and I need to be sure I have it fully set before working in the softer gold. Inlay cavities are cut to a depth of about half the material thickness and the teeth are raised prior to setting the inlay material. Once the inlay is set, I removed the background from the vignette area to achive an illusiuon of a fully raised inlay. The Brittany was completed with both fine-line and bulino detail. The Parker 20Ga. will be finished in French Gray with the background inked for contrast. In advance of the equipment questions that will surely arise, the device I use for holding down inlay material was manufactured by Ray LaTerneau (maker of the LaTerneau Block). You'll also see that I'm using my John Madole "Pilot Wheel Engraver's Block." In case you're unfamiliar with block, Joh Madole made these for a short time before his death- they are an engraver's dream and I'm sorry everyone can't have one! The entire piece of work was done with the Lindsay Palm Graver. Cheers, enjoy the photos! cheers2: 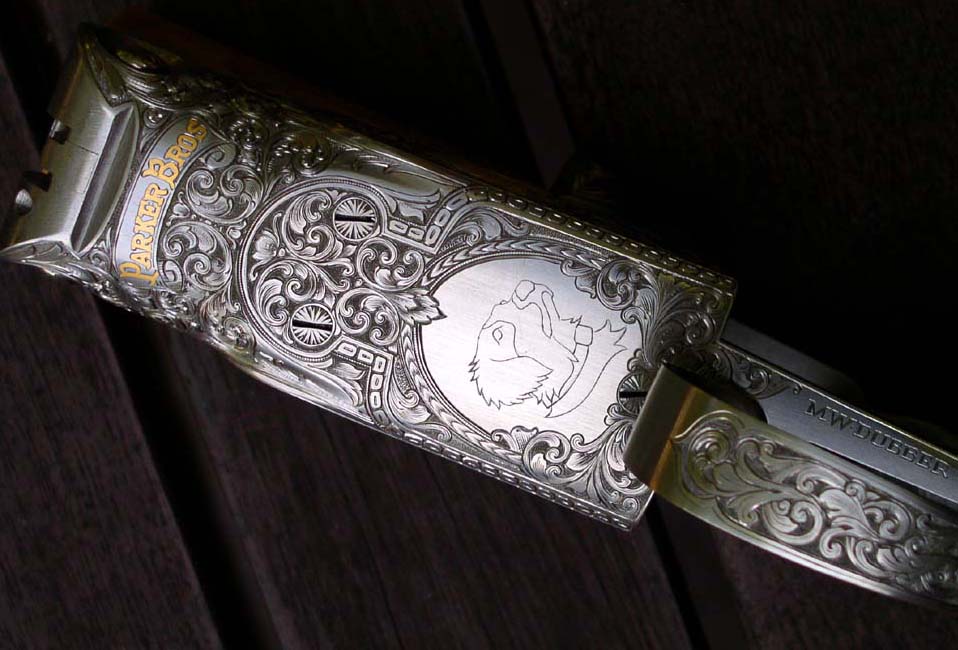 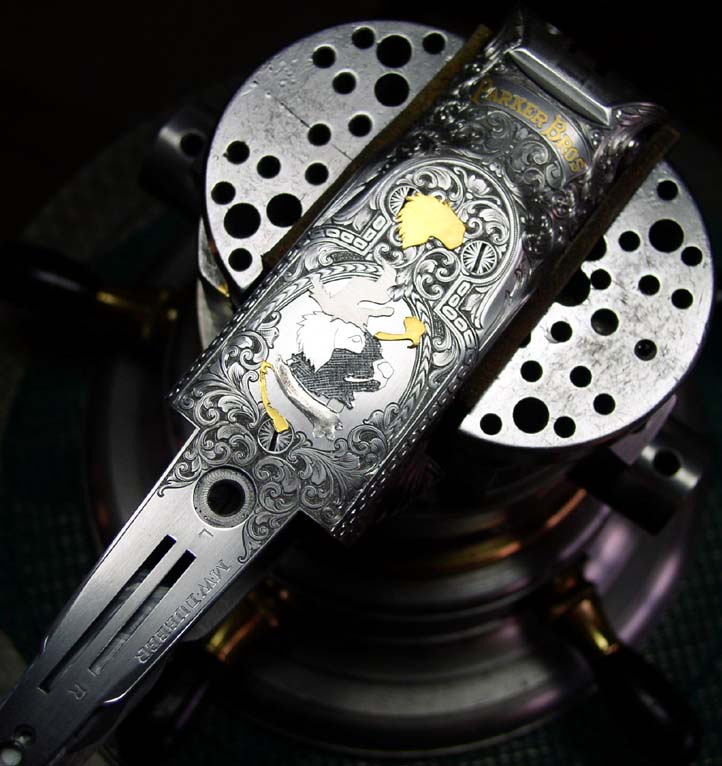 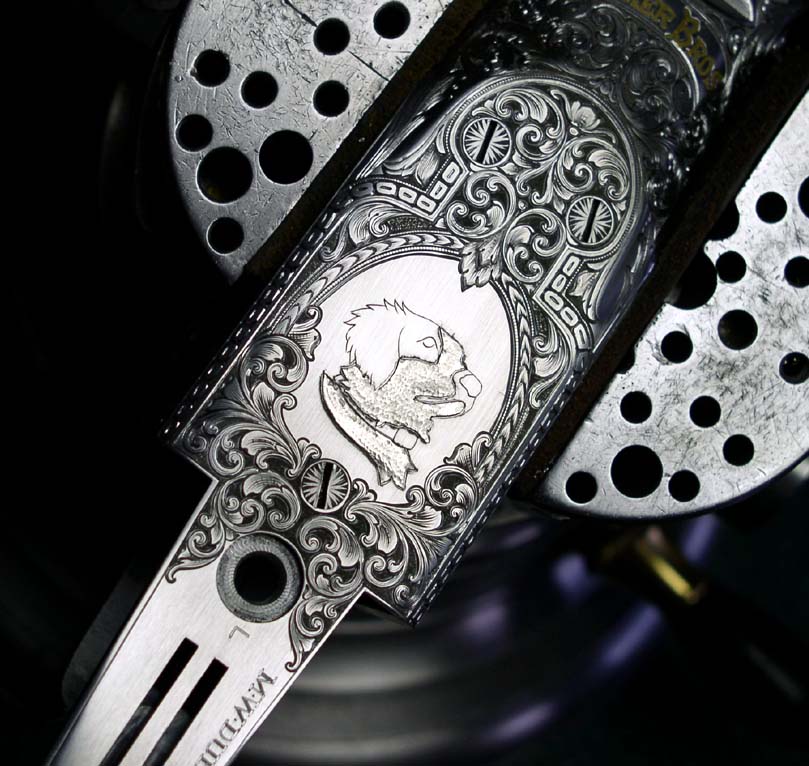 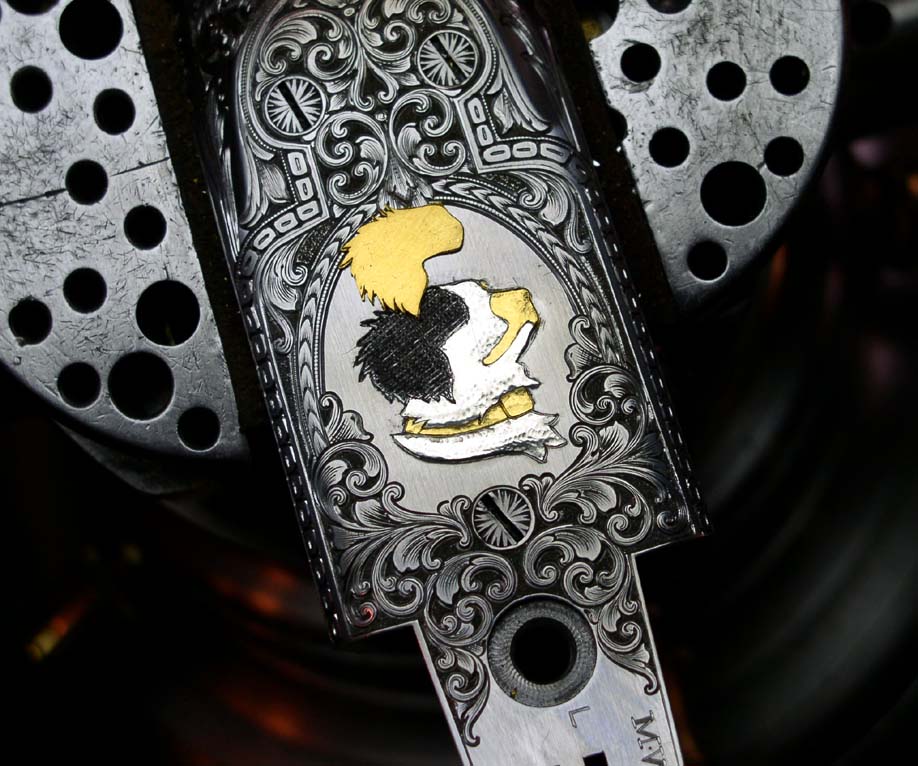 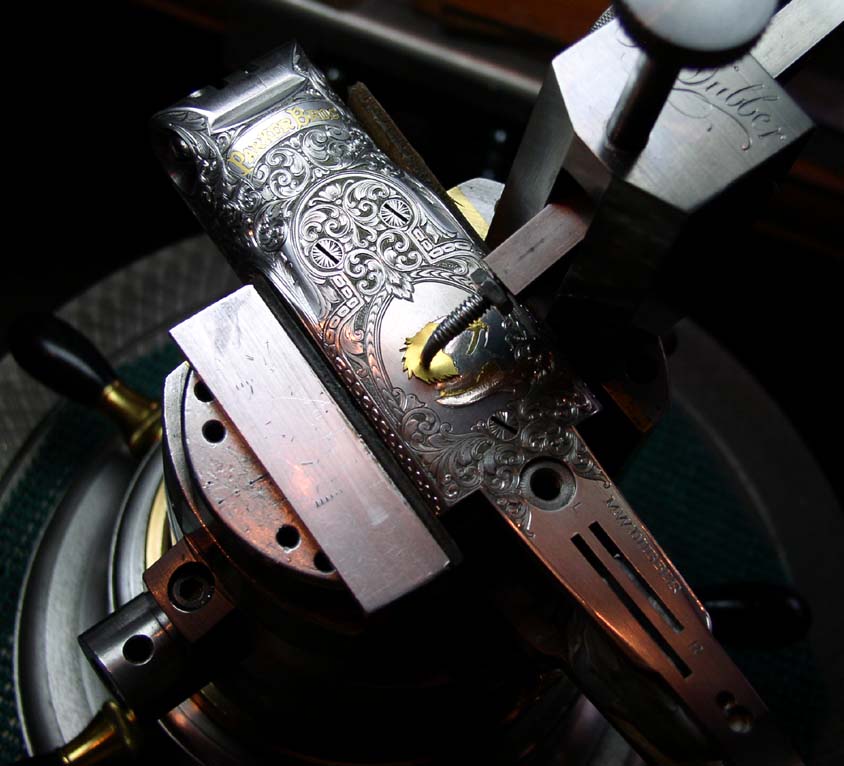 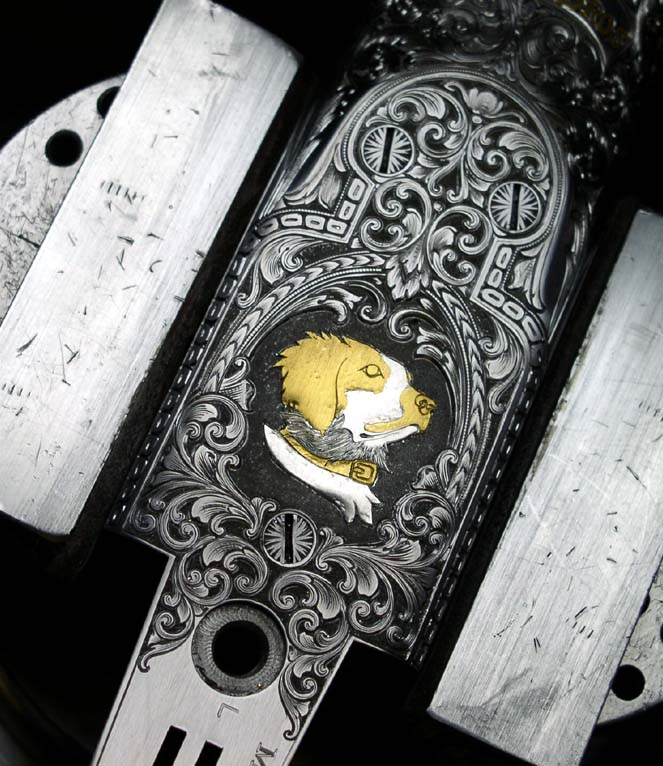 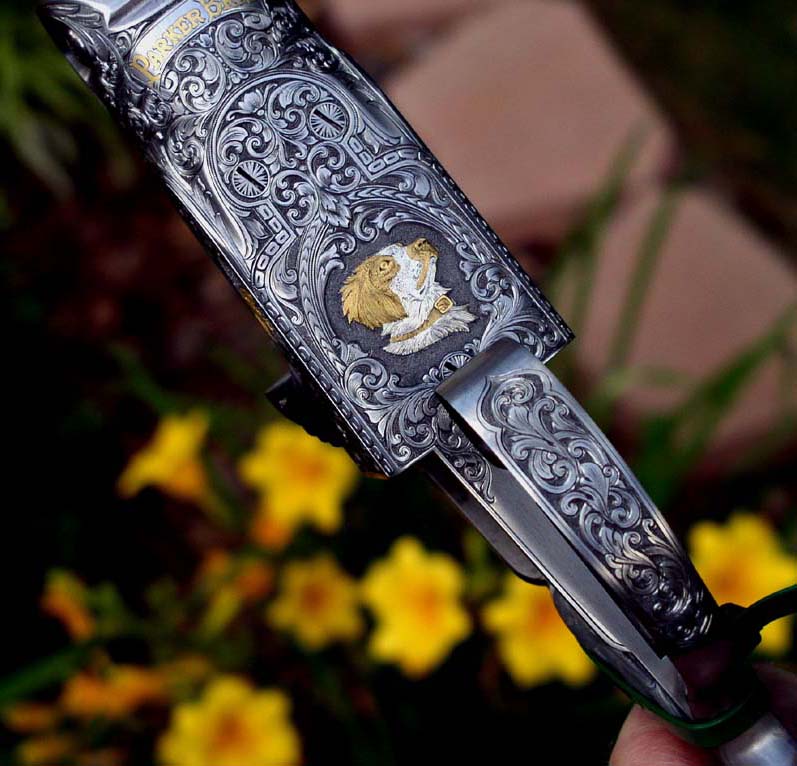

|
|
#2
06-09-2007, 09:30 AM
|
||||
|
||||
|
That is stunning!
I like the vice too. What is the arm on the vice in the 5th pic? Awesome work. Cheers, Alex Ptak
|
|
#3
06-09-2007, 12:25 PM
|
|||
|
|||
|
Beautiful piece of work Mike.
Thanks for taking the time to show it to us.
|
|
#4
06-09-2007, 03:31 PM
|
||||
|
||||
|
Hi Mike,
Thank you for posting and the sequence photos. Beautiful work! My father and I had Brittany spaniels at one time. Very loving companions. You have captured the look of a Brittany wonderfully.  Steve
|
|
#5
06-11-2007, 07:30 AM
|
||||
|
||||
|
Hi Mike. Beautiful job. I have some questions that maybe others are thinking of but didn't ask, or maybe they just already know the answers, or of course they could just be dumb questions. (1) You are using 20 Ga. metal and this seems like pretty thick for inlays (I have been using 24 Ga.). I assume that there is a reason that you use this gauge and I am wondering what it is. (2) How do you anchor the silver inlay to hold it in place before you put in the gold, at the point where the silver and gold come together? (3) Do you clean up the edges of the silver where it meets the gold before installing the gold so you have a nice clean line? Normally when I put in the metal and start pounding it down it starts expanding out all over the place on the edges and obviously the gold part of the puzzle would not fit after that. If you don't clean them up how do you keep them nice and clean for the gold to go in.
I have never done mixed metal inlays and would like to experiment. Thanks!
|
|
#6
06-11-2007, 08:03 AM
|
||||
|
||||
|
Jon:
24 Ga is a bit thick for some applications, but I wanted this inlay to be "raised" and I wanted to do some sculpting prior to adding detail and bulino . As for the Silver; from the photos you'll see that I only inlaid one Silver cavity at one time, i.e., I left separate areas confined to solid edges. That way the silver does not tend to "spread" beyond it's intended fill area. When the subsequent gold areas are mined out and inlaid they fill that new open area to meet with the hardened silver. The metals don't really mix, but the gold spreads to fill all the voids and I've never had any problems develop throug the bluing/finishing process. Inlaying Silver: as long as you've provided a good cavity, raised good hooks and annealed the silver, it inlays as easily as gold (although it does work hardend as it's set.) Be aware that you should use "fine" silver, not Sterling silver. I also work with platinum inlays, both solid and mixed, but I use pure platinum, not irratiated (jelwery grade alloy) platinum.
|
|
#7
06-11-2007, 09:56 AM
|
|||
|
|||
|
Hi Mike,
Great work! I think you meant platinum/iridium jewelry alloy? Just finished a job inlaying palladium... didn't like it much, but it can be done. The object was to save some money. In the end it cost the customer about the same as platinum would have - for the extra work. Brian
|
|
#8
06-11-2007, 11:31 AM
|
||||
|
||||
|
Thanks Brian, you are correct, it is irirdium.
I've been invloved in the jewelry business for about 45 years now - the old term was "iradiated", probably meaning it was platinum with added iridium content. At least that's what I learned -although it was probably incorrect even back then?
|
|
#9
06-11-2007, 06:32 PM
|
||||
|
||||
|
Mike
Thank You for the excellent learning experience and the work is fantanstic. Thanks Again Dave
|
|
#10
06-11-2007, 10:13 PM
|
||||
|
||||
|
Thanks Mike. I went back and studied your photos some more and I think that I have it. I think that I will give it a try tomorrow with some silver and copper (my practice metals), although with something a bit simpler for start. Maybe a Yin Yang or something. Jon
|
|
#11
06-12-2007, 05:28 AM
|
||||
|
||||
|
Go for it, Yin and Yang will provide good practive! I suggest excavating and inlaying the copper area first. Then excavate the silver inlay area, exposing the mating edge of the inlaid copper - then lay in the silver.
|
|
#12
06-12-2007, 06:56 PM
|
||||
|
||||
|
Well I went out to the shop today and played some with the inlay. I must say that even though I saw what you did, I was a little skeptical that the two metals would provide a clean line. I was pleasantly surprised at how clean and crisp the lines were where the two metals (copper and silver) came together. I had been wondering for some time how that was done and now I know. My practice plate even passed the "drop it on the floor and see if it pops out" test. Thanks much for this helpful thread. Jon
Last edited by Jon C. Dake; 06-12-2007 at 07:03 PM.
|
|
#13
06-13-2007, 07:21 PM
|
||||
|
||||
|
I'm happy that your metal-to-metal exercise was successful! These techniques, once illustrated, are really not so mysterious - and it's likely that anyone who is willing to apply themselves to the art can do them.
|
|
#15
06-14-2007, 08:06 AM
|
||||
|
||||
|
I'm gonna have to pay you another visit and learn how to do all that. Hell, I may just move up there, it's gettin' hot down here and it's only June.
Great work Mike! 
__________________
"If one needs a tool, and does not acquire it, they end up paying for it, but not having it." - Henry Ford
|
|
#16
06-14-2007, 11:37 AM
|
||||
|
||||
|
Sure, come up anytime, but it's hot and dry up here.
|
|
#17
06-17-2007, 11:15 PM
|
||||
|
||||
|
Fine piece of work my old friend...
__________________
Barry Lee Hands www.barryleehands.com "Critics gather, they discuss aesthetics, Artists gather, they discuss turpentine. . ."- Pablo Picasso
|
|
#18
06-18-2007, 05:30 AM
|
||||
|
||||
|
Thanks Barry - and in regard to your own Damascened Sheep, that was my inspiration to to post my Brittany!
|
|
#19
06-18-2007, 06:44 AM
|
||||
|
||||
|
Quote:
__________________
Barry Lee Hands www.barryleehands.com "Critics gather, they discuss aesthetics, Artists gather, they discuss turpentine. . ."- Pablo Picasso
|
|
#20
10-25-2007, 01:41 PM
|
||||
|
||||
|
Quote:

|
|
#21
11-02-2007, 01:34 PM
|
||||
|
||||
|
Have you ever considered doing this for a living?
Awesome cutting. Care to do a artist point of view about the design process on the scroll patterns. How do you begin, where does the patterning come from, is it a traditional shape mass per gun style Keep in mind having read and looked at 1000's of scrolls the concept still doesnt seem to be one that I can figure out design wise So aside from the obvious and the main lines do you just let it come and see where it goes or is there a logic to it all Thanks in advance steve
__________________
CoinCutter
|
|
#22
11-06-2007, 09:14 AM
|
||||
|
||||
|
More than applied logic, the application of scrolls in defined areas is an artistic thing. Having said that, and after designing scrolls for many years, there are logical artistic steps that engravers go through everytime they develop scroll patterns - and it gets easier with experience. Scroll patterns, and the way they are placed into the various odd shaped spaces we are given to fill, become a natural extension of our artistic/engraving senses. We have alternative resources in the depths of our minds that allow us (those with years and years of experience) to pick and choose from the many patterns that reside in our artistic portfolio. Give us a difficult shape to fill, and most of us can see it even before we pick up a pencil and draw the pattern. Different engravers approach the same space with their impression of what work best - and it's fun to see how differently each of us solve the problems of drawing gracefull and fitting scrolls. We learn from one another.
The most skilled of all in relating these artistic processes, in my opinion, is Ron Smith. Buy his book(s), study how Ron solves the problems of filling odd spaces with beautiful scrolls, leaves and other artistic patterns. It's the quickest way I know to develop and culture the way you think about drawing scrolls.
|
|
#23
03-02-2008, 12:46 AM
|
|||
|
|||
|
Mike,
Your work is inspiring - I'm going to try this inlay technique now! But I do have a few questions though! :smile5: You said: "Inlay cavities are cut to a depth of about half the material thickness and the teeth are raised prior to setting the inlay material". What shape graver do you use to create the cross-hatch, and can you please explain how the "teeth" work in securing the precious metal? are these teeth pyramid shaped, or is there some undercut involved?? Thanks Henri
|
|
#24
03-03-2008, 12:13 AM
|
|||
|
|||
|
This is a quite wonderful sequence, Mike,
and thank you for posting with beautiful clarity in your pictures! For me, it shows the transition from very precise engineering needed to allow your gold canvas to be set in place faultlessly, allowing the next stage of pure artisty to come to the fore. A generous posting! Rod
|
|
#25
06-03-2008, 10:36 PM
|
||||
|
||||
|
Thanks Mike, I really enjoy your posts so keep it up. I learn something from every one. Keep up the good photos and text.
Neil:yesnod:
|
|
#26
06-04-2008, 05:23 AM
|
||||
|
||||
|
Mike
Incredible work! I have one question about the finished piece. In the beginning you cut the cavities and inlaid each piece. At the end you relieved the area around the inlaid piece to make it stand out more. Did you relieve all the way up to the inlays or did you leave a bit of an outline so you still had something holding down the edge? It looked like you had a great array of teeth under the inlays so you probably don't need the edge holding but I'm curious. I'm guessing that after having been in a cavity by the time you carve away the metal from the outside the inlay is so well fused that there's no edge / little danger of it being able to be pried up from the side.
|
|
#27
06-04-2008, 06:25 AM
|
||||
|
||||
|
I've learned to make my inlay cavity very secure by raising hooks that bite the inlay material as it is set - once the inlay is set properly, I cut the surrounding metal away all the way up to the inlay. I cut so close that I remove the surrounding metal from the surface and leave a small amount of supporting metal to secure the inlay. Finally, a background treatment (dot or point punch) obscures the transition from inlay to background. If you examine it under the scope, you can see that the inlay is still held by a very tiny "dam" of metal base.
Having said that, setting an inlay/overlay securly can be done using several methods, including the damscening technique you can examine closely on Barry Lee Hands' previous tutorial. Barry used much the same setting technique by raising hooks (criss-cross cuts) to bite his Elk inlay gold as it was set. He then cut around the outside of the inlay essentially leaving no outside steel "dam" to hold it place. Success in setting secure inlays depends on the quality of your prep work in creating a good base, keeping your inlay material clean and annealed, and setting the inlay in gradual calculated steps.
|
|
#28
06-04-2008, 05:06 PM
|
||||
|
||||
|
Thanks for the info Mike! :thumbsup:
So at the end, if you look very closely you might see just a little 'ramp' of material around the very base of the 'inlay' (which has now turned into more of an overlay). Sounds like that should protect the edges well enough that it's incredibly unlikely it can be knocked out.
|
|
#29
01-31-2010, 06:23 AM
|
|||
|
|||
|
Beautiful work!
You said you used argentium silver, but then you say to use pure silver. I like the argentium silver in my jewelry applications. Does the argentium silver work harden sooner than pure silver in this application? I love the combination of the metals. Thanks for sharing your methods and beautiful work. Jay
|
|
#30
02-12-2010, 07:12 PM
|
||||
|
||||
|
For clarification - I prefer Arhentium Silver now that it's readily available. In the past (prior to the new Argentium mix) I always used pure (Fine) silver. I find that Argentium and Fine silvers work about the same.
However, if I'm using silver for a muti-color inlay, I always use Fine Silver because it's just a bit brighter/whiter.
|
|
#32
01-21-2014, 10:39 AM
|
||||
|
||||
|
Beautiful work, Thank you for Sharing
|
|
| Bookmarks |
|
|


