
 |
The Internet's Largest and Fastest Growing Engraving Community
Discuss hand engraving using basic to the most advanced methods and equipment
Forum Members: 14,774. Welcome to our newest member, Chuck Norris
EngravingForum.com -
Domain since Feb 7, 2003
 Graver Video Conferencing is empty Join now!
|
|||||||
| ENGRAVING TOOLS - Paypal accepted | Classes | Glossary | Feedback | Tips | Sharpening | Bulino | Videos | Forum Policies |
 |
|
|
Thread Tools |
|
#1
|
|||
|
|||
|
This will be a continuing Tutorial starting with Photoshop continuing through CorelDraw.
A step by step from first idea to finished gun. I will start two threads, one for the Tutorial and the second for Critiques, Comments and Questions. I welcome any and all, Critiques, Comments and Questions in the second thread, that is the only way i have of knowing if I am making myself understood. Please do not Post's to the Tutorial section, My plan is to have separate posts by myself, would be like different chapters. Thanks Ken One of my son's, (Michael) has decided he would like to become an Engraver. So far he has been working on his drawing skills and cutting a lot of practice plates. I have been doing all of his design work and making his transfers. It is now time he has learned to do his own design work and Transfers, hence this Tutorial. You are all welcome to come along. I will use CorelDraw X5, Photoshop Cs2 and PrintKey Pro, as my design/drawing tools. I recently purchased CorelDraw X5 (15) on Ebay for $75.00. CorelDraw X5 (X5 = 15) now has most of the functions of PhotoShop (at least the one's I use). I had intended to start with a Tutorial on CorelDraw and then a little on how I use PhotoShop, but Roland Baptiste came out with his Tutorial and forced my hand, (I will show you how I use PhotoShop) I don't want to interfere with Roland's Tutorial or step on his toes toes in any way. Actually my Tutorial will be very different from that of Roland's. First Roland uses PhotoShop as a drawing tool, (I use CorelDraw for that) and to compose or manipulate a drawing I already have. As soon as I have completed my Tutorial, I am looking forward to purchasing Roland's. And this brings up the Biggest Difference, my Tutorial will be free. Before I start FEGA, has a DVD Tutorial featuring FancyGun (Marty Rabeno) with lots of good PhotoShop information. Phil Coggan also has two Excellent Tutorials, CREATING A GAME SCENE USING PHOTOSHOP http://www.engravingforum.com/showth...1675#post11675 ANOTHER PHOTOSHOP STEP by STEP http://www.engravingforum.com/showth...1972#post11972 You will have to scroll down through some of Phil's Beautiful Engravings to get to the Tutorials. You say you don't have PhotoShop. You might do as I did become a student, all you need is a student body Card and be enrolled in any collage class (night class is OK) then purchase a student edition (same thing just cheaper). If not, check out a Internet Site called ---- 9down.com ----. 9down.com has many examples of Trial software (Trial Software is fully functional Software the owners offer free for you to use, for a limited amount of time) if you are computer savvy you can use some, longer than others (and thats all I can or will say about that). If not do a Google search for Adobe Photoshop Cs2 trial or Tryout You might also try This Link http://www.click-now.net/download/Ad...toshop_CS2.htm In my Tutorial my goal is not to necessarily show you how to make a design but to give examples of the use of the tools I use to make a design. I will cover most of the same tools as Marty and Phil and add a few more I use, plus some I use completely differently. So lets get started. Click on Start,Programs,Photoshop Cs2 and you will be presented with Photoshops opening screen (I hope you have PhotoShop or have obtained a trial copy). For best results you should have Photoshop and this Tutorial both running on your desktop, that way you can run each demo in real time as you view the Tutorial. When you are finished looking at this screen, left click on close Picture0001.jpg 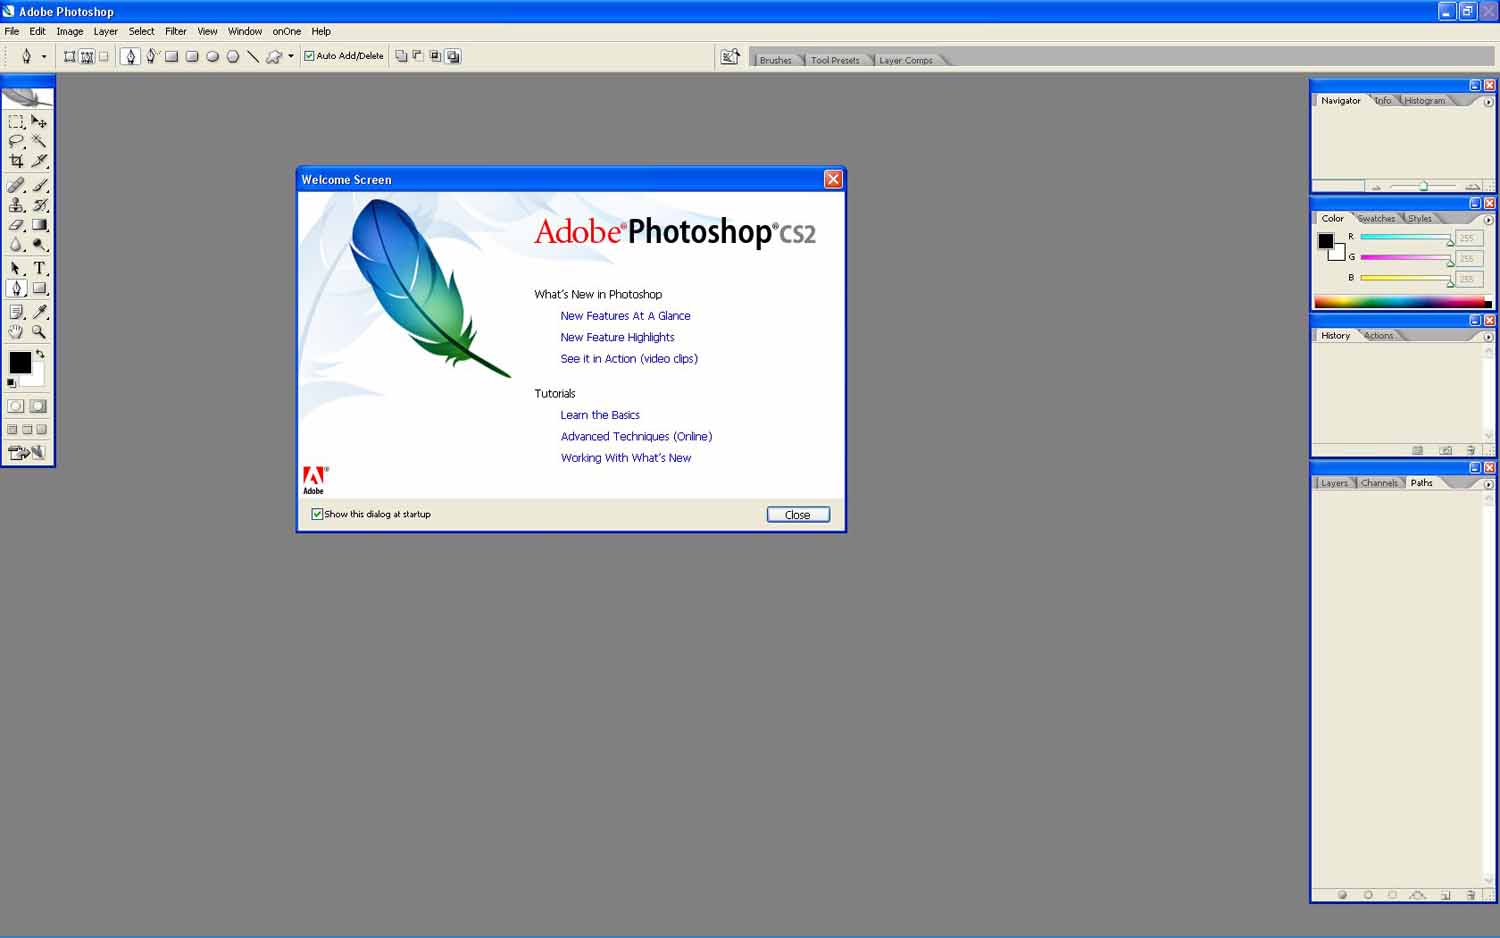 Go to the next picture and click on Window, and another Menu will pop out. At the bottom of the new Menu you will see a check mark on Tools, click on the Check mark to uncheck it. You will see the Tools menu along the left disappears, open window again and click next to Tools and the tools menu reappears. I would recommend you click off and back on each checked box so as to identify what each mark controls, in case you loose part of your Tool Menus or functions you will know how to get them back. picture0002.Jpg 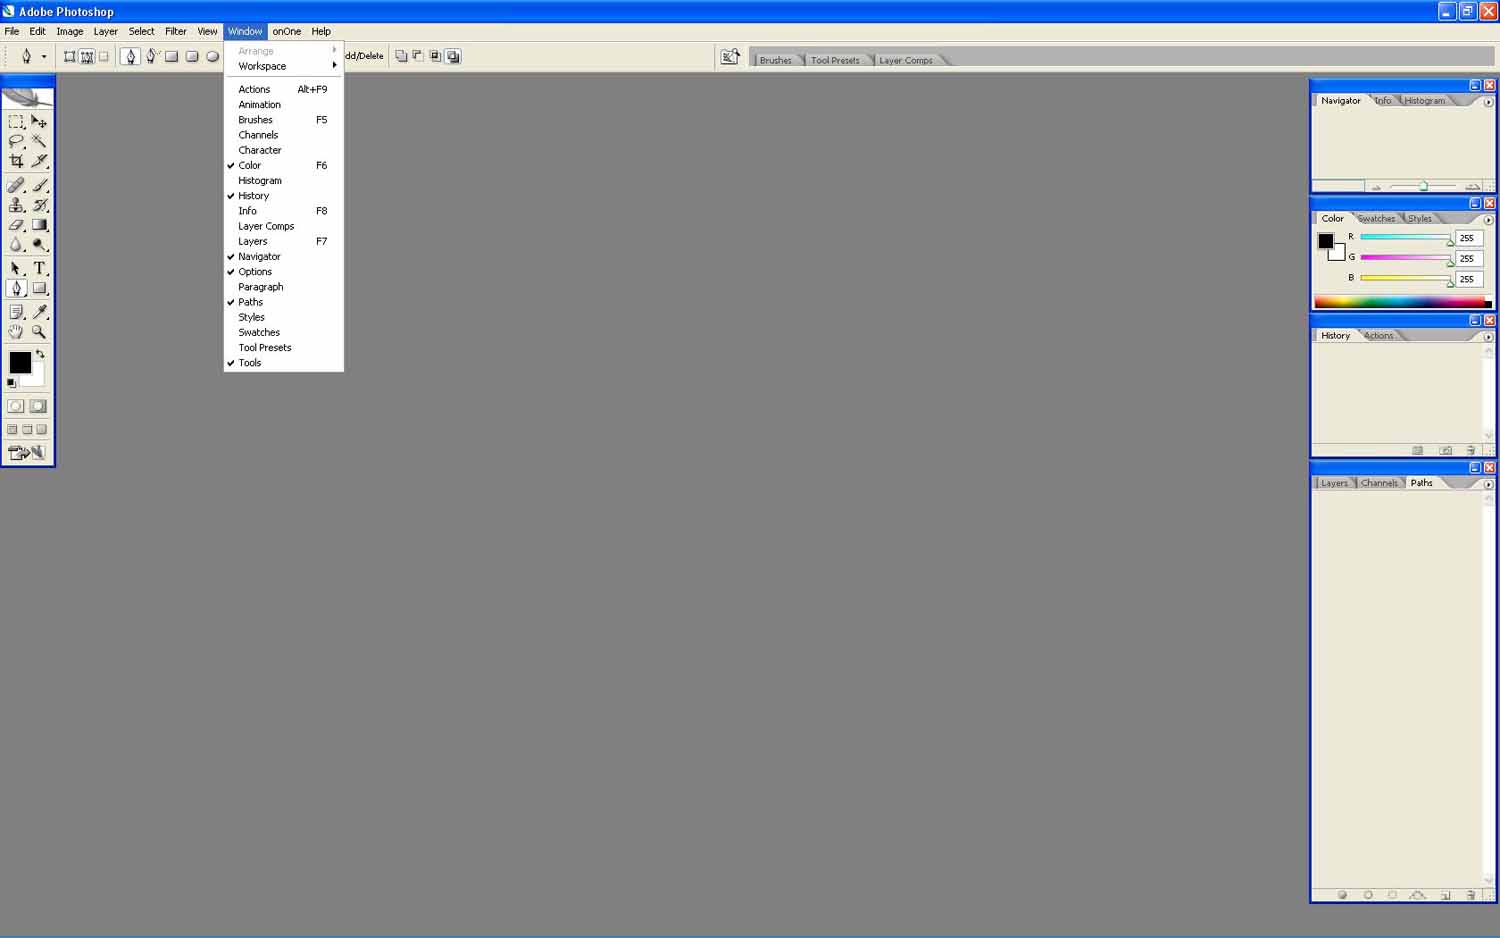 If you get the Menus messed up to the point you can not get them straightened out. Go to the next Tool function , Window,Workspace, Default Workspace and the menus will be back in default positions. DefaultWorkspace.jpg 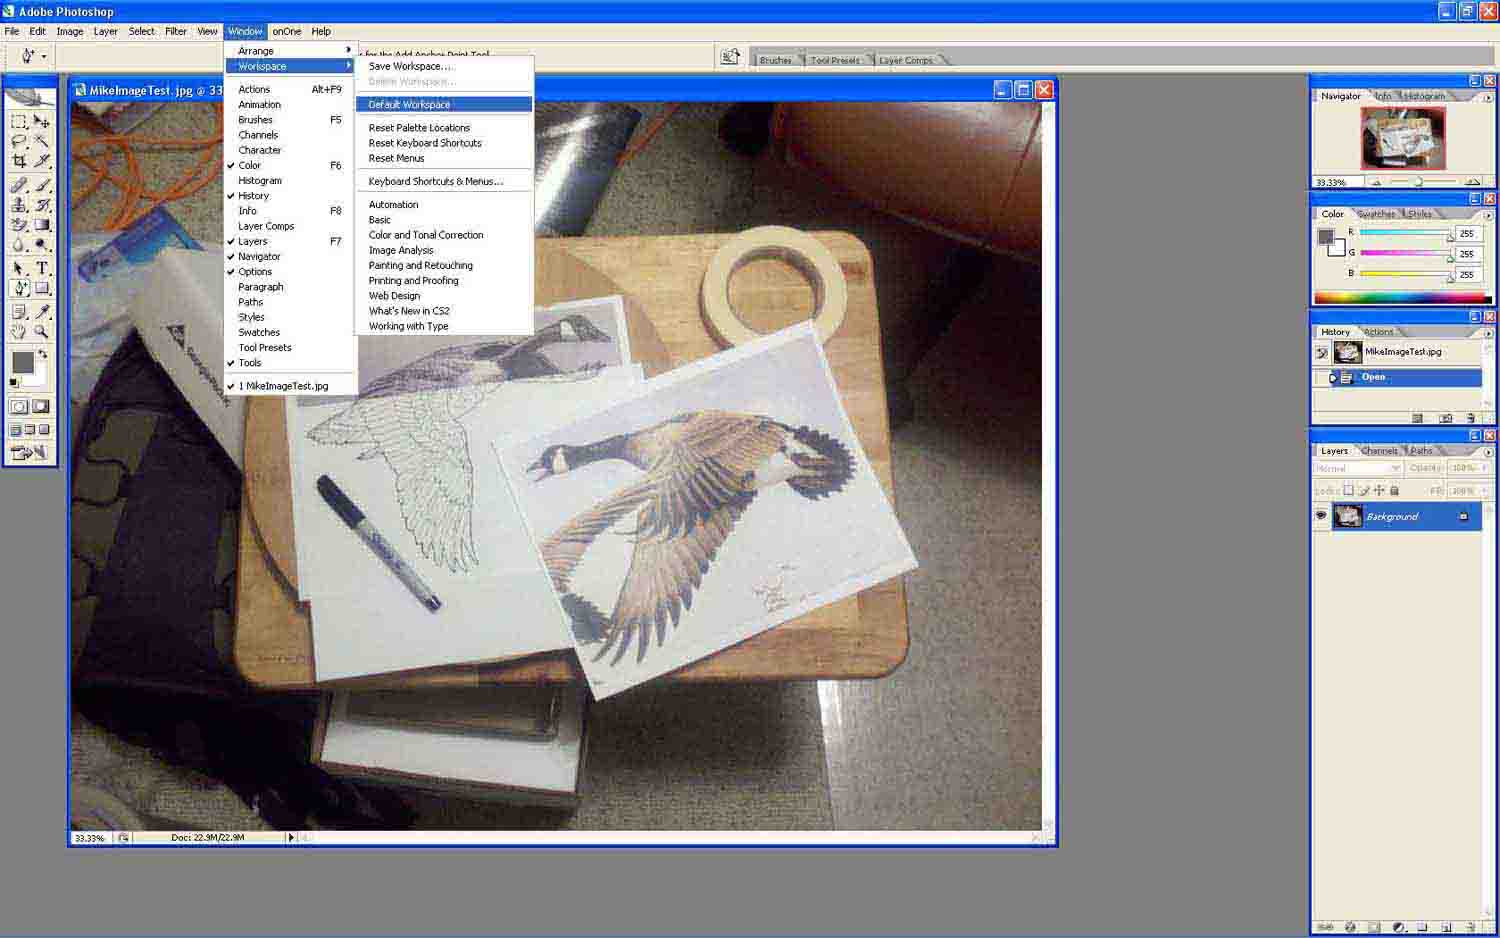 I have gathered many pictures of Ducks, Geese Etc. that can be manipulated to be used in a Bulino project. Picture manipulating Example Lets open a photo I took in my computer room using the camera built in my Droid X Smart Phone. This is a picture of my Lazy Susan drawing board. I purchased one round and one rectangular serving trays and a Lazy Susan bearing at Walmart to make this drawing board, it is not necessary but very handy. I taped all four corners of a picture of a flying Goose to the circular part of the Lazy Susan drawing board. Then I covered the Goose with a clear plastic sheet taped along the top only (so it can be raised). I used a extra fine tip marking pen to trace a outline of each feather on the Goose (it is very important that the outside line of the goose is solid/complete, no breaks). I can then slip a plain sheet of white paper between the picture and the marked plastic to be able to see each line better to be sure I haven't missed something. This picture could stand to be cleaned up a bit (lets get rid of all the background clutter). Picture0003.jpg 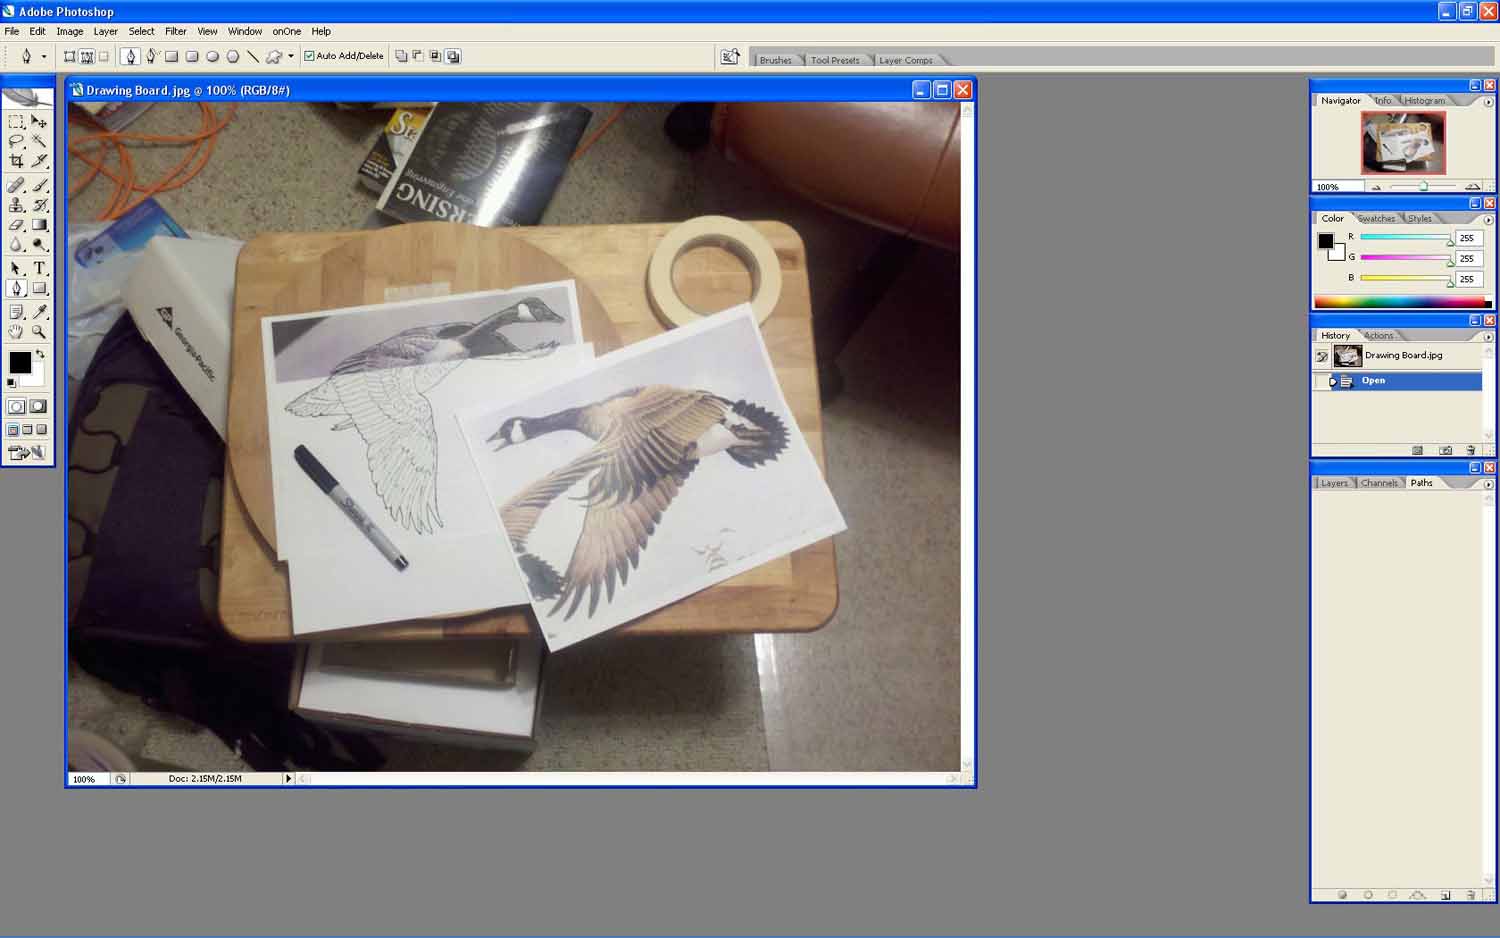 The first Tool we will use is the pen Tool (9th tool from the top) along the left side. Notice a black triangle on the bottom right corner of the Pen Icon, if you click and drag across the triangle another Menu will pop up, make sure the top pen tool is checked (this is how you select the different tools). Picture00031.jpg 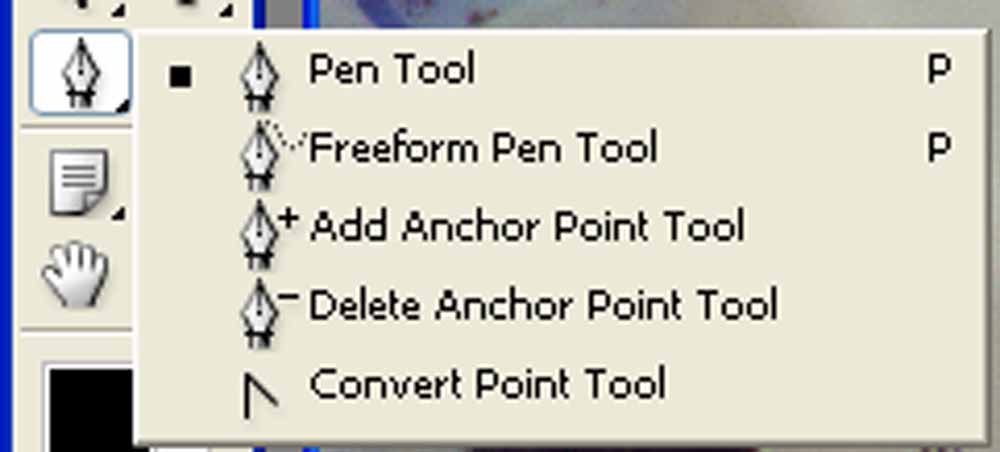 After you select the Pen Tool and return to the Desktop there is really nothing except that small black square you saw next to the Pen Tool to indicate you have done anything (Curser does not change Etc). The next picture shows where I placed each Node with the Pen Tool (click and release, one time at each position). You can start at any one of the positions (I placed a red dot to highlight each node position) go clockwise or counter clockwise as long as you continue in the same direction until you click one more time on the beginning position to complete the encirclement. A line will be laid down from position to position as you place each Node. NodesMarkedRed.jpg 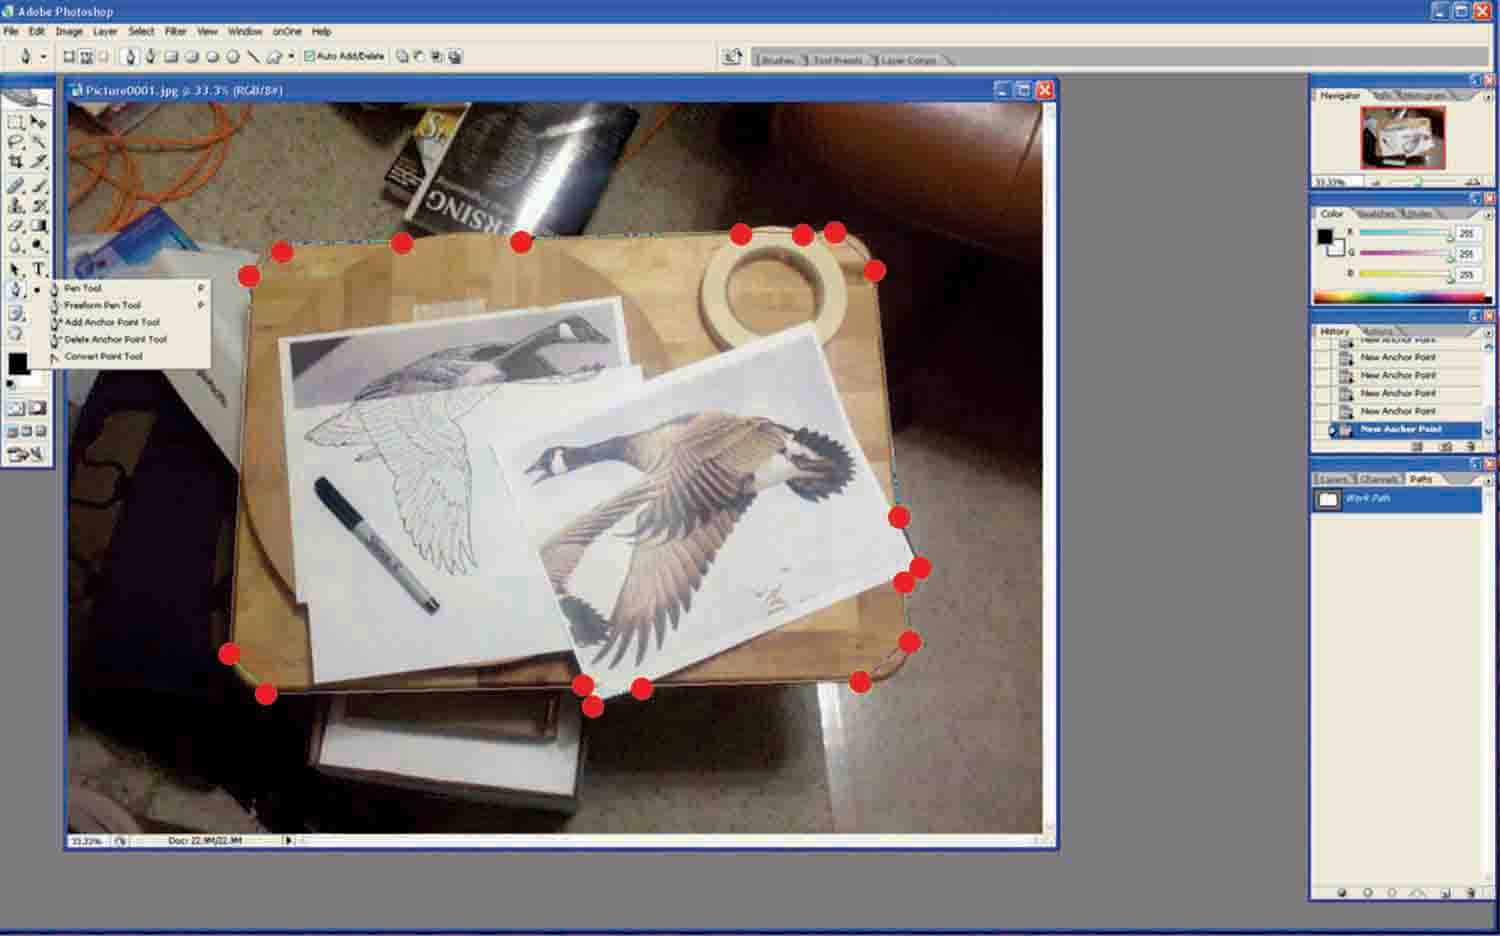 Picture0004.jpg 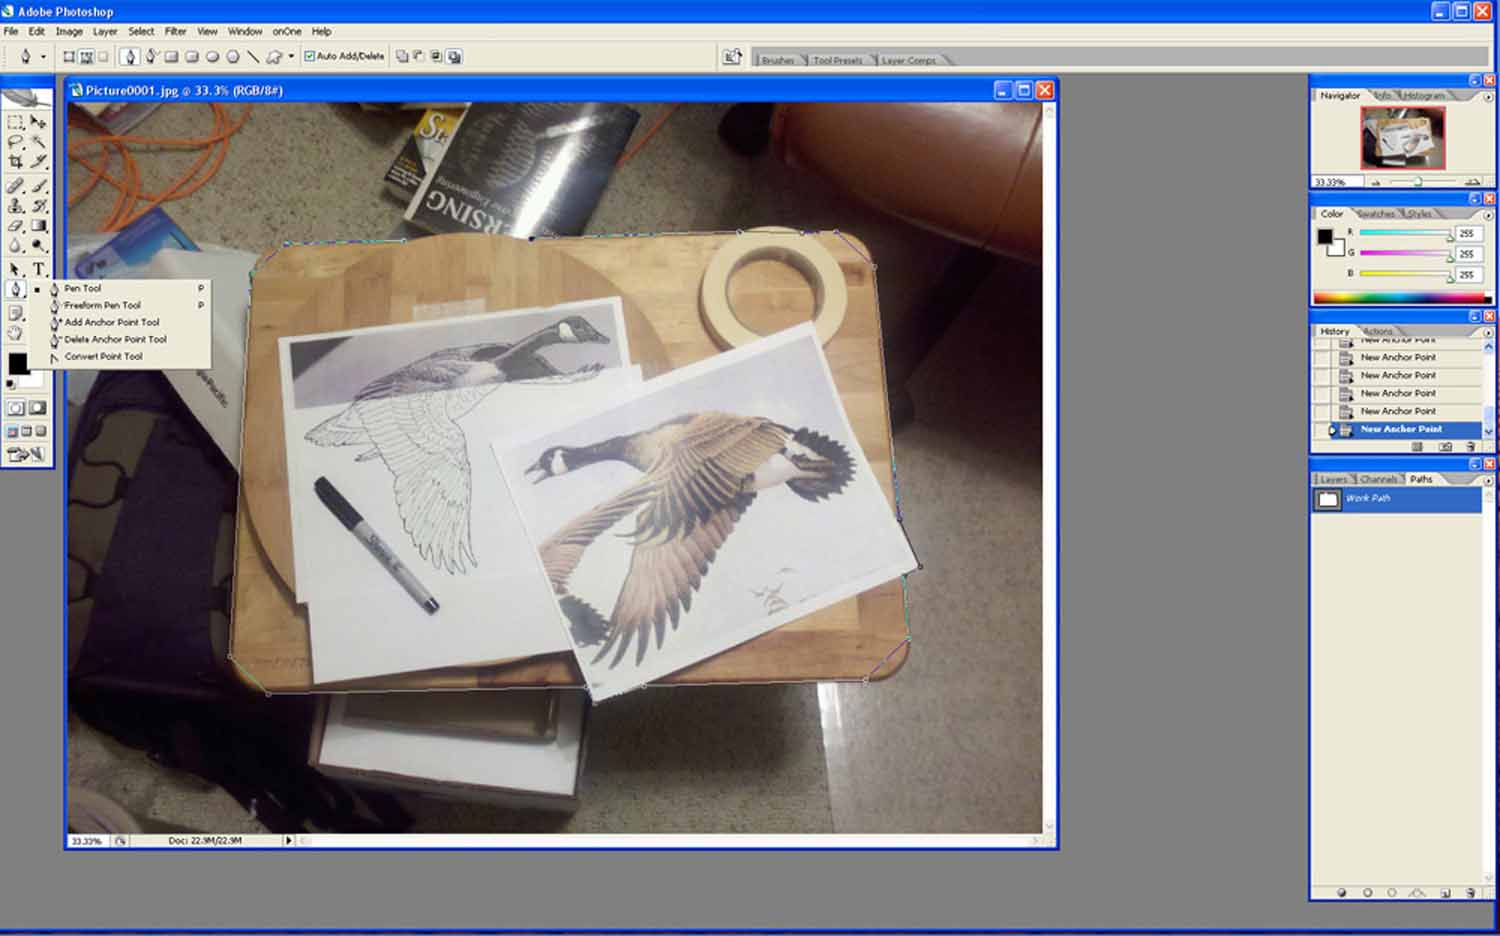 Go back to the picture and start just to the left of the circular part of the Lazy Susan drawing board and Click once and release, this will set a node in place at each point around the drawing Board (using the pen tool). You can see I have gone to the left around the circumference and stopped just on the right side of the curved area/circular disk on the Lazy Susan for you to see better, now go ahead and click on the first point (now we have gone all the way around). Notice how I jumped stright across each of the curved items (I will correct this in a second). A closeup Picture0005.jpg 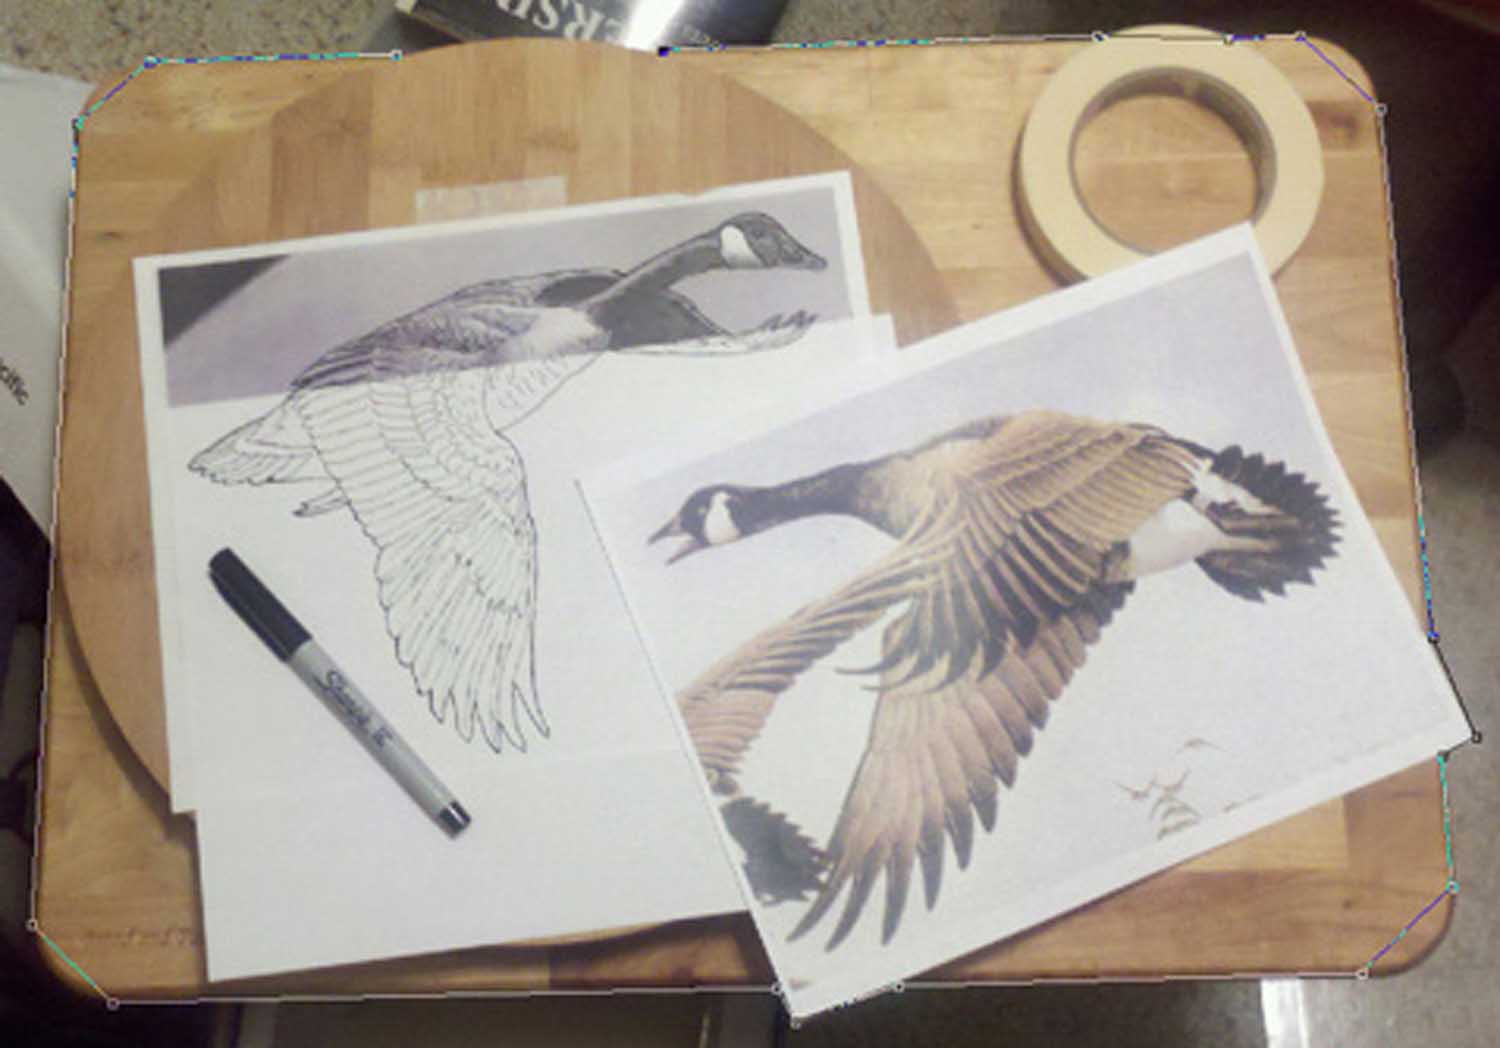 Lets look at a new Tool/Function, The Navigator. Closeup Navigator Tool Closeup.jpg 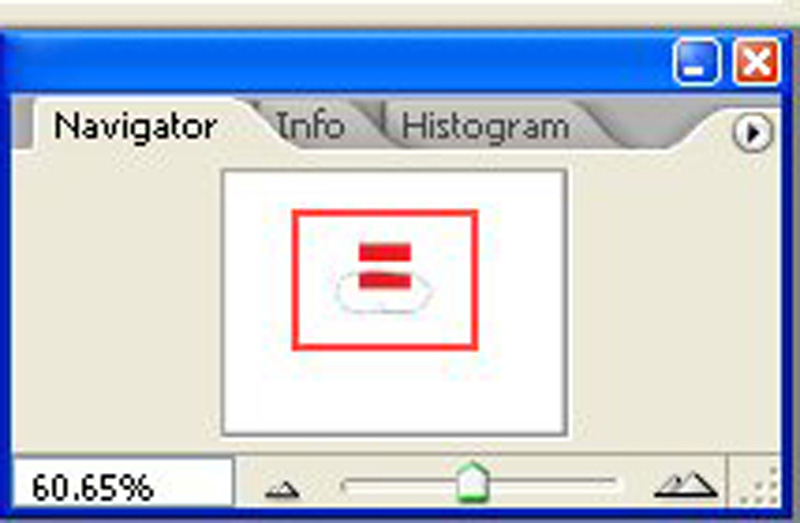 Notice along the Top Right of the next picture, a smaller copy of our picture with a red outline and a slider bar along the bottom. If you move the slider bar left or right the red square will get larger and smaller, but also zooms in or out on our picture. You can then click on the red square and then move it to a portion that will be enlarged. Notice in the next picture how I went straight across the left corner. We will use a new tool to correct this (actually I have let my pictures get ahead of my storyline, I have already corrected the portion across the Lazy Susan). Go back to the Pen Tool Menu and select the Add Anchor Point Tool. Go to the outline section where I went across the left corner and click once and release on the line half way between the two corner points/nodes to add another Node, then click back on the same Node, hold the mouse button down and push the Node up and to the left and stop when the line fits the picture. Picture0006.jpg 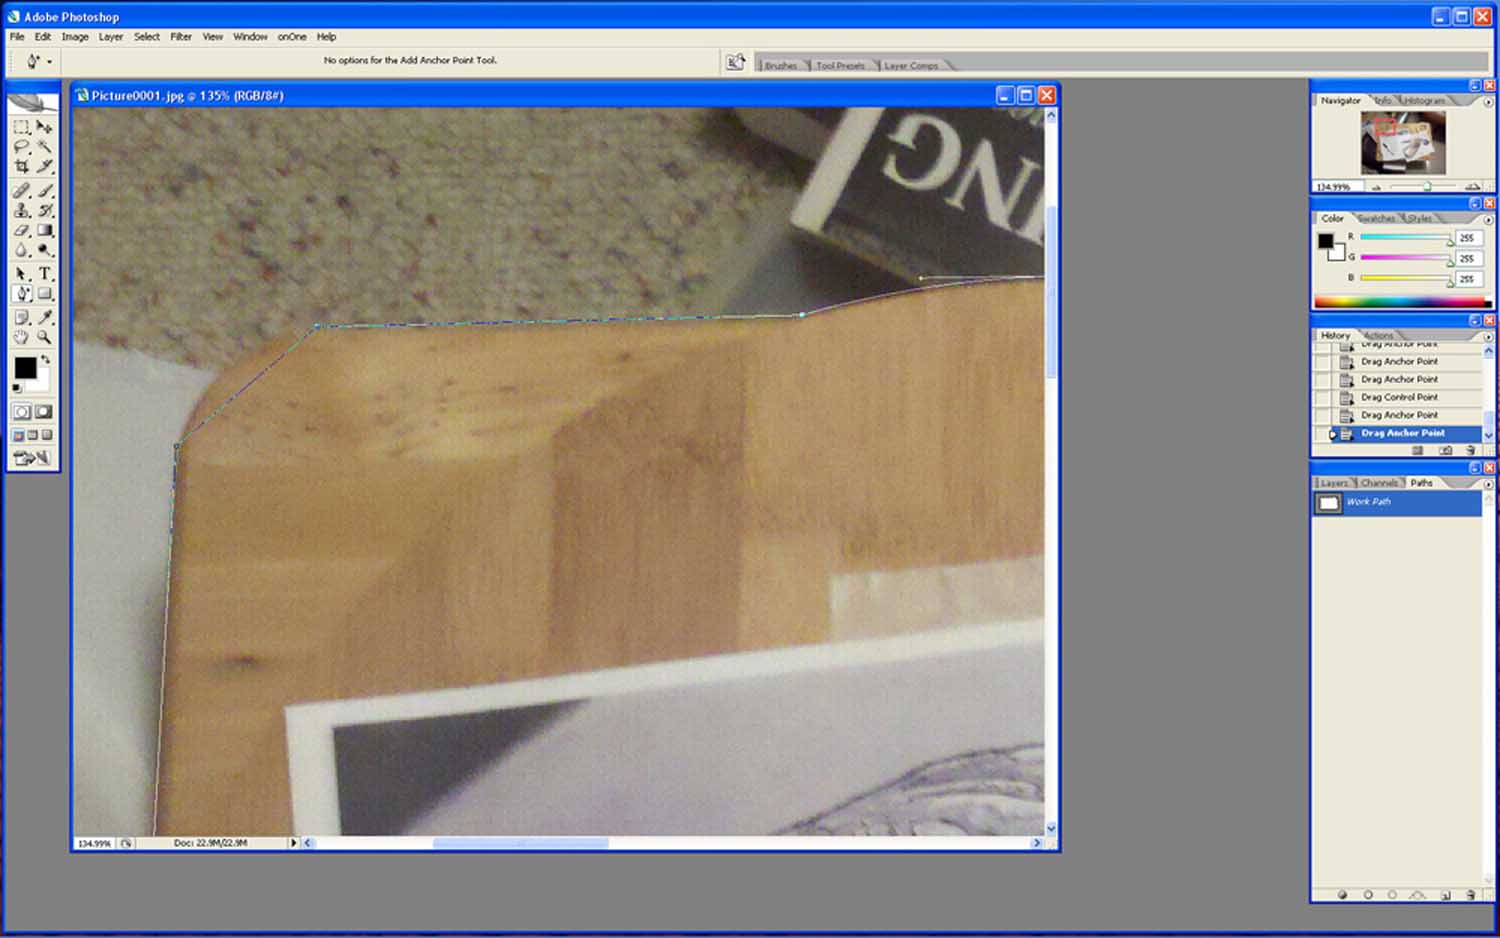 In the next picture I have corrected or adjusted the line to fit the picture. Notice at the top of the masking tape I have just moved the line and these two antenna like things appear, you can click and hold and adjust the line for a closer fit with the two antennas. You can also zoom in and adjust the first Nodes we put down for a closer fit, just by clicking on the node, hold down the mouse button to move any one of the nodes. Picture0007.jpg 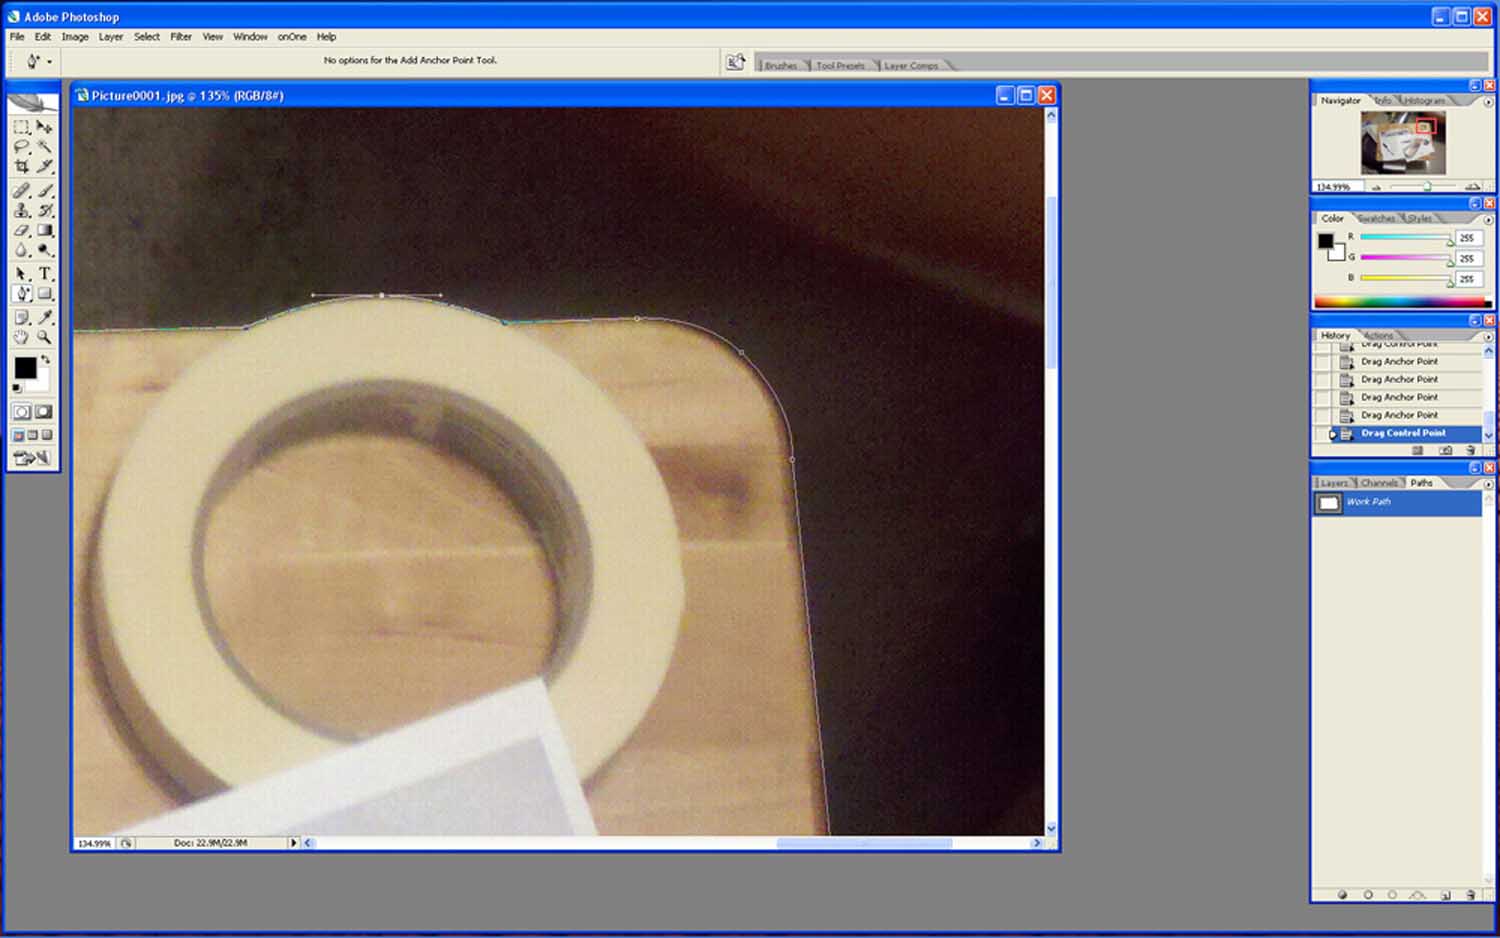 Before we get to far I want to introduce you to probably the most important Tool in the box, and that is Edit Undo. If you make a mistake there are three ways we can fix it. First is Edit/Undo, If you select the wrong tool or what ever, just go to Edit and then Undo, you will Undo one step Backward. Also notice two lines down another function "Step Backward" will do exactly as it says it will step even farther backwards than the one step Edit Undo. The fact that it says Edit Undo Crop is because Crop was the last function used (if Move had been the last Function it would say Edit Undo Move). EditUndoCrop.jpg 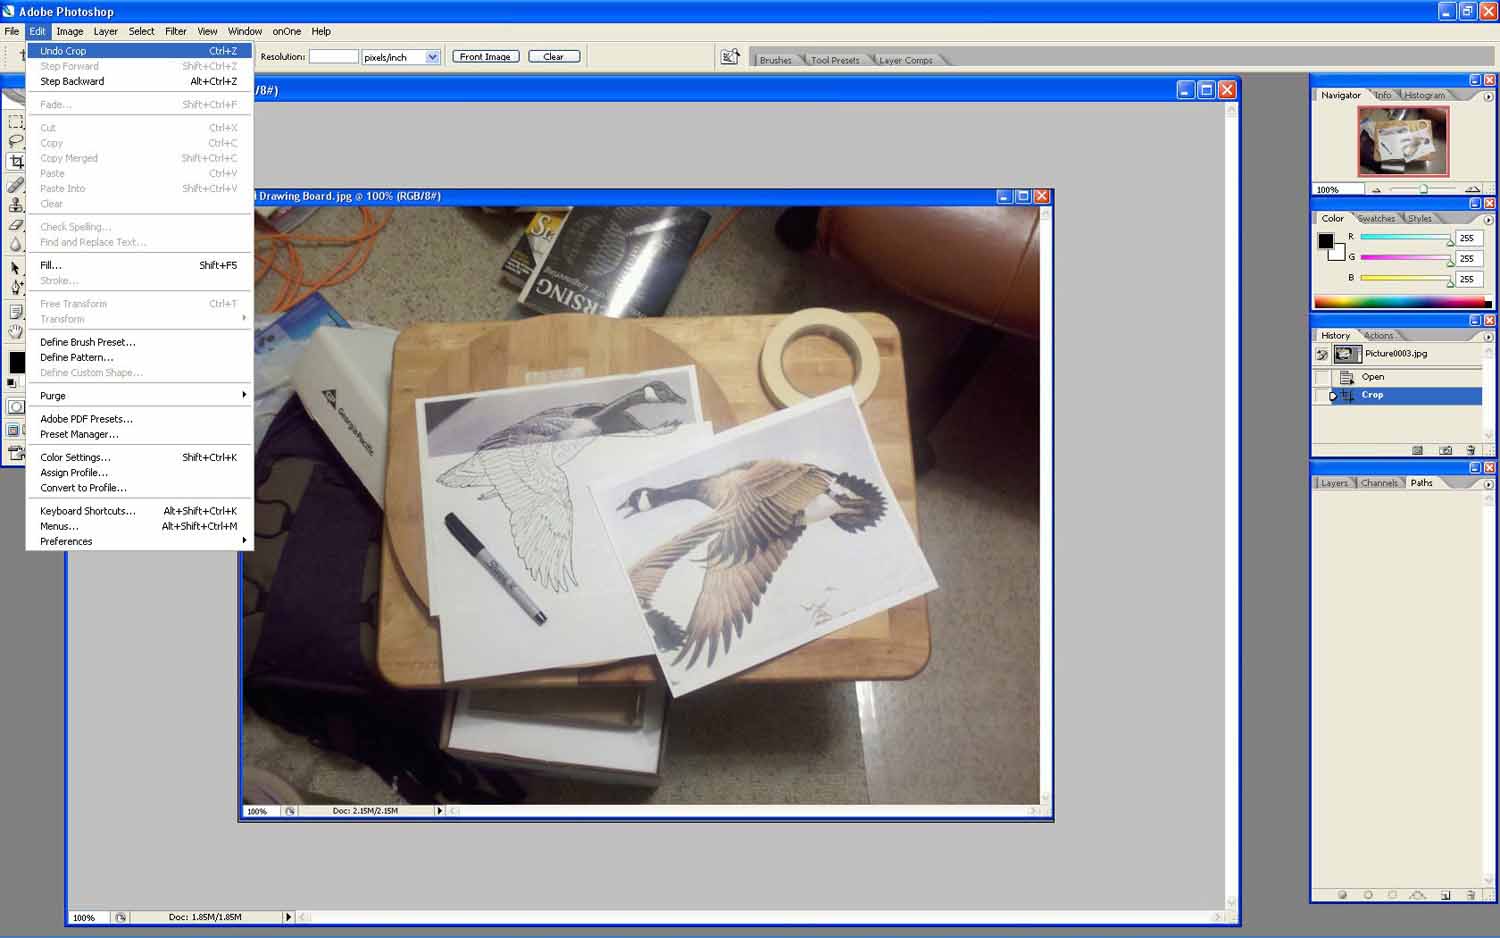 The second Tool is the History Tool, Look to the right side of the next Picture and the third Tool down from the top is the History Tool. Make certain History is selected and you will be able to see each step you have made, maybe the mistake was six steps back, You can Click and hold on the sixth step back and dray down to the Garbage Bin/Can/Pale and all six steps will be erased in one fell swoop. HistoryClosup.jpg 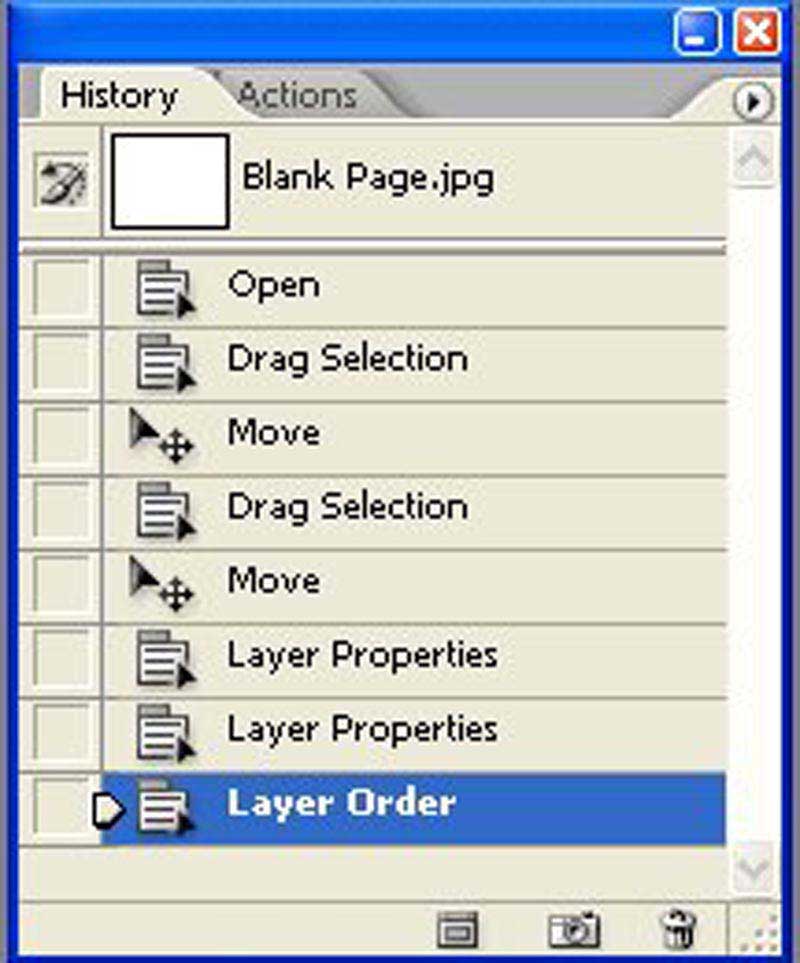 And the third way is one I use quite often and that is, before you make any change to your drawing make certain it is Saved, then if you really mess it up Just quit the program without saving and when you restart you will be back where you started. Once you are satisfied with the fit Picture0008.jpg 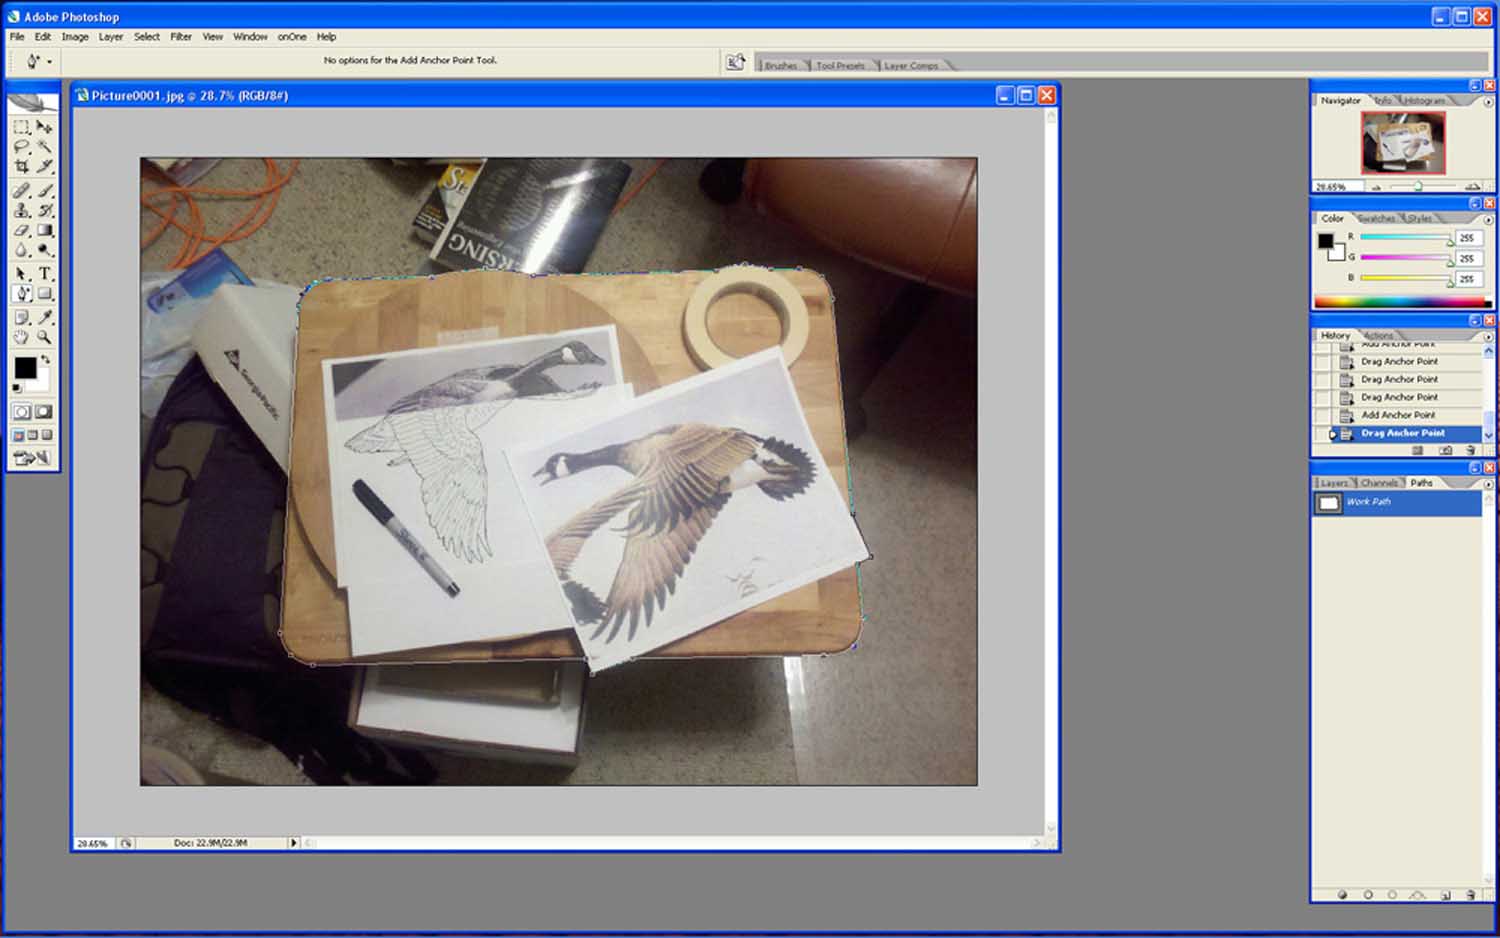 A new Tool/Function Go to the bottom right function, make sure Paths is selected then see along the bottom, the third Tool/Icon from the left is Load Path as a Selection. Click and hold on Work Path and drag down to the Load Path as a Selection Icon and release, and the famous Photoshop so called Marching Ants will appear around the picture. This tell us we have selected the area within the Marching Ants, but hold on, this is not exactly what we want. What we want to do is get rid of all the clutter on the outside of the drawing board. Picture0009.jpg 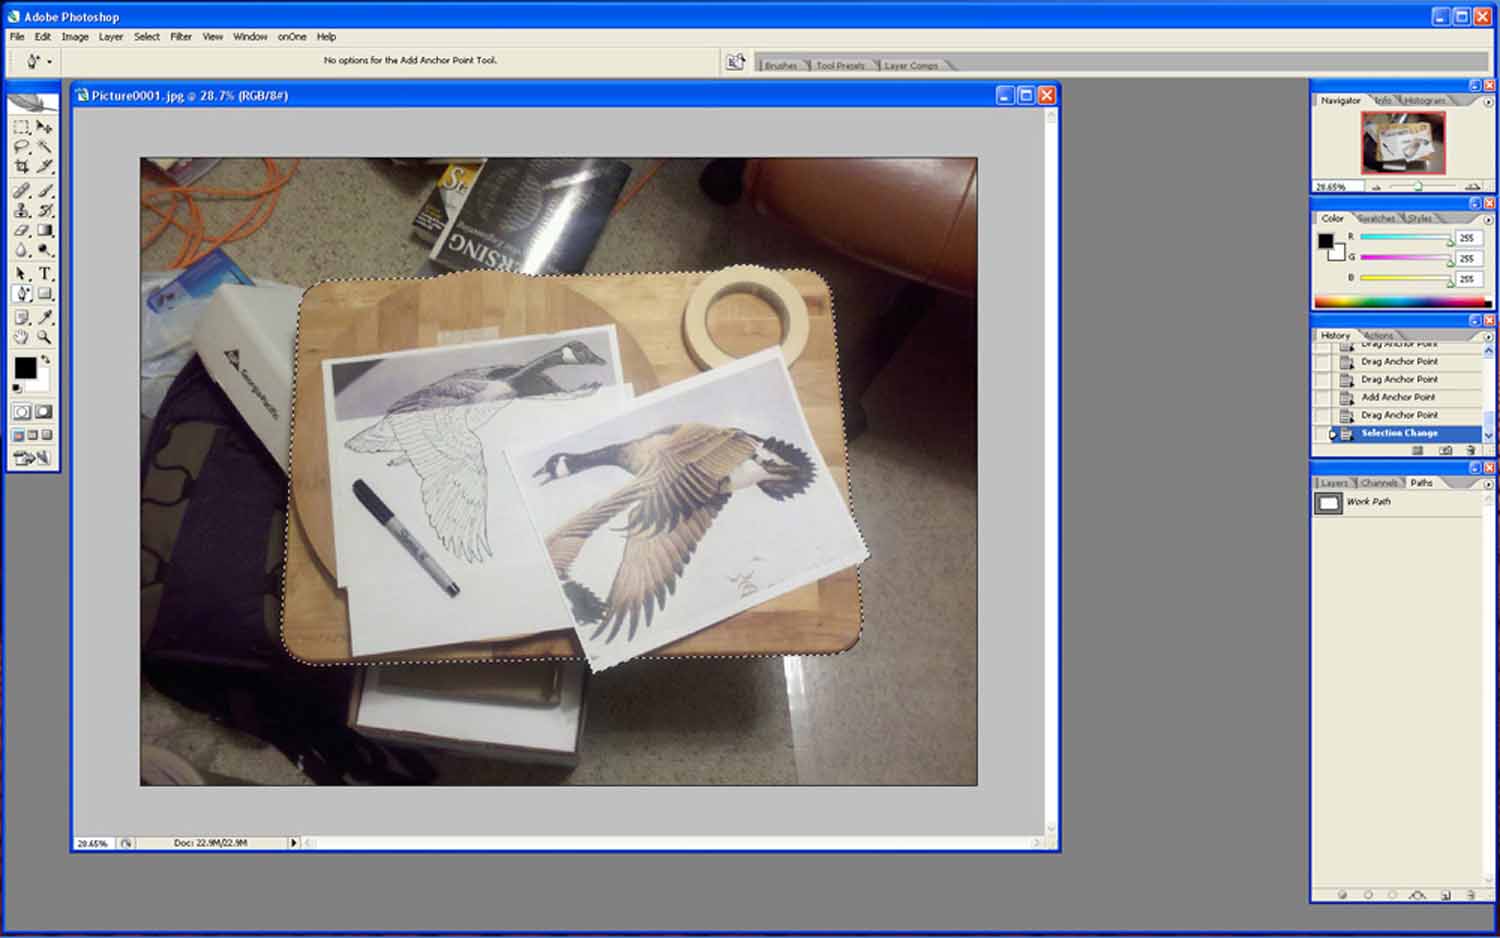 Go to the top and click on Select, a new Menu Pops up, come down and click on inverse, now the Marching Ants are still around the picture but also are around the outer portion of the picture. This tells us we have selected the portion around the outside of the picture. Picture0010.jpg 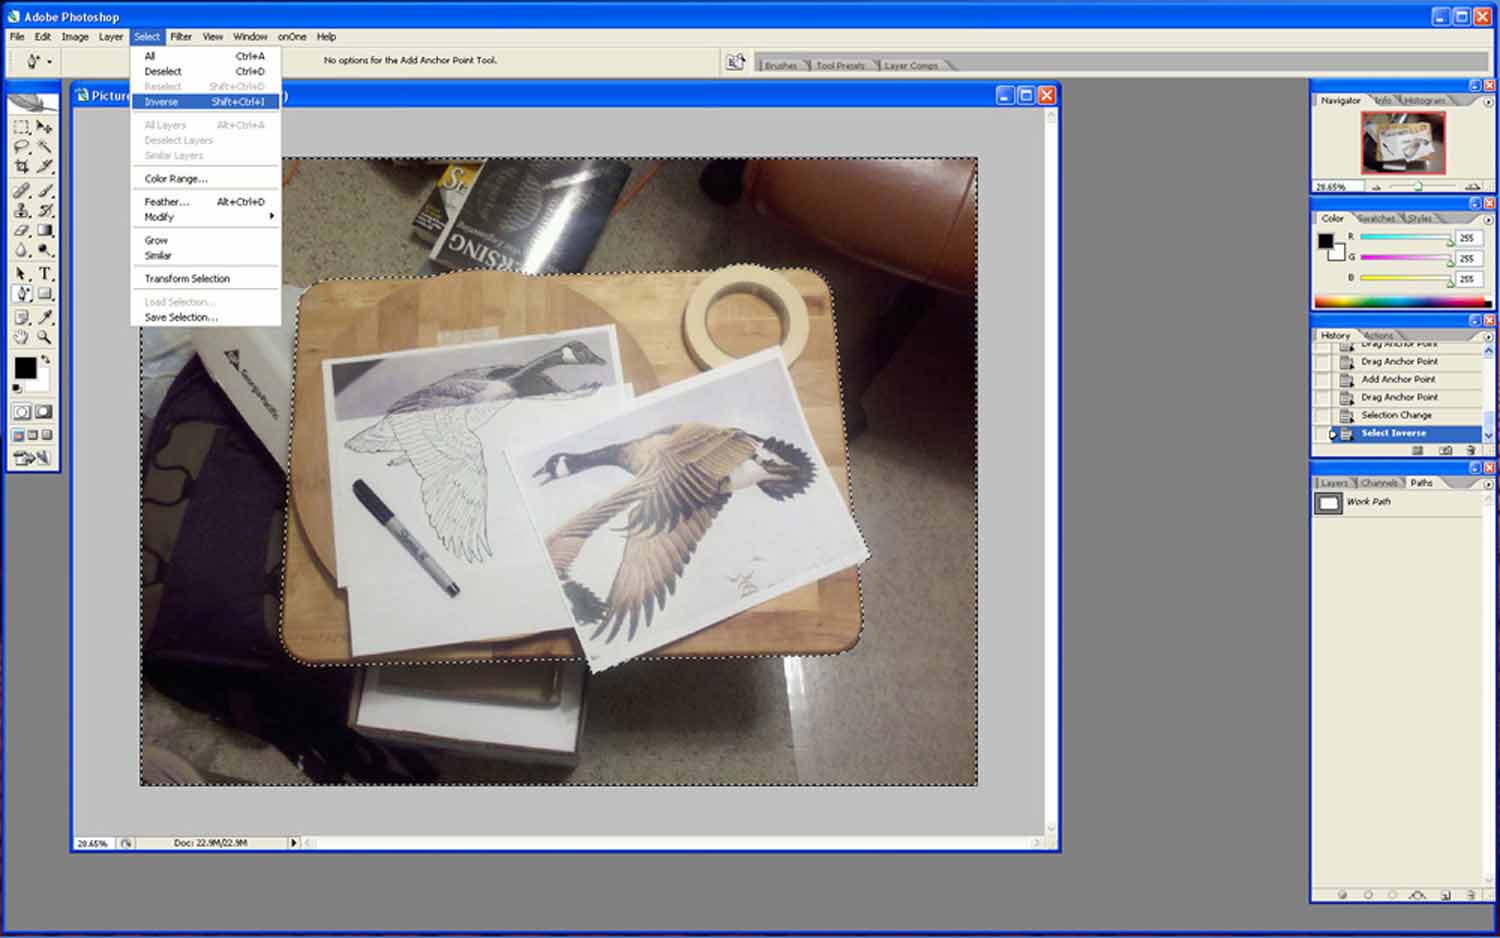 New Tool/Function Go to Edit, a new Menu Pops up, and click on Cut. Picture0011.jpg 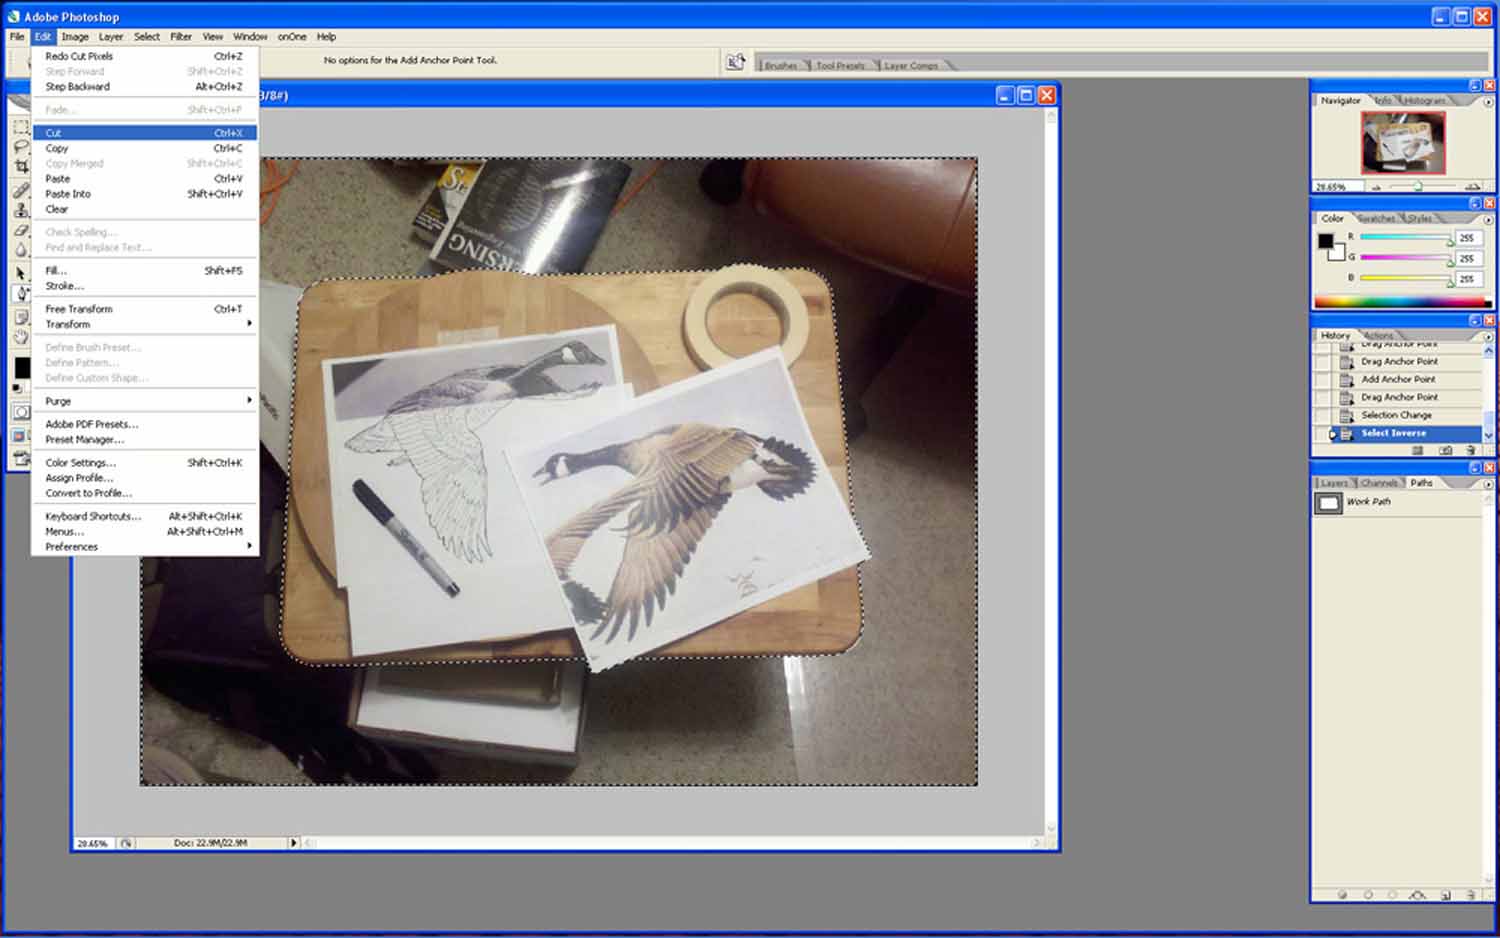 And that quickly the cluttered area is gone Picture0012.jpg 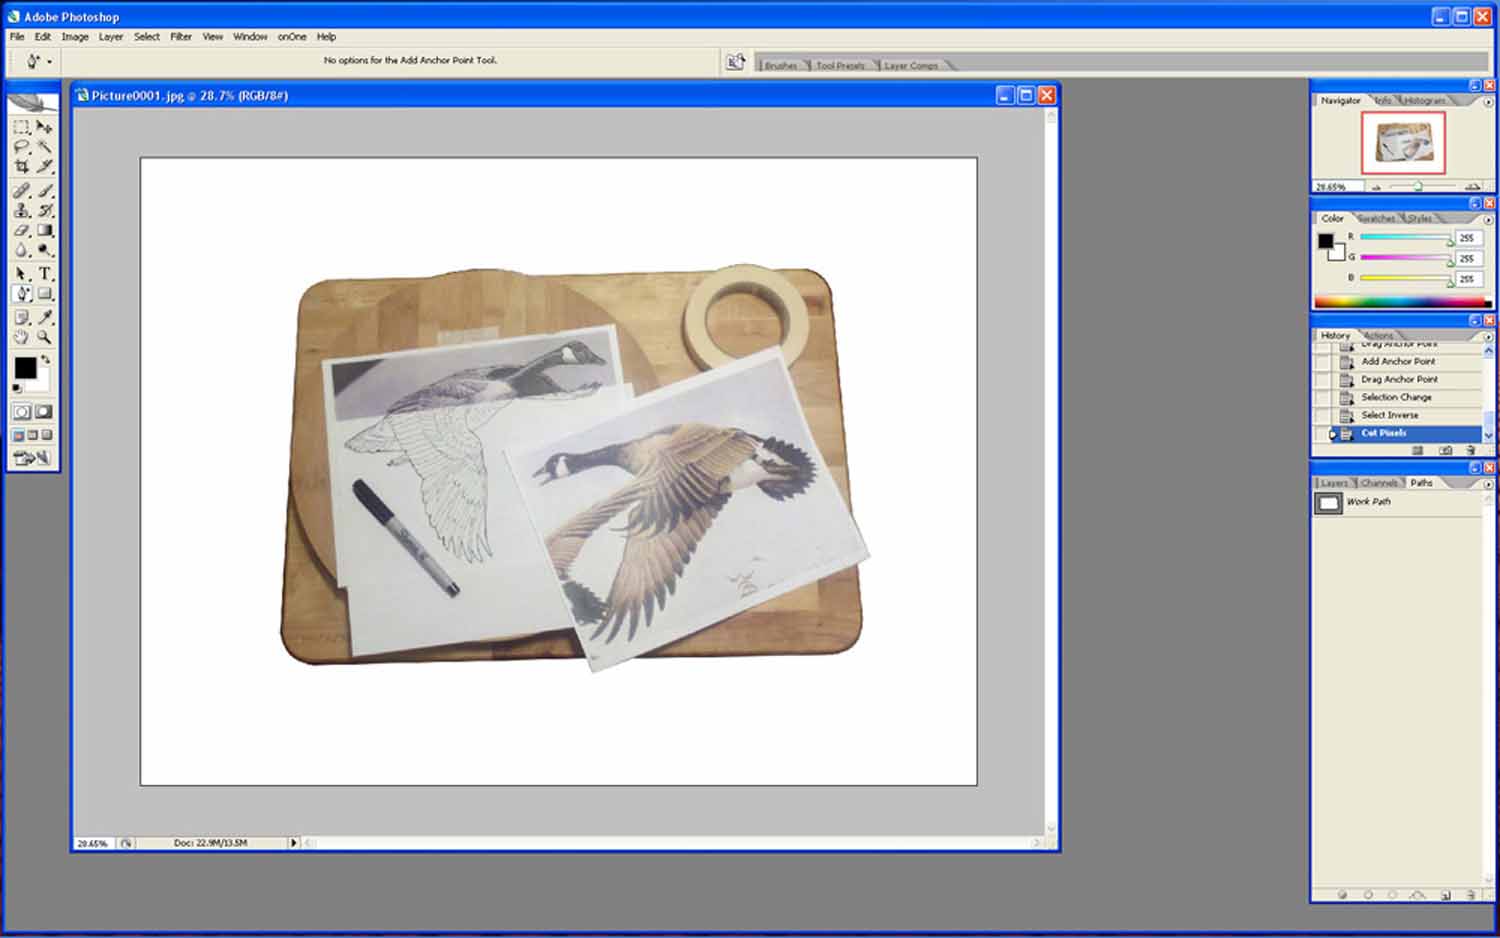 Now go to the left Tool bar and click on the third tool down from the top, this is the Crop Tool. Go back to the picture using the Crop Tool, drag a rectangle around the picture and release, don't worry you will still be able to adjust the area, (click and hold one of the nodes and move as needed) when you are satisfied press enter and the picture will be cropped to the new size. Picture0013.jpg 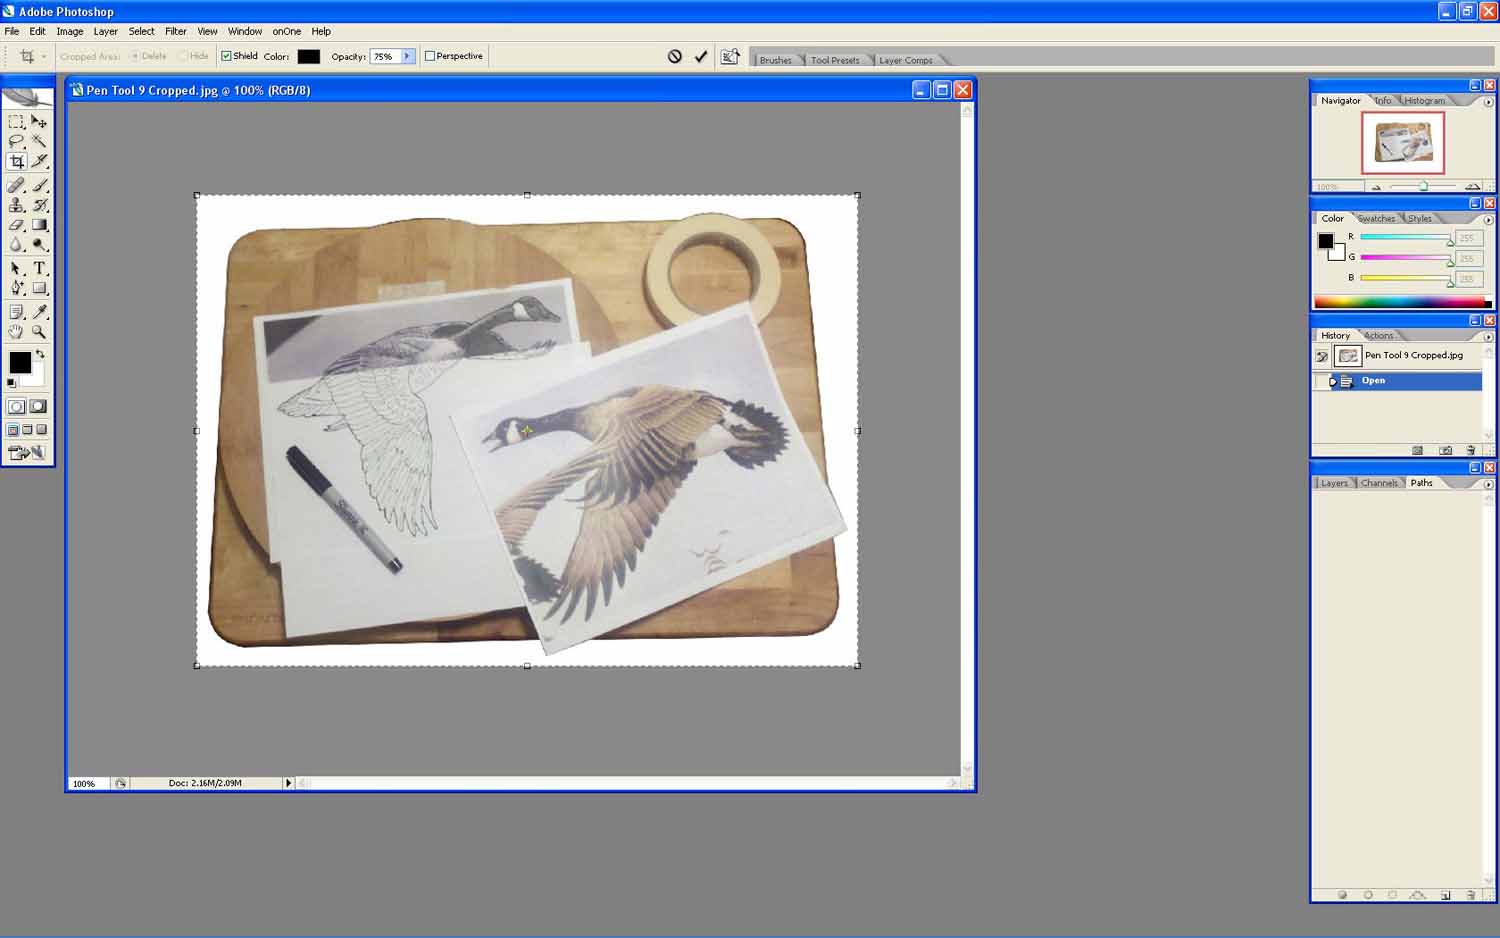 A closeup Picture0014.jpg 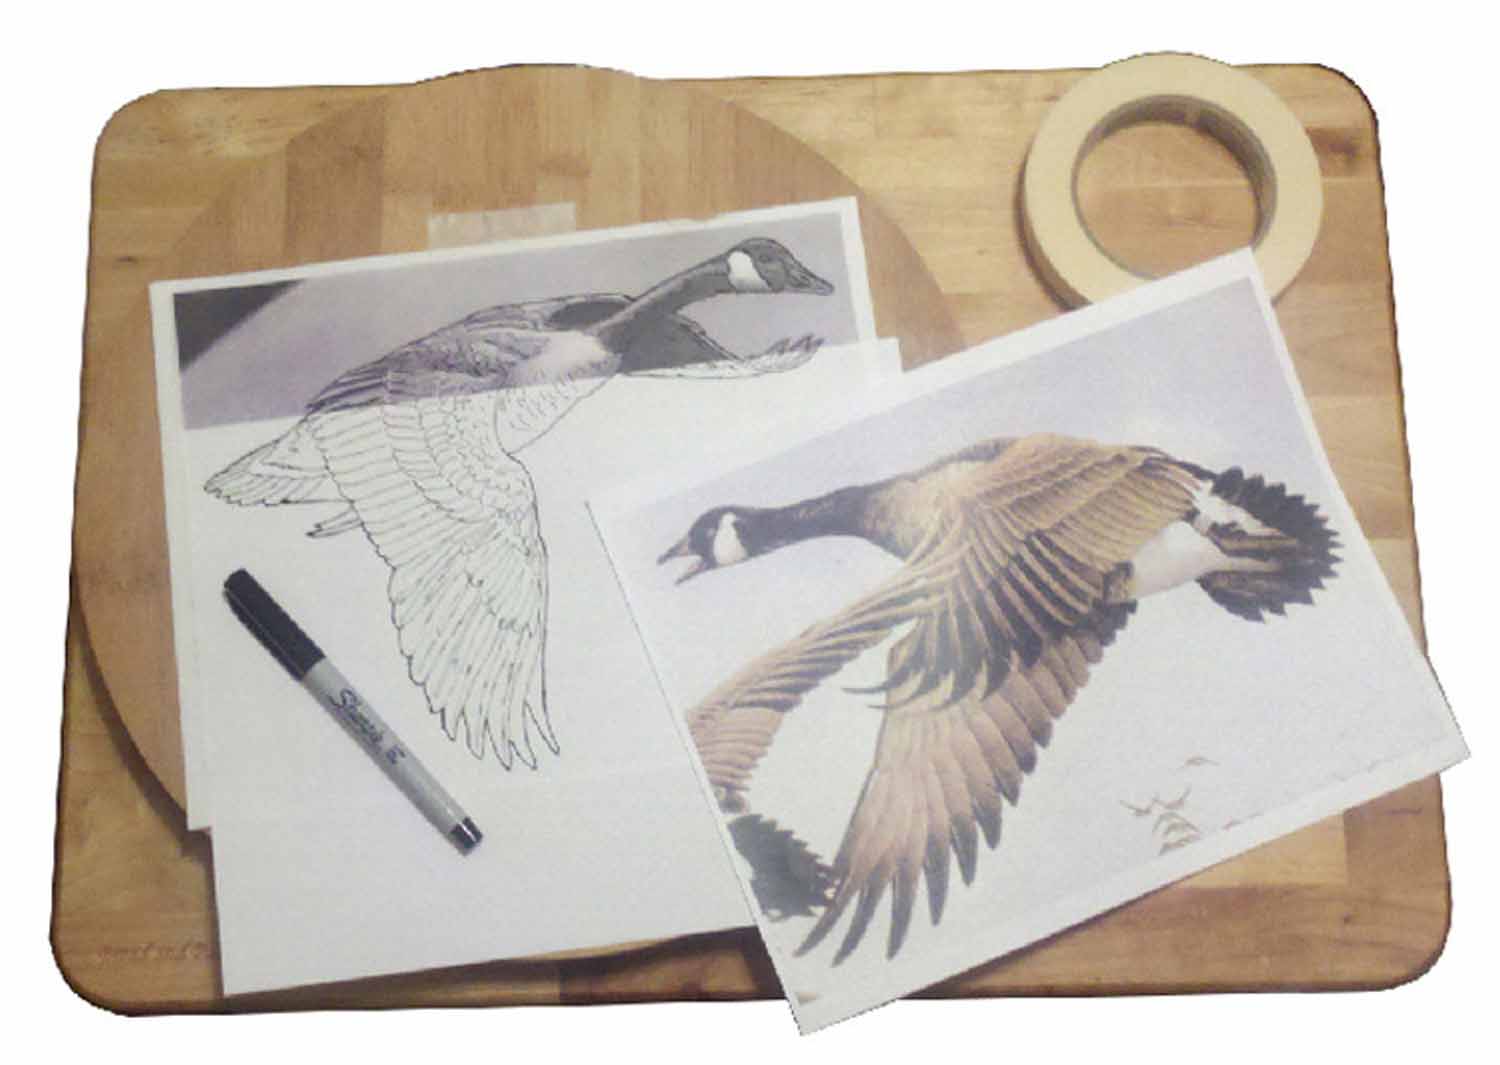 Now go to the top Tool Bar and select Image and then Image Size Picture0015.jpg 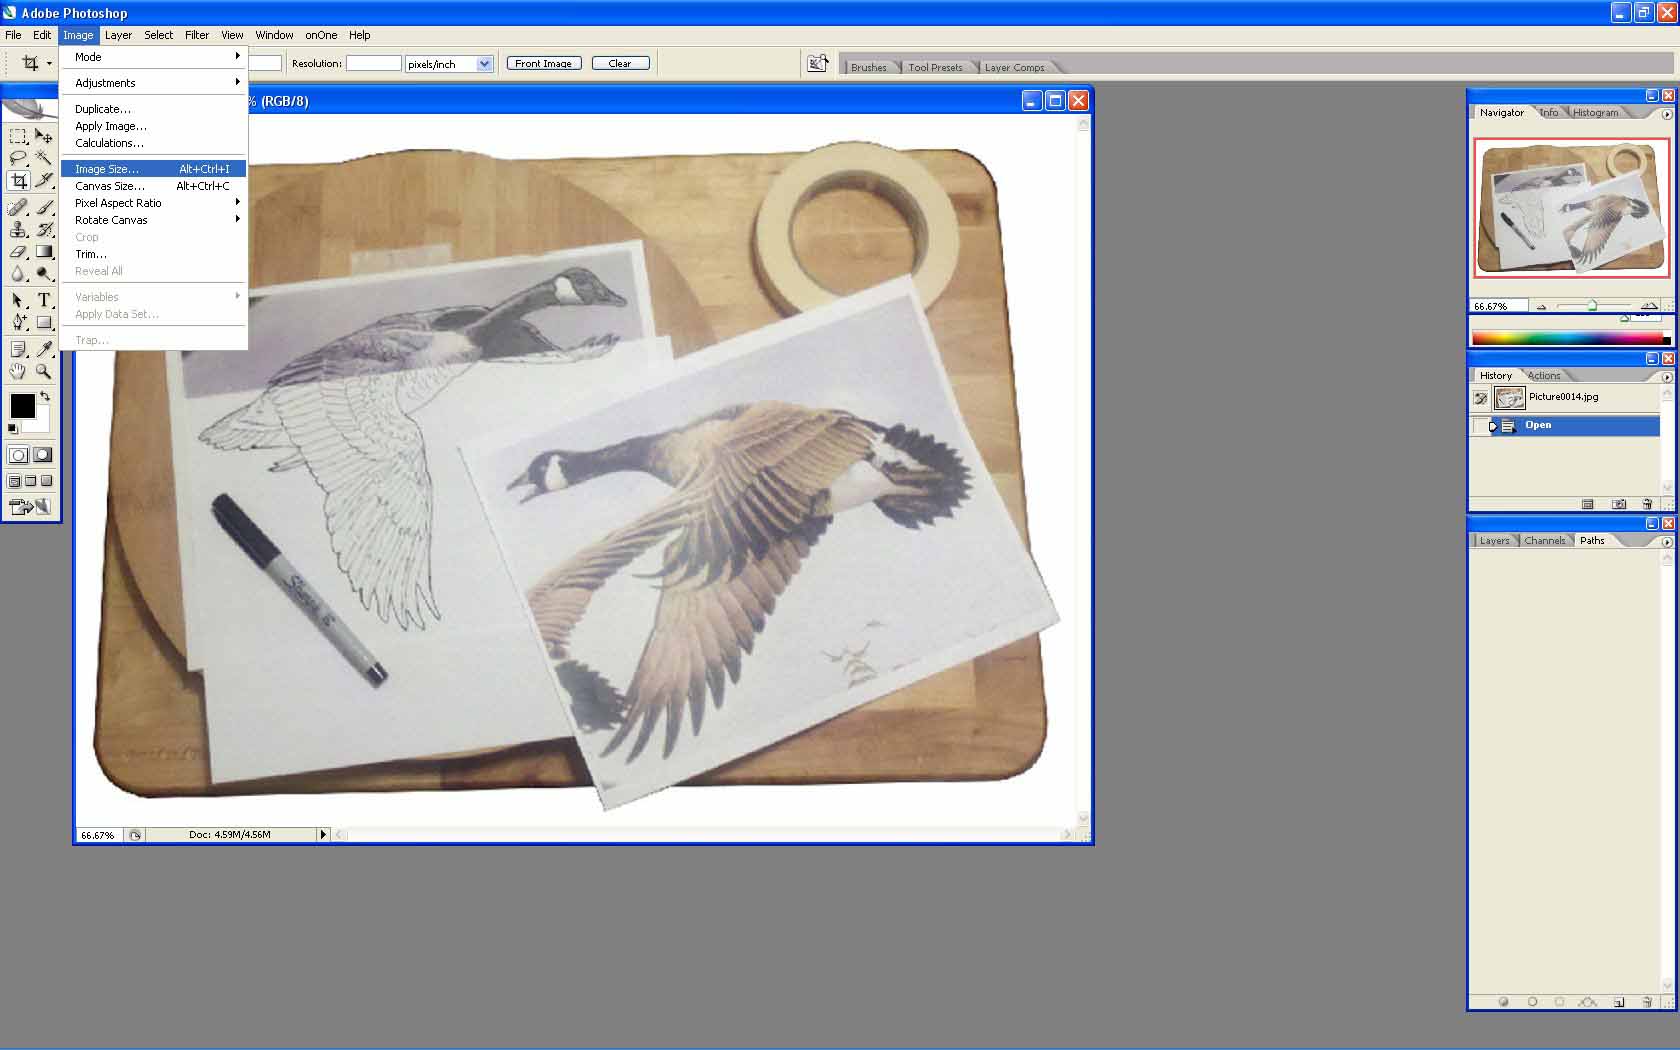 Now in the Width Box type in 1000 and then press Enter or click OK This sets the correct picture size to publish in the Forum Picture0016.jpg 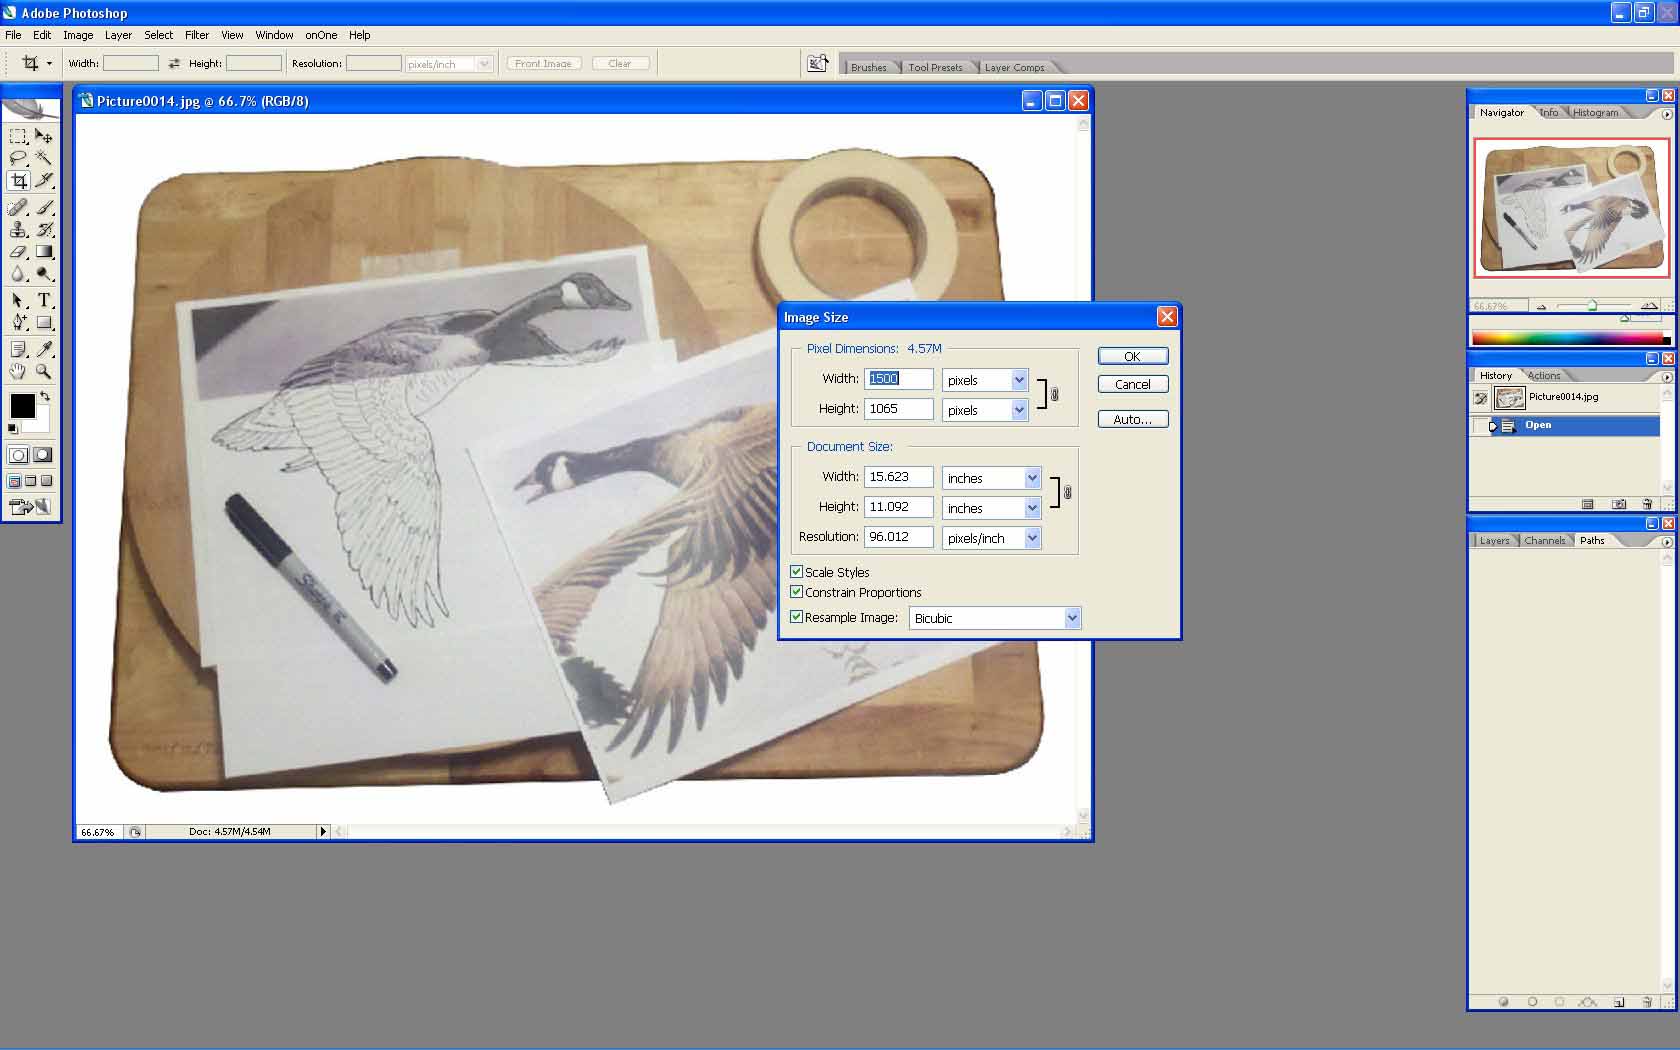 What have you learned so far (actually nothing more than Phil Coggan's taught you in his Tutorial) but we have just got started. You have learned to use the Window Function to setup your PhotoShop desktop. You have learned to make a Lazy Susan drawing board. You have learned to use the Pen Tool to trace a outline around a picture to remove clutter. You have learned to use the Add Anchor Point Tool to add nodes. You have learned to use the Load Path as a Selection Tool You have learned to use the Select and Inverse tools to change the marching ants. You have learned to use the the Edit and Cut Tools. You have learned to use the Crop Tools. You have learned to use the Image Size Tool to resize photos. First Chapter To Be Continued Kenneth Crutcher |
 |
| Bookmarks |
|
|